一. 概要
1.1 虚拟机安装
os version: Ubuntu 22.04.1 LTS
虚拟机安装Ubuntu非常简单, 过程略过.
但是注意安装过程, 不建议勾选在线安装软件, 这个过程太慢.
1.2 变更软件下载源
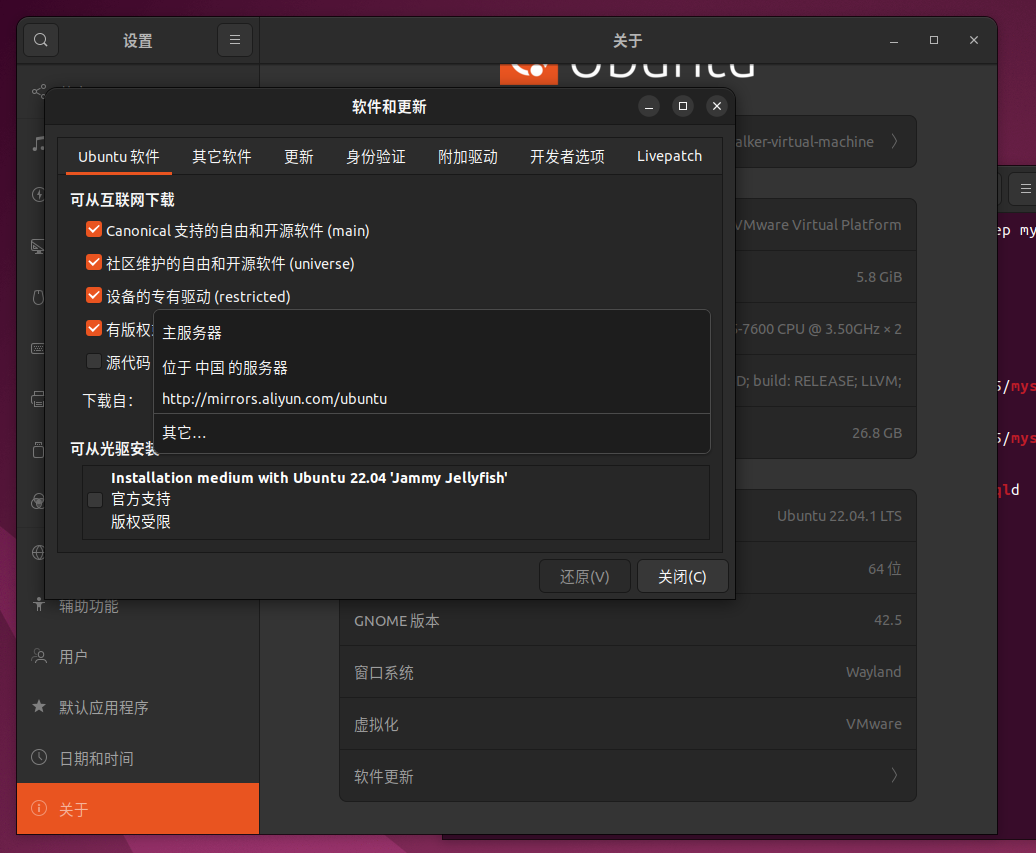
不要使用Ubuntu默认的中国服务器, 或者是其选的所谓最优服务器(有时选取的服务器在境外, 更慢), 手动选择阿里云的服务器即可, 速度非常快.
1.3 snap
(base) skywalker@skywalker-virtual-machine:~$ snap list
名称                         版本                修订版本   追踪               发布者         注记
bare                       1.0               5      latest/stable    canonical✓  base
core20                     20221212          1778   latest/stable    canonical✓  base
firefox                    108.0.2-1         2263   latest/stable/…  mozilla✓    -
gnome-3-38-2004            0+git.6f39565     119    latest/stable/…  canonical✓  -
gtk-common-themes          0.1-81-g442e511   1535   latest/stable/…  canonical✓  -
snap-store                 41.3-60-gfe4703a  582    latest/stable/…  canonical✓  -
snapd                      2.57.6            17883  latest/stable    canonical✓  snapd
snapd-desktop-integration  0.1               49     latest/stable/…  canonical✓  -
通过Snap可以安装众多的软件包. 需要注意的是, snap是一种全新的软件包管理方式, 它类似一个容器拥有一个应用程序所有的文件和库, 各个应用程序之间完全独立. 所以使用snap包的好处就是它解决了应用程序之间的依赖问题, 使应用程序之间更容易管理. 但是由此带来的问题就是它占用更多的磁盘空间.
1.4 下载工具
考虑到wget的下载速度太慢, 这里使用axel来替代wget.
-
安装
axelapt-get install axel -
语法
axel [options] url1 [url2] [url…]
选项
–max-speed=x , -s x 最高速度 x
–num-connections=x , -n x 连接数 x
–output=f , -o f 下载为本地文件 f
–search[=x] , -S [x] 搜索镜像
–header=x , -H x 添加头文件字符串x( 指定 HTTP header)
–user-agent=x , -U x 设置用户代理( 指定 HTTP user agent)
–no-proxy , -N 不使用代理服务器
–quiet , -q 静默模式
–verbose , -v 更多状态信息
–alternate , -a Alternate progress indicator
–help , -h 帮助
–version , -V 版本信息实例:
如指定10个线程, 文件存储/tmp/目录下axel -n 10 -o /tmp/ https://openslr.magicdatatech.com/resources/12/train-other-500.tar.gz # 不要下载这个文件, 巨大无比 # Ctrl + C取消下载
1.5 文件共享
Windows10上非常简易的文件共享的实现.
Samba是在Linux系统上实现的SMB(Server Messages Block, 信息服务块) 协议的一款免费软件. 它实现在局域网内共享文件和打印机, 是一个客户机/服务器型协议. 客户机通过SMB协议访问服务器上的共享文件系统. 可以实现Windows系统访问Linux系统上的共享资源
sudo apt-get install samba

# 安装好之后, 检查
samba --version

# 创建一个需要共享的文件夹
mkdir samba_share

# 授予足够高的权限
sudo chmod 777 samba_share

# 添加用户-Ubuntu的用户
sudo smbpasswd -a skywalker

# 打开samba配置文件
sudo vi /etc/samba/smb.conf
# 注意这个操作

# 担心损坏或者操作失当可以提前备份一份
sudo cp /etc/samba/smb.conf /etc/samba/smb_backup.conf

# 将光标执行最后一行
G

<< config
    [share]
    comment = Share folder

    # 共享目录, 这个写的是你刚刚创建的samba共享目录
    path = /home/skywalker/samba_share
    create mask = 0700
    directory mask = 0700

    # 用于登录的账户
    valid users = skywalker
    force user = skywalker
    force group = skywalker

    # 是否公开分享
    public = yes

    # 是否允许来宾用户访问
    guest ok = yes

    # 是否只读
    read only = no

    # 是否可被浏览
    browseable = yes
    available = yes
    writable = yes
config
:wq
# 保存

# 重启服务
sudo service smbd restart
在Windows下
Run(运行)下输入
\\192.168.2.102
即可实现文件的共享
1.6 包格式
-
deb
deb, 源自
Debian,Ubuntu的默认格式.# 分析包其依赖项 # sudo apt install gdebi sudo dpkg -i package_name -
rpm
Ubuntu的软件包格式为deb
而RPM格式的包归属于红帽子Red Hat需要将
rpm的格式包转换为deb的格式包sudo apt-get install alien # 转换包 sudo alien xxxx.rpm # 然后安装 sudo dpkg -i xxxx.deb -
sh
bash Anaconda3-2022.10-Linux-x86_64.sh -
bin
假设该安装包位于/home/a1eafall/a.bin, 则在终端下执行
$cd /home/a1eafall# 赋予权限 $sudo chmod u+x a.bin $sudo ./a.bin -
压缩文件
常见格式
.tar.gz,tar.xz.这种格式一般会采用源代码编译安装, 或是解压完直接就可以运行的方式, 可以通过查看目录内是否有源代码或是configure文件来确实是不是源代码.
编译安装: 使用cd命令进入解压目录.$./configure //配置 $make //编译 $make install //安装如果在解压目录下发现/bin/a.sh, 就可以直接运行了.
$./a.sh
1.7 bashrc文件介绍
.bashrc文件是一个存在于ubuntu系统内, 普通用户目录(/home/dong)或root用户目录(/root)下的隐藏文件. Linux系统中很多shell, 包括bash, sh, zs, dash和korn等, 不管哪种shell都会有一个.bashrc的隐藏文件, 它就相当于shell的配置文件. .bashrc文件在每次打开新的终端时, 都要被读取. 简单的ls命令不会显示该文件, 需要使用指令ls-al进行查看. 这个文件主要保存一些终端配置和环境变量, 例如: 别名alias, 路径path等.
修改/root路径下的.bashrc文件将会应用到整个系统, 属于系统级的配置, 而修改用户目录(/home/dong)下的.bashrc则只是限制在用户应用上, 属于用户级设置. 两者在应用范围上有所区别, 建议如需修改的话, 修改用户目录下的.bashrc, 这样既无需root权限, 也不会影响其他用户..bash_history: 记录之前输入的命令.
.bash_logoutt: 当你退出shell时执行的命令.
.profile: 当你登入shell时执行的命令. 一般会在.profile文件中显式调用.bashrc, 启动bash时首先会去读取/.profile文件, 这样/.bashrc也就得到执行了, 你的个性化设置也就生效了.
1.8 权限
Linux file ownership
In Linux, there are three types of owners:
user,group, andothers.
- Linux User
A user is the default owner and creator of the file. So this user is called owner as well.
- Linux Group
A user-group is a collection of users. Users that belonging to a group will have the same Linux group permissions to access a file/ folder.
You can use groups to assign permissions in a bulk instead of assigning them individually. A user can belong to more than one group as well.
- Other
Any users that are not part of the user or group classes belong to this class.
Linux File Permissions
File permissions fall in three categories:
read,write, andexecute.
- Read permission
For regular files, read permissions allow users to open and read the file only. Users can't modify the file.
Similarly for directories, read permissions allow the listing of directory content without any modification in the directory.
- Write permission
When files have write permissions, the user can modify (edit, delete) the file and save it.
For folders, write permissions enable a user to modify its contents (create, delete, and rename the files inside it), and modify the contents of files that the user has write permissions to.
- Execute permission
For files, execute permissions allows the user to run an executable script. For directories, the user can access them, and access details about files in the directory.
Below is the symbolic representation of permissions to user, group, and others.
sudo chmod -R 755 /var/run/mysqld

ls -l
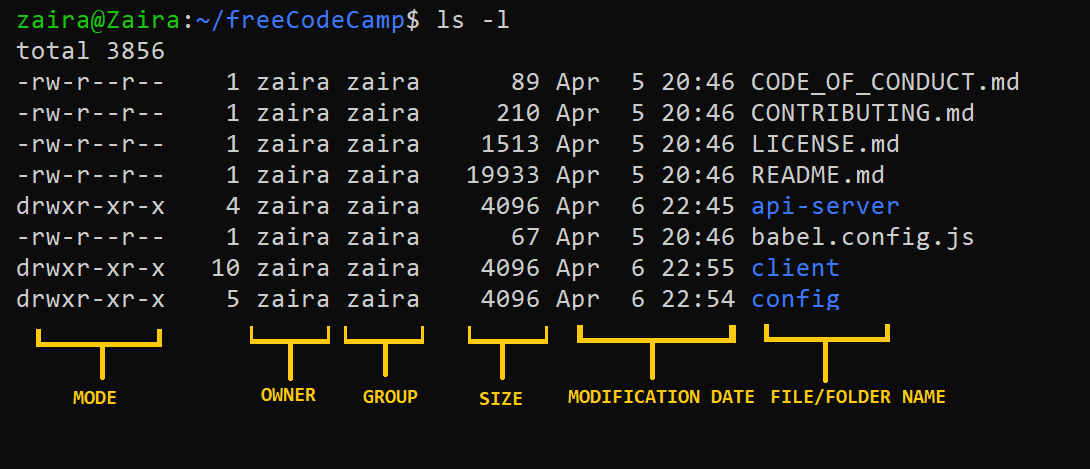
In the output above,
drepresents a directory and-represents a regular file.d代表目录,
-代表常规文件
1.8.1 chown
chown, change owner, 更改文件的所属用户及组.
3, 4列, 文件所属用户及用户组.
$ ls -lah .
total 1.2M
drwxr-xr-x 11 shanyue shanyue 4.0K Jun 22 18:42 .
drwxr-xr-x  5 root    root    4.0K Jun 24 11:06 ..
drwxr-xr-x  2 shanyue shanyue 4.0K Jun 10 15:45 .circleci
drwxr-xr-x  2 shanyue shanyue 4.0K Jun 10 15:45 .codesandbox
-rw-r--r--  1 shanyue shanyue  294 May 22  2021 .editorconfig
-rw-r--r--  1 shanyue shanyue  759 Jun 10 15:45 .eslintignore
-rw-r--r--  1 shanyue shanyue 8.4K Jun 10 15:45 .eslintrc.js
drwxr-xr-x  7 shanyue shanyue 4.0K Jun 14 19:06 .git
-rw-r--r--  1 shanyue shanyue   12 May 22  2021 .gitattributes
复制代码
通过 chown -R, 可一并将子文件所属用户及用户组进行修改.
# 将 . 文件夹下当前目录的用户及用户组设为 shanyue
# -R: 遍历子文件修改
$ chown -R shanyue:shanyue .
1.8.2 chmod
chmod permissions filename
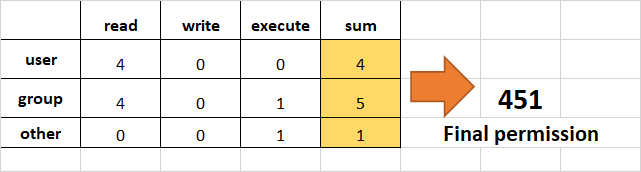
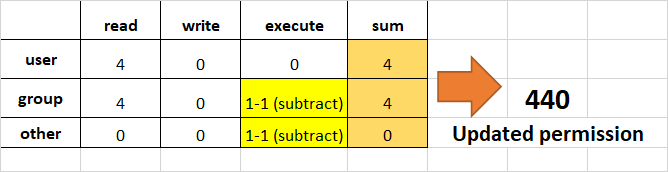
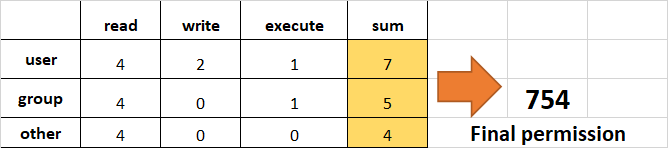
mode 指 linux 中对某个文件的访问权限. 通过 stat 可获取某个文件的 mode.
# -c: --format
# %a: 获得数字的 mode
$ stat -c %a README.md
644

# %A: 获得可读化的 mode
$ stat -c %A README.md
-rw-r--r--
- r: 可读, 二进制为 100, 也就是 4
- w: 可写, 二进制为 010, 也就是 2
- x: 可执行, 二进制为 001, 也就是 1
而 linux为多用户系统, 我们可对用户进行以下分类.
user, 文件当前用户group, 文件当前用户所属组other, 其它用户
再回到刚才的 644 所代表的的释义
# rw-: 当前用户可写可读, 110
# r--: 当前用户组可读, 010
# r--: 其它用户可读, 010
# 所以加起来就是 644
-rw-r--r--
而通过 chmod 即可修改用户的权限.
$ chmod 777 yarn.lock
复制代码
另外也可以以可读化形式添加权限, 如下所示:
# u: user
# g: group
# o: other
# a: all
# +-=: 增加减少复制
# perms: 权限
$ chmod [ugoa...][[+-=][perms...]...]

# 为 yarn.lock 文件的用户所有者添加可读权限
$ chmod u+r yarn.lock
- 参考链接
- Linux chmod and chown – How to Change File Permissions and Ownership in Linux (freecodecamp.org)
二. Shell
# 查看用户登录
w
# 清空终端的显示内容
clear
# 类似于powershell的 cls

# 查看服务运行的状态
service --status-all
 [ - ]  apparmor
 [ ? ]  apport
 [ - ]  console-setup.sh
 [ + ]  cron
 [ - ]  dbus
 [ ? ]  hwclock.sh
 [ + ]  irqbalance
 [ - ]  keyboard-setup.sh
 [ ? ]  kmod
 [ - ]  mysql
 [ ? ]  plymouth
 [ ? ]  plymouth-log
 [ - ]  procps
 [ - ]  rsync
 [ - ]  screen-cleanup
 [ + ]  udev
 [ - ]  ufw
 [ - ]  unattended-upgrades
 [ - ]  uuidd
# 三种状态
+: the service is running
-: the service is not running
?: the service state cannot be determined (for some reason).

# 清空回收站
sudo rm -rf ~/.local/share/Trash/*
2.1 文件管理
(base) skywalker@skywalker-virtual-machine:~$ mkdir python_test
(base) skywalker@skywalker-virtual-machine:~$ touch python_test/hello.txt
(base) skywalker@skywalker-virtual-machine:~$ cd python_test
(base) skywalker@skywalker-virtual-machine:~/python_test$ ls
hello.txt
(base) skywalker@skywalker-virtual-machine:~/python_test$ cd
# cd 返回
(base) skywalker@skywalker-virtual-machine:~$
| 命令 | 说明 |
|---|---|
| touch文件名 | 创建指定文件 |
| mkdir 目录名 | 创建目录(文件夹) |
| rm 文件名或者目录名 | 删除指定文件或者目录 |
| rmdir 目录名 | 删除空目录 |
| ls | 查看文件 |
# 删除文件
rm(remove)指令用于删除目录或文件:
语法:            rm [-dfirv][--help][--version][文件或目录...]
补充说明:     执行rm指令可删除文件或目录, 如欲删除目录必须加上参数" -r" , 否则预设仅会删除文件.
参数:
                     -d或–directory  直接把欲删除的目录的硬连接数据删成0, 删除该目录.
                     -f或–force  强制删除文件或目录.
                     -i或–interactive  删除既有文件或目录之前先询问用户.
                     -r或-R或–recursive  递归处理, 将指定目录下的所有文件及子目录一并处理.
                     -v或–verbose  显示指令执行过程.

例如:

删除文件夹:
                     rm -rf folder_name
                     将会删除code目录以及其下所有文件, 文件夹. ( -r递归)
删除文件:
                     rm -f  filename/path
# 创建多级目录
(base) alex@DESKTOP-F6VO5U4:~/test_folder$ mkdir c/d
mkdir: cannot create directory ‘c/d’: No such file or directory

# 需要加上 -p
(base) alex@DESKTOP-F6VO5U4:~/test_folder$ mkdir c/d -p
2.1.1 查看文档内容
cat命令:
(base) skywalker@skywalker-virtual-machine:~$ cat python_test/test.py
import os

print(os.path.exists('/home/skywalker/python_test/hello.txt'))
- cat test.txt : 查看test.txt内容
- cat -n test.txt, 查看linux.txt文件的内容, 并且由1开始对所有输出行进行编号. ( 包括空白行)
- cat -b linux.txt , 用法和 -n 差不多, 但是不对空白行编号.
- cat -s linux.txt, 当遇到有连续两行或两行以上的空白行, 就代换为一行的空白行.
- cat -e linux.txt, 在输出内容的每一行后面加一个$符号. ( 包括空白行)
- cat linux1.txt linux2.txt, 同时显示f1.txt和f2.txt文件内容, 注意文件名之间以空格分隔, 而不是逗号.
- cat -n linux1.txt>linux2.txt, 对linux1.txt文件中每一行加上行号后然后写入到linux2.txt中, 会覆盖原来的内容, 文件不存在则创建它.
- cat -n linux1.txt>>linux2.txt, 对f1.txt文件中每一行加上行号后然后追加到f2.txt中去, 不会覆盖原来的内容, 文件不存在则创建它.
tail命令:
- tail -f filename 监视filename文件的尾部内容 (默认10行, 相当于增加参数 -n 10), 刷新显示在屏幕上. 退出, 按下CTRL+C.
2.1.2 换行符
| 系统 | 中文描述 | 英文描述 | 简写 | 转义符 |
|---|---|---|---|---|
| Windows | 回车换行 | Carriage Return and Line Feed | CRLF | \n\r |
| Unix/Linux | 换行 | Line Feed | LF | \n |
| Mac OS | 回车 | Carriage Return | CR | \r |
- file, 查看换行符
file [选项][参数]
- -b: 列出辨识结果时, 不显示文件名称;
- -c: 详细显示指令执行过程, 便于排错或分析程序执行的情形;
- -f<名称文件>: 指定名称文件, 其内容有一个或多个文件名称时, 让file依序辨识这些文件, 格式为每列一个文件名称;
- -L: 直接显示符号连接所指向的文件类别;
- -m<魔法数字文件>: 指定魔法数字文件;
- -v: 显示版本信息;
- -z: 尝试去解读压缩文件的内容.
# windows下创建的文件
(base) skywalker@skywalker-virtual-machine:~$ file 'samba_share/new 1.txt'
samba_share/new 1.txt: Unicode text, UTF-8 text, with CRLF line terminators

# 原生
(base) skywalker@skywalker-virtual-machine:~$ file python_test/hello.txt
python_test/hello.txt: Unicode text, UTF-8 text
# -b
(base) skywalker@skywalker-virtual-machine:~$ file -b python_test/hello.txt
Unicode text, UTF-8 text
(base) skywalker@skywalker-virtual-machine:~$ file -b 'samba_share/new 1.txt'
Unicode text, UTF-8 text, with CRLF line terminators
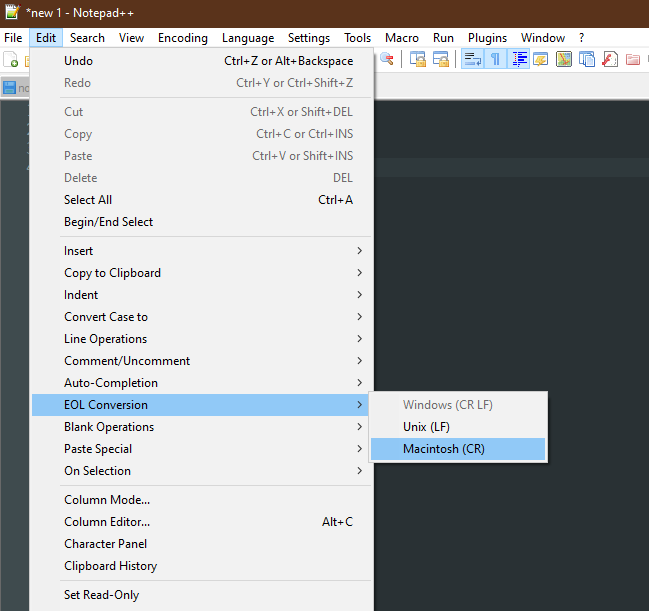
在Windows的将换行符转为Linux下的, 使用notepad++
在Ubuntu下
vim test_a.txt
:set ff?
# 如果出现fileforma=dos 表示是Windows上的换行符.
# 设置为unix
:set fileformat=unix
# 保存
:wq!
file test_a.txt
或者使用dos2unix(第三方)进行处理.
2.1.3 编辑内容
-
基于vi
-
基于nano
在终端中修改文件内容还是比较麻烦的, 只作为应急之用.
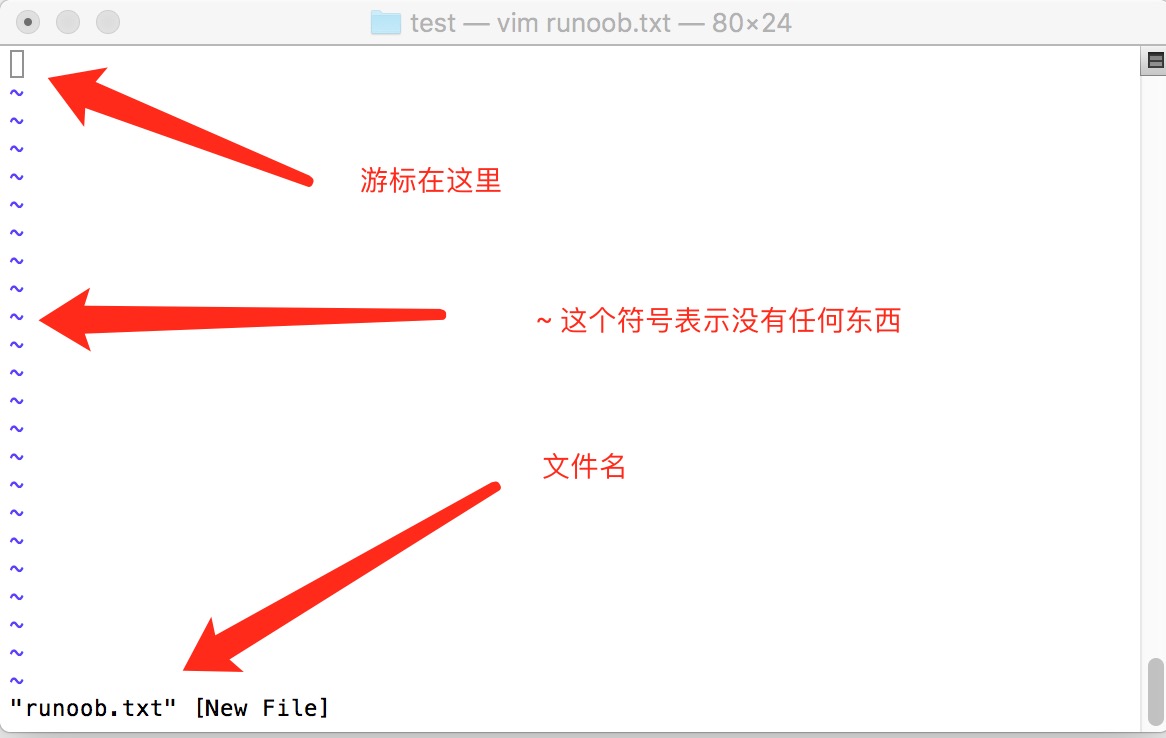
vi python_test/hello.txt
# 按下 i/insert, 进入编辑模式
# 按下esc, 退出编辑
:w, 保存文件但不退出vi
:w file, 将修改另外保存到file中, 不退出vi
:w!, 强制保存, 不推出vi
:wq, 保存文件并退出vi
:wq!, 强制保存文件, 并退出vi
:q, 不保存文件, 退出vi
:q!, 不保存文件, 强制退出vi
:e!, 放弃所有修改, 从上次保存文件开始再编辑
以下的这些命令都只能在命令模式下使用, 所以首先需要按下 Esc 进入命令模式, 如果你正处于插入模式.
注意vi/vim区分大小写.
2.1.4 目录结构
-
/boot, 存放Ubuntu内核和系统启动文件. 系统启动时这些文件先被装载. -
/etc, 系统的配置文件目录. 密码文件, 设置网卡信息, 环境变量的设置等都在此目录中, 许多网络配置文件也在其中. -
/bin,bin是Binaries(二进制文件) 的缩写, 这个目录存放着最经常使用的命令. -
/lib, 根文件系统目录下程序和核心模块的共享库. 这个目录里存放着系统最基本的动态链接共享库, 类似于Windows下的system32目录, 几乎所有的应用程序都需要用到这些共享库. -
/media, 主要用于挂载多媒体设备.ubuntu系统自动挂载的光驱,usb设备, 存放临时读入的文件. -
/proc, 这个目录是系统内存的映射, 我们可以直接访问这个目录来获取系统信息. 也就是说, 这个目录的内容不在硬盘上而是在内存里. -
/sbin, 就是Super User的意思. 这里存放的是系统管理员使用的系统管理程序, 如系统管理, 目录查询等关键命令文件. -
/root, 该目录为系统管理员, 也称作超级权限者的用户主目录. -
/tmp, 这个目录是用来存放一些临时文件的, 所有用户对此目录都有读写权限. -
/home, 用户的主目录. 下面是自己定义的用户名的文件夹. 每个用户的设置文件, 用户的桌面文件夹, 还有用户的数据都放在这里. -
/mnt, 此目录主要是作为挂载点使用. 通常包括系统引导后被挂载的文件系统的挂载点. 如挂载Windows下的某个分区 -
/run, 是一个临时文件系统, 存储系统启动以来的信息. 当系统重启时, 这个目录下的文件应该被删掉或清除. 如果你的系统上有/var/run目录, 应该让它指向run. -
/var,var是variable(变量) 的缩写, 这个目录中存放着在不断扩充着的东西, 我们习惯将那些经常被修改的目录放在这个目录下, 包括各种日志文件.
在Terminal上打开wsl, 载入的初始目录.
目录的相对路径的表示方法:
./, 表示当前目录.., 表示上级目录/, 是指根目录, 即所有目录最顶层的目录.~表示当前登录用户的用户目录.
2.1.5 查看文件目录
# 指定查看文件夹
(base) alex@DESKTOP-F6VO5U4:~/test_folder$ ls [a]
1.txt  2.txt

# 都可以显示隐藏的文件
(base) alex@DESKTOP-F6VO5U4:~/test_folder$ ls -a
.  ..  a  a.txt  b  b.txt
(base) alex@DESKTOP-F6VO5U4:~/test_folder$ ls -l
total 16
drwxr-xr-x 2 alex alex 4096 Jan 11 21:32 a
-rw-r--r-- 1 alex alex   44 Jan 11 21:28 a.txt
drwxr-xr-x 2 alex alex 4096 Jan 11 21:30 b
-rw-r--r-- 1 alex alex   29 Jan 11 21:28 b.txt

# 文件大小
(base) alex@DESKTOP-F6VO5U4:~/test_folder$ ls -a -l -h
total 24K
drwxr-xr-x 4 alex alex 4.0K Jan 11 21:30 .
drwxr-x--- 9 alex alex 4.0K Jan 11 21:28 ..
drwxr-xr-x 2 alex alex 4.0K Jan 11 21:32 a
-rw-r--r-- 1 alex alex   44 Jan 11 21:28 a.txt
drwxr-xr-x 2 alex alex 4.0K Jan 11 21:30 b
-rw-r--r-- 1 alex alex   29 Jan 11 21:28 b.txt

# 正则表达式
(base) alex@DESKTOP-F6VO5U4:~/test_folder$ ls a*
a.txt

a:
1.txt  2.txt

# 查看文件夹下包括子文件夹下, 全部内容
ls -al -R

(base) alex@DESKTOP-F6VO5U4:~/test_folder$ ls -al -R
.:
total 24
drwxr-xr-x 4 alex alex 4096 Jan 11 21:30 .
drwxr-x--- 9 alex alex 4096 Jan 11 21:28 ..
drwxr-xr-x 2 alex alex 4096 Jan 11 21:32 a
-rw-r--r-- 1 alex alex   44 Jan 11 21:28 a.txt
drwxr-xr-x 2 alex alex 4096 Jan 11 21:30 b
-rw-r--r-- 1 alex alex   29 Jan 11 21:28 b.txt

./a:
total 8
drwxr-xr-x 2 alex alex 4096 Jan 11 21:32 .
drwxr-xr-x 4 alex alex 4096 Jan 11 21:30 ..
-rw-r--r-- 1 alex alex    0 Jan 11 21:32 1.txt
-rw-r--r-- 1 alex alex    0 Jan 11 21:32 2.txt

./b:
total 8
drwxr-xr-x 2 alex alex 4096 Jan 11 21:30 .
drwxr-xr-x 4 alex alex 4096 Jan 11 21:30 ..

--------------------------------------------------
Mandatory arguments to long options are mandatory for short options too.
  -a, --all                  do not ignore entries starting with .
  -A, --almost-all           do not list implied . and ..
      --author               with -l, print the author of each file
  -b, --escape               print C-style escapes for nongraphic characters
      --block-size=SIZE      with -l, scale sizes by SIZE when printing them;
                               e.g., '--block-size=M'; see SIZE format below
  -B, --ignore-backups       do not list implied entries ending with ~
  -c                         with -lt: sort by, and show, ctime (time of last
                               modification of file status information);
                               with -l: show ctime and sort by name;
                               otherwise: sort by ctime, newest first
  -C                         list entries by columns
      --color[=WHEN]         colorize the output; WHEN can be 'always' (default
                               if omitted), 'auto', or 'never'; more info below
  -d, --directory            list directories themselves, not their contents
  -D, --dired                generate output designed for Emacs' dired mode
  -f                         do not sort, enable -aU, disable -ls --color
  -F, --classify             append indicator (one of */=>@|) to entries
      --file-type            likewise, except do not append '*'
      --format=WORD          across -x, commas -m, horizontal -x, long -l,
                               single-column -1, verbose -l, vertical -C
      --full-time            like -l --time-style=full-iso
  -g                         like -l, but do not list owner
      --group-directories-first
                             group directories before files;
                               can be augmented with a --sort option, but any
                               use of --sort=none (-U) disables grouping
  -G, --no-group             in a long listing, don't print group names
  -h, --human-readable       with -l and -s, print sizes like 1K 234M 2G etc.
      --si                   likewise, but use powers of 1000 not 1024
  -H, --dereference-command-line
                             follow symbolic links listed on the command line
      --dereference-command-line-symlink-to-dir
                             follow each command line symbolic link
                               that points to a directory
      --hide=PATTERN         do not list implied entries matching shell PATTERN
                               (overridden by -a or -A)
      --hyperlink[=WHEN]     hyperlink file names; WHEN can be 'always'
                               (default if omitted), 'auto', or 'never'
      --indicator-style=WORD  append indicator with style WORD to entry names:
                               none (default), slash (-p),
                               file-type (--file-type), classify (-F)
  -i, --inode                print the index number of each file
  -I, --ignore=PATTERN       do not list implied entries matching shell PATTERN
  -k, --kibibytes            default to 1024-byte blocks for disk usage;
                               used only with -s and per directory totals
  -l                         use a long listing format
  -L, --dereference          when showing file information for a symbolic
                               link, show information for the file the link
                               references rather than for the link itself
  -m                         fill width with a comma separated list of entries
  -n, --numeric-uid-gid      like -l, but list numeric user and group IDs
  -N, --literal              print entry names without quoting
  -o                         like -l, but do not list group information
  -p, --indicator-style=slash
                             append / indicator to directories
  -q, --hide-control-chars   print ? instead of nongraphic characters
      --show-control-chars   show nongraphic characters as-is (the default,
                               unless program is 'ls' and output is a terminal)
  -Q, --quote-name           enclose entry names in double quotes
      --quoting-style=WORD   use quoting style WORD for entry names:
                               literal, locale, shell, shell-always,
                               shell-escape, shell-escape-always, c, escape
                               (overrides QUOTING_STYLE environment variable)
  -r, --reverse              reverse order while sorting
  -R, --recursive            list subdirectories recursively
  -s, --size                 print the allocated size of each file, in blocks
  -S                         sort by file size, largest first
      --sort=WORD            sort by WORD instead of name: none (-U), size (-S),
                               time (-t), version (-v), extension (-X)
      --time=WORD            change the default of using modification times;
                               access time (-u): atime, access, use;
                               change time (-c): ctime, status;
                               birth time: birth, creation;
                             with -l, WORD determines which time to show;
                             with --sort=time, sort by WORD (newest first)
      --time-style=TIME_STYLE  time/date format with -l; see TIME_STYLE below
  -t                         sort by time, newest first; see --time
  -T, --tabsize=COLS         assume tab stops at each COLS instead of 8
  -u                         with -lt: sort by, and show, access time;
                               with -l: show access time and sort by name;
                               otherwise: sort by access time, newest first
  -U                         do not sort; list entries in directory order
  -v                         natural sort of (version) numbers within text
  -w, --width=COLS           set output width to COLS.  0 means no limit
  -x                         list entries by lines instead of by columns
  -X                         sort alphabetically by entry extension
  -Z, --context              print any security context of each file
  -1                         list one file per line.  Avoid '\n' with -q or -b
      --help     display this help and exit
      --version  output version information and exit
2.2 vim/vi

vi/vim 按键说明
除了上面简易范例的 i, Esc, :wq 之外, 其实 vim 还有非常多的按键可以使用.
2.2.1 光标移动/复制粘贴/搜索替换
| 移动光标的方法 | 说明 |
|---|---|
| h 或 向左箭头键(←) | 光标向左移动一个字符 |
| j 或 向下箭头键(↓) | 光标向下移动一个字符 |
| k 或 向上箭头键(↑) | 光标向上移动一个字符 |
| l 或 向右箭头键(→) | 光标向右移动一个字符 |
| 如果你将右手放在键盘上的话, 你会发现 hjkl 是排列在一起的, 因此可以使用这四个按钮来移动光标. 如果想要进行多次移动的话, 例如向下移动 30 行, 可以使用 "30j" 或 "30↓" 的组合按键, 亦即加上想要进行的次数(数字)后, 按下动作即可! | |
| [Ctrl] + [f] | 屏幕『向下』移动一页, 相当于 [Page Down]按键 (常用) |
| [Ctrl] + [b] | 屏幕『向上』移动一页, 相当于 [Page Up] 按键 (常用) |
| [Ctrl] + [d] | 屏幕『向下』移动半页 |
| [Ctrl] + [u] | 屏幕『向上』移动半页 |
| + | 光标移动到非空格符的下一行 |
| - | 光标移动到非空格符的上一行 |
| n |
那个 n 表示『数字』, 例如 20 . 按下数字后再按空格键, 光标会向右移动这一行的 n 个字符. 例如 20 |
| 0 或功能键[Home] | 这是数字『 0 』: 移动到这一行的最前面字符处 (常用) |
| $ 或功能键[End] | 移动到这一行的最后面字符处(常用) |
| H | 光标移动到这个屏幕的最上方那一行的第一个字符 |
| M | 光标移动到这个屏幕的中央那一行的第一个字符 |
| L | 光标移动到这个屏幕的最下方那一行的第一个字符 |
| G | 移动到这个档案的最后一行(常用) |
| nG | n 为数字. 移动到这个档案的第 n 行. 例如 20G 则会移动到这个档案的第 20 行(可配合 :set nu) |
| gg | 移动到这个档案的第一行, 相当于 1G 啊! (常用) |
| n |
n 为数字. 光标向下移动 n 行(常用) |
| 搜索替换 | |
| /word | 向光标之下寻找一个名称为 word 的字符串. 例如要在档案内搜寻 vbird 这个字符串, 就输入 /vbird 即可! (常用) |
| ?word | 向光标之上寻找一个字符串名称为 word 的字符串. |
| n | 这个 n 是英文按键. 代表重复前一个搜寻的动作. 举例来说, 如果刚刚我们执行 /vbird 去向下搜寻 vbird 这个字符串, 则按下 n 后, 会向下继续搜寻下一个名称为 vbird 的字符串. 如果是执行 ?vbird 的话, 那么按下 n 则会向上继续搜寻名称为 vbird 的字符串! |
| N | 这个 N 是英文按键. 与 n 刚好相反, 为『反向』进行前一个搜寻动作. 例如 /vbird 后, 按下 N 则表示『向上』搜寻 vbird . |
| 使用 /word 配合 n 及 N 是非常有帮助的! 可以让你重复的找到一些你搜寻的关键词! | |
| :n1,n2s/word1/word2/g | n1 与 n2 为数字. 在第 n1 与 n2 行之间寻找 word1 这个字符串, 并将该字符串取代为 word2 ! 举例来说, 在 100 到 200 行之间搜寻 vbird 并取代为 VBIRD 则: 『:100,200s/vbird/VBIRD/g』. (常用) |
| :1,$s/word1/word2/g 或 :%s/word1/word2/g | 从第一行到最后一行寻找 word1 字符串, 并将该字符串取代为 word2 ! (常用) |
| :1,$s/word1/word2/gc 或 :%s/word1/word2/gc | 从第一行到最后一行寻找 word1 字符串, 并将该字符串取代为 word2 ! 且在取代前显示提示字符给用户确认 (confirm) 是否需要取代! (常用) |
| 删除, 复制与贴上 | |
| x, X | 在一行字当中, x 为向后删除一个字符 (相当于 [del] 按键), X 为向前删除一个字符(相当于 [backspace] 亦即是退格键) (常用) |
| nx | n 为数字, 连续向后删除 n 个字符. 举例来说, 我要连续删除 10 个字符, 『10x』. |
| dd | 剪切游标所在的那一整行(常用), 用 p/P 可以粘贴. |
| ndd | n 为数字. 剪切光标所在的向下 n 行, 例如 20dd 则是剪切 20 行(常用), 用 p/P 可以粘贴. |
| d1G | 删除光标所在到第一行的所有数据 |
| dG | 删除光标所在到最后一行的所有数据 |
| d$ | 删除游标所在处, 到该行的最后一个字符 |
| d0 | 那个是数字的 0 , 删除游标所在处, 到该行的最前面一个字符 |
| yy | 复制游标所在的那一行(常用) |
| nyy | n 为数字. 复制光标所在的向下 n 行, 例如 20yy 则是复制 20 行(常用) |
| y1G | 复制游标所在行到第一行的所有数据 |
| yG | 复制游标所在行到最后一行的所有数据 |
| y0 | 复制光标所在的那个字符到该行行首的所有数据 |
| y$ | 复制光标所在的那个字符到该行行尾的所有数据 |
| p, P | p 为将已复制的数据在光标下一行贴上, P 则为贴在游标上一行! 举例来说, 我目前光标在第 20 行, 且已经复制了 10 行数据. 则按下 p 后, 那 10 行数据会贴在原本的 20 行之后, 亦即由 21 行开始贴. 但如果是按下 P 呢? 那么原本的第 20 行会被推到变成 30 行. (常用) |
| J | 将光标所在行与下一行的数据结合成同一行 |
| c | 重复删除多个数据, 例如向下删除 10 行, [ 10cj ] |
| u | 复原前一个动作. (常用) |
| [Ctrl]+r | 重做上一个动作. (常用) |
| 这个 u 与 [Ctrl]+r 是很常用的指令! 一个是复原, 另一个则是重做一次~ 利用这两个功能按键, 你的编辑, 嘿嘿! 很快乐的啦! | |
| . | 不要怀疑! 这就是小数点*! 意思是重复前一个动作的意思. 如果你想要重复删除, 重复贴上等等动作, 按下小数点『.』就好了! (常用) |
2.2.2 编辑模式
| 进入输入或取代的编辑模式 | |
|---|---|
| i, I | 进入输入模式(Insert mode): i 为『从目前光标所在处输入』, I 为『在目前所在行的第一个非空格符处开始输入』. (常用) |
| a, A | 进入输入模式(Insert mode): a 为『从目前光标所在的下一个字符处开始输入』, A 为『从光标所在行的最后一个字符处开始输入』. (常用) |
| o, O | 进入输入模式(Insert mode): 这是英文字母 o 的大小写. o 为在目前光标所在的下一行处输入新的一行; O 为在目前光标所在的上一行处输入新的一行! (常用) |
| r, R | 进入取代模式(Replace mode): r 只会取代光标所在的那一个字符一次; R会一直取代光标所在的文字, 直到按下 ESC 为止; (常用) |
| 上面这些按键中, 在 vi 画面的左下角处会出现『--INSERT--』或『--REPLACE--』的字样. 由名称就知道该动作了吧! ! 特别注意的是, 我们上面也提过了, 你想要在档案里面输入字符时, 一定要在左下角处看到 INSERT 或 REPLACE 才能输入喔! | |
| [Esc] | 退出编辑模式, 回到一般模式中(常用) |
2.2.3 指令行模式
| 指令行的储存, 离开等指令 | |
|---|---|
| :w | 将编辑的数据写入硬盘档案中(常用) |
| :w! | 若文件属性为『只读』时, 强制写入该档案. 不过, 到底能不能写入, 还是跟你对该档案的档案权限有关啊! |
| :q | 离开 vi (常用) |
| :q! | 若曾修改过档案, 又不想储存, 使用 ! 为强制离开不储存档案. |
| 注意一下啊, 那个惊叹号 (!) 在 vi 当中, 常常具有『强制』的意思~ | |
| :wq | 储存后离开, 若为 :wq! 则为强制储存后离开 (常用) |
| ZZ | 这是大写的 Z 喔! 如果修改过, 保存当前文件, 然后退出! 效果等同于(保存并退出) |
| ZQ | 不保存, 强制退出. 效果等同于 :q!. |
| :w [filename] | 将编辑的数据储存成另一个档案( 类似另存新档) |
| :r [filename] | 在编辑的数据中, 读入另一个档案的数据. 亦即将 『filename』 这个档案内容加到游标所在行后面 |
| :n1,n2 w [filename] | 将 n1 到 n2 的内容储存成 filename 这个档案. |
| :! command | 暂时离开 vi 到指令行模式下执行 command 的显示结果! 例如 『:! ls /home』即可在 vi 当中察看 /home 底下以 ls 输出的档案信息! |
| vim 环境的变更 | |
| :set nu | 显示行号, 设定之后, 会在每一行的前缀显示该行的行号 |
| :set nonu | 与 set nu 相反, 为取消行号! |
特别注意, 在 vi/vim 中, 数字是很有意义的! 数字通常代表重复做几次的意思! 也有可能是代表去到第几个什么什么的意思.
举例来说, 要删除 50 行, 则是用 『50dd』 对吧! 数字加在动作之前, 如我要向下移动 20 行呢? 那就是『20j』或者是『20↓』即可.
2.3 2. sudo
super user do
sudo, 允许普通用户使用超级用户权限执行某些命令. 和Windows以管理员命令执行cmd/powershell类似, sudo之后, 将触发密码输入的要求.
# 提权操作
sudo doing something

# 暂时切换到root
sudo su

-------------------------------------
su

su为switch user, 即切换用户的简写.

格式为两种:

su -l USERNAME( -l为login, 即登陆的简写)

su USERNAME

如果不指定USERNAME( 用户名) , 默认即为root, 所以切换到root的身份的命令即为: su -root或su -, su root 或su.

su USERNAME, 与su - USERNAME的不同之处如下:

su - USERNAME切换用户后, 同时切换到新用户的工作环境中.

su USERNAME切换用户后, 不改变原用户的工作目录, 及其他环境变量目录.

su -

su -, su -l或su --login 命令改变身份时, 也同时变更工作目录, 以及HOME, SHELL, USER, LOGNAME. 此外, 也会变更PATH变量. 用su -命令则默认转换成成root用户了.

而不带参数的`su命令`不会改变当前工作目录以及`HOME,SHELL,USER,LOGNAME`. 只是拥有了`root`的权限而已.

注意: su -使用root的密码,而sudo su使用用户密码
# 因为权限的差异, 得到的信息的差异
(base) skywalker@skywalker-virtual-machine:~/桌面$ netstat -anp | grep mysql
( 并非所有进程都能被检测到, 所有非本用户的进程信息将不会显示, 如果想看到所有信息, 则必须切换到 root 用户)
unix  2      [ ACC ]     流        LISTENING     39438    -                    /var/run/mysqld/mysqlx.sock
unix  2      [ ACC ]     流        LISTENING     38654    -                    /var/run/mysqld/mysqld.sock
(base) skywalker@skywalker-virtual-machine:~/桌面$ sudo netstat -anp | grep mysql
[sudo] skywalker 的密码:
tcp6       0      0 :::3306                 :::*                    LISTEN      1101/mysqld
tcp6       0      0 :::33060                :::*                    LISTEN      1101/mysqld
unix  2      [ ACC ]     流        LISTENING     39438    1101/mysqld          /var/run/mysqld/mysqlx.sock
unix  2      [ ACC ]     流        LISTENING     38654    1101/mysqld          /var/run/mysqld/mysqld.sock
unix  2      [ ]         数据报  已连接     36399    1101/mysqld
2.4 3. apt
apt, advanced package tool, 高级包工具, 属于debian系linux发行版的关键组成部分之一.
# 查看安装列表
apt list
# 非常长

# 获取包更新列表
sudo apt-get update
# 对比本地, 可更新的
sudo apt-get upgrade

sudo apt-get upgrade package_name

# 列出可更新的包
apt list --upgradeable

sudo apt-get dist-upgrad package_name
与apt-get upgrade命令相似, apt-get dist-upgrade也会升级软件包. 除此之外, 它还使用最新版本的软件包来处理依赖关系的更改. 它可以智能地解决程序包依赖关系之间的冲突, 并根据需要尝试以不重要的程序为代价升级最重要的程序包. 与apt-get upgrade命令不同, apt-get dist-upgrade是主动式的, 它会安装新软件包或自行删除现有软件包以完成升级.

# 检索
apt search package_name

# 安装
sudo apt install package_name
# 多个
sudo apt install <package_1> <package_2> <package_3>

# 安装, 如果存在则不升级
sudo apt install package_name --no-upgrade

# 升级
sudo apt install package_name --only-upgrade

sudo apt install package_name >= version_number

# 查看安装包的信息
apt show package_name

# 移除
apt remove package_name

# 移除软件包及配置文件
sudo apt purge package_name

# 清理旧版本的软件缓存
sudo apt-get autoclean

清理所有软件缓存
sudo apt-get clean
2.5 4. dpkg
# 查看已经安装的包
dpkg -l

# -s 查看安装包
alex@DESKTOP-F6VO5U4:/mnt/c/Users/Lian$ dpkg -s net-tools
Package: net-tools
Status: install ok installed
Priority: important
Section: net
Installed-Size: 800
Maintainer: Ubuntu Developers <ubuntu-devel-discuss@lists.ubuntu.com>
Architecture: amd64
Multi-Arch: foreign
Version: 1.60+git20181103.0eebece-1ubuntu5
Depends: libc6 (>= 2.34), libselinux1 (>= 3.1~)
Description: NET-3 networking toolkit
 This package includes the important tools for controlling the network
 subsystem of the Linux kernel.  This includes arp, ifconfig, netstat,
 rarp, nameif and route.  Additionally, this package contains utilities
 relating to particular network hardware types (plipconfig, slattach,
 mii-tool) and advanced aspects of IP configuration (iptunnel, ipmaddr).
 .
 In the upstream package 'hostname' and friends are included. Those are
 not installed by this package, since there is a special "hostname*.deb".
Homepage: http://sourceforge.net/projects/net-tools/
Original-Maintainer: net-tools Team <team+net-tools@tracker.debian.org>

dpkg -L net-tools
# 查看包所涉及的文件

系统安装软件一般在/usr/share, 可执行的文件在/usr/bin, 配置文件可能安装到了/etc下等.
文档一般在 /usr/share
可执行文件 /usr/bin
配置文件 /etc
lib文件 /usr/lib

dpkg -c filename
# 查看包内容

dpkg -I deb_packagename
# 查看包信息

# 安装
dpkg -i package_name

dpkg -r package_name
# 卸载包

# --purge
dpkg -P package_name
# 卸载软件包的同时删除其配置文件的命令
2.6 5. net状态
## netstat已经被ss命令所取代
ss -l 显示本地打开的所有端口
ss -pl 显示每个进程具体打开的socket
ss -t -a 显示所有tcp socket
ss -u -a 显示所有的UDP Socekt
ss -o state established '( dport = :smtp or sport = :smtp )' 显示所有已建立的SMTP连接
ss -o state established '( dport = :http or sport = :http )' 显示所有已建立的HTTP连接
ss -x src /tmp/.X11-unix/* 找出所有连接X服务器的进程
ss -s 列出当前socket详细信息

## ifconfig 被ip命令所取代
(base) alex@DESKTOP-F6VO5U4:/mnt/c/Users/Lian$ ip a
1: lo: <LOOPBACK,UP,LOWER_UP> mtu 65536 qdisc noqueue state UNKNOWN group default qlen 1000
    link/loopback 00:00:00:00:00:00 brd 00:00:00:00:00:00
    inet 127.0.0.1/8 scope host lo
       valid_lft forever preferred_lft forever
    inet6 ::1/128 scope host
       valid_lft forever preferred_lft forever
2: bond0: <BROADCAST,MULTICAST,MASTER> mtu 1500 qdisc noop state DOWN group default qlen 1000
    link/ether 52:a8:3f:0c:68:9c brd ff:ff:ff:ff:ff:ff
3: dummy0: <BROADCAST,NOARP> mtu 1500 qdisc noop state DOWN group default qlen 1000
    link/ether 1a:6d:08:94:f3:e6 brd ff:ff:ff:ff:ff:ff
4: tunl0@NONE: <NOARP> mtu 1480 qdisc noop state DOWN group default qlen 1000
    link/ipip 0.0.0.0 brd 0.0.0.0
5: sit0@NONE: <NOARP> mtu 1480 qdisc noop state DOWN group default qlen 1000
    link/sit 0.0.0.0 brd 0.0.0.0
6: eth0: <BROADCAST,MULTICAST,UP,LOWER_UP> mtu 1500 qdisc mq state UP group default qlen 1000
    link/ether 00:15:5d:6a:fc:de brd ff:ff:ff:ff:ff:ff
    inet 172.17.211.121/20 brd 172.17.223.255 scope global eth0
       valid_lft forever preferred_lft forever
    inet6 fe80::215:5dff:fe6a:fcde/64 scope link
       valid_lft forever preferred_lft forever
2.7 6 压缩/解压
常见的压缩格式:
.zip, .gz, .bz2, .tar, .tar.gz, .tar.bz2
# 对同一文件压缩
# 最大压缩率
-rw-r--r-- 1 alex alex 334K Jan 12 10:34 123.jpg.gz
-rw-r--r-- 1 alex alex 340K Jan 12 10:36 123.tar
-rw-r--r-- 1 alex alex 340K Jan 12 10:42 123.tar.bz2
-rw-r--r-- 1 alex alex 334K Jan 12 10:40 123.zip
| 参数 | 含义 |
|---|---|
| tar | Linux压缩/解压缩工具 |
| -z | 代表gzip, 使用gzip工具进行压缩或解压 |
| -x | 代表extract, 解压文件( 压缩文件是-c) |
| -v | 代表verbose, 显示解压过程( 文件列表) |
| -f | 代表file, 指定要解压的文件名( or 要压缩成的文件名) |
# 解压文件
tar -xvf zip_pack

# 将文件解压到指定的文件夹
tar -xvf zip_pack -C /test_foler

# 查看压缩包内容
(base) alex@DESKTOP-F6VO5U4:~/test_folder$ tar tvf test.tar
drwxr-xr-x alex/alex         0 2023-01-11 21:32 a/
-rw-r--r-- alex/alex         0 2023-01-11 21:32 a/2.txt
-rw-r--r-- alex/alex         0 2023-01-11 21:32 a/1.txt

# 将文件夹压缩
(base) alex@DESKTOP-F6VO5U4:~/test_folder$ tar -cvf test.tar a
a/
a/2.txt
a/1.txt
(base) alex@DESKTOP-F6VO5U4:~/test_folder$ ls
a  a.txt  b  b.txt  test.tar

# 默认支持递归压缩
(base) alex@DESKTOP-F6VO5U4:~/test_folder$ tar -cvf 3.tar c
c/
c/c1.txt
c/d/
c/d/d1.txt

# 不要压缩包的顶级目录在解压时, --strip-components 1
(base) alex@DESKTOP-F6VO5U4:~/test_folder$ tar -xvf 3.tar -C test_no_top --strip-components 1
c/c1.txt
c/d/
c/d/d1.txt

(base) alex@DESKTOP-F6VO5U4:~/test_folder$ ls test_no_top/ -R
test_no_top/:
c1.txt  d

test_no_top/d:
d1.txt
# 没有预装, 需要手动安装
sudo apt-get install zip

# 注意这个坑,当指定的是文件夹, 它并没有加压文件夹内的内容
(base) alex@DESKTOP-F6VO5U4:~/test_folder$ zip -sf 1.zip
Archive contains:
  a/
Total 1 entries (0 bytes)

# 多层级的目录, 也是如此, -r, 实际上就是递归获取文件进行加压
(base) alex@DESKTOP-F6VO5U4:~/test_folder$ zip -r 3.zip c
  adding: c/ (stored 0%)
  adding: c/c1.txt (stored 0%)
  adding: c/d/ (stored 0%)
  adding: c/d/d1.txt (stored 0%)

# 需要使用参数 -r
(base) alex@DESKTOP-F6VO5U4:~/test_folder$ zip -r 1.zip a
  adding: a/ (stored 0%)
  adding: a/2.txt (stored 0%)
  adding: a/1.txt (stored 0%)
  adding: a/3.txt (stored 0%)
(base) alex@DESKTOP-F6VO5U4:~/test_folder$ zip -sf 1.zip
Archive contains:
  a/
  a/2.txt
  a/1.txt
  a/3.txt
Total 4 entries (0 bytes)

# zip 解压缩
(base) alex@DESKTOP-F6VO5U4:~/test_folder$ zip test.zip a
  adding: a/ (stored 0%)
(base) alex@DESKTOP-F6VO5U4:~/test_folder$ ls
a  a.txt  b  b.txt  test.tar  test.zip

# 添加文件到现有的压缩包
(base) alex@DESKTOP-F6VO5U4:~/test_folder$ zip -m test.zip ./b/b1.txt
  adding: b/b1.txt (deflated 4%)
(base) alex@DESKTOP-F6VO5U4:~/test_folder$ zip -v test.zip

# 压缩文件夹后删除源文件
zip a.zip a | rm -rf a

zip error: Nothing to do! (test.zip)
# 查看压缩包, 但不解压
(base) alex@DESKTOP-F6VO5U4:~/test_folder$ zip -sf test.zip
Archive contains:
  a/
  b/b1.txt
Total 2 entries (27 bytes)

# 查看压缩情况
(base) alex@DESKTOP-F6VO5U4:~/test_folder$ unzip -v test.zip
Archive:  test.zip
 Length   Method    Size  Cmpr    Date    Time   CRC-32   Name
--------  ------  ------- ---- ---------- ----- --------  ----
       0  Stored        0   0% 2023-01-11 21:32 00000000  a/
      27  Defl:N       26   4% 2023-01-12 09:49 669df147  b/b1.txt
--------          -------  ---                            -------
      27               26   4%                            2 files
zip支持参数
语法结构: zip [-options] [-b path] [-t mmddyyyy] [-n suffixes] [zipfile list] [-xi list]
- -f 更新现有的文件
- -u 与-f参数类似, 但是除了更新现有的文件外, 也会将压缩文件中的其他文件解压缩到目录中
- -d 指定文件解压缩后所要存储的目录
- -m 将文件压缩并加入压缩文件后, 删除原始文件, 即把文件移到压缩文件中
- -r 将指定的目录下的所有子目录以及文件一起处理
- -j 不处理压缩文件中原有的目录路径
- -0 在存储, 不压缩
- -l 显示压缩文件内所包含的文件
- -1 较快速度的压缩
- -9 较高质量的压缩
- -q 安静模式, 在压缩的时候不显示指令的执行过程
- -v 执行是时显示详细的信息
- -c 将解压缩的结果显示到屏幕上, 并对字符做适当的转换
- -z 仅显示压缩文件的备注文字
- -@ 从标准输入中读取名称, 一个路径名称用一行
- -o 将压缩文件内的所有文件的最新变动时间设为压缩时候的时间
- -x 指定不要处理.zip压缩文件中的哪些文件
- -i 只压缩符合条件的文件
- -F 尝试修复损坏的压缩文件
- -D 压缩文件内不建立目录名称
- -A 调整可执行的自动解压缩文件
- -J 删除可执行文件, 留下一个普通的zip归档文件
- -T 检查备份文件内的每个文件是否正确无误
- -X 解压缩时同时回存文件原来的UID/GID
- -y 直接保存符号连接, 而非该连接所指向的文件, 本参数仅在UNIX之类的系统下有效
- -e 加密
- -n 不压缩具有特定字尾字符串的文件
- -h2 显示更多帮助
三. Python
Ubuntu目前内置的python版本已经升级到python3.x, python2已经被移除, 但是python的关联的关键词还是python3.
# 无内置的pip, 需要手动安装
sudo apt install python3-pip
3.1 anaconda
# 下载安装包, 打开官网下载页, 找到linux即可
# 过慢, 使用阿里镜像
axel -n 10 https://mirrors.aliyun.com/anaconda/archive/Anaconda3-2022.10-Linux-x86_64.sh
wget https://repo.anaconda.com/archive/Anaconda3-2022.10-Linux-x86_64.sh

# 下载好之后
bash Anaconda3-2022.10-Linux-x86_64.sh
# 会列出软件的协议
yes
# 即可, 后面的操作

# 注意执行
--------------------------------------------------------------------
Do you wish the installer to initialize Anaconda3
by running conda init? [yes|no]
[no] >>>
# 这里可以选择自动初始化
# 假如没有自动初始化

# 打开环境变量配置文件

sudo vim /etc/profile

# 在最后添加
export PATH=/home/alex/anaconda3/bin:$PATH

# 保存
# 重新载入环境变量, 即可取代原有的python
source /etc/profile
# 如果不生效, logout => 再登录进Ubuntu
----------------------------------------------------------------------------
# 添加conda到环境变量
source ~/.bashrc

# 安装之后原有的python将被覆盖
python --version
python3 --version
pip list
# 都将指向 anaconda的python
# 暂时移除anaconda路径
echo $PATH
#此时会打印出若干路径, 例如:
# /home/xxx/anaconda3/bin:/usr/xxx/bin:/usr/xxx/local/bin

# 此时就需要暂时去除PATH中的anaconda环境
PATH=/usr/xxx/bin:/usr/xxx/local/bin
# 再次查看PATH

/usr/xxx/bin:/usr/xxx/local/bin
# 此时, 在此Terminal中PATH暂时去除了Anaconda环境路径, 运行CMake则可以解决冲突.
变更pip的镜像源
pip config set global.index-url https://repo.huaweicloud.com/repository/pypi/simple
卸载anaconda
conda install anaconda-clean
# y
四. 数据库
4.1 MongoDB
- version: 6.x
# 导入公钥
wget -qO - https://www.mongodb.org/static/pgp/server-6.0.asc | sudo apt-key add -
# 注意这种方式是不安全, 将被废弃
# Warning: apt-key is deprecated. Manage keyring files in trusted.gpg.d instead (see apt-key(8)).
# https://stackoverflow.com/questions/68992799/warning-apt-key-is-deprecated-manage-keyring-files-in-trusted-gpg-d-instead?noredirect=1

echo "deb [ arch=amd64,arm64 ] https://repo.mongodb.org/apt/ubuntu focal/mongodb-org/6.0 multiverse" | sudo tee /etc/apt/sources.list.d/mongodb-org-6.0.list

sudo apt-get update

# 安装mongodb
sudo apt-get install -y mongodb-org

下列软件包有未满足的依赖关系:
 mongodb-org-mongos : 依赖: libssl1.1 (>= 1.1.1) 但无法安装它
 mongodb-org-server : 依赖: libssl1.1 (>= 1.1.1) 但无法安装它
E: 无法修正错误, 因为您要求某些软件包保持现状, 就是它们破坏了软件包间的依赖关系.
# 缺乏依赖的libssl库
地址见, libssl index
wget http://archive.ubuntu.com/ubuntu/pool/main/o/openssl/libssl1.1_1.1.1-1ubuntu2.1~18.04.20_amd64.deb
# 直接下载, 速度奇慢无比, 可以使用其他的工具下载
sudo dpkg -i libssl1.1_1.1.1-1ubuntu2.1~18.04.20_amd64.deb
# 安装好之后
# 重新安装mysql
sudo apt install -y mongodb-org
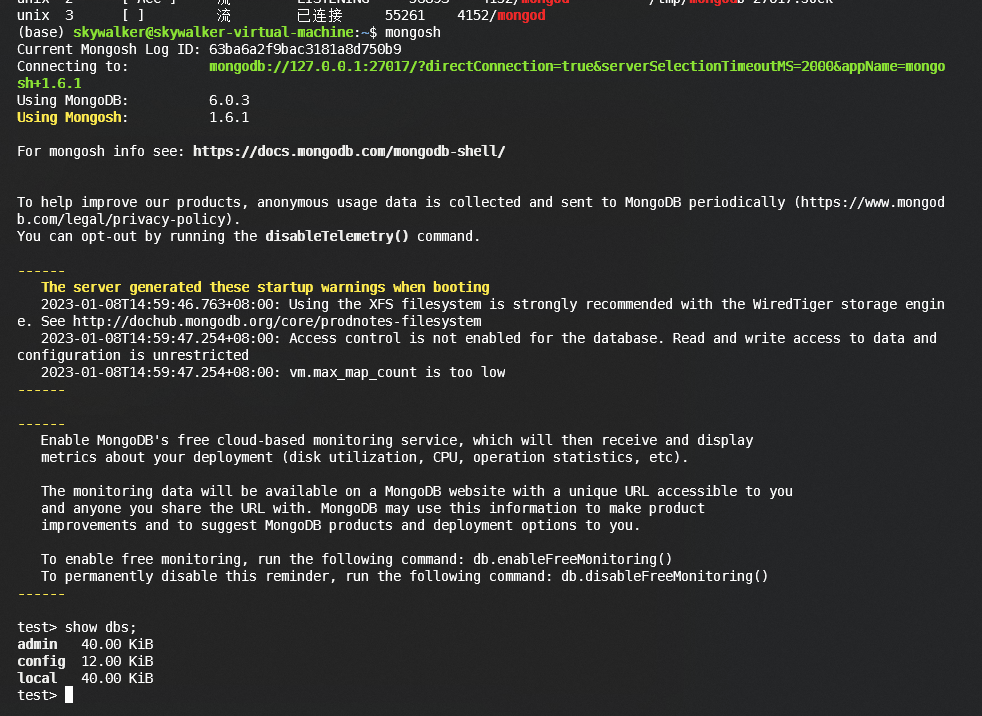
# 查看mongodb的状态
sudo systemctl status mongod
○ mongod.service - MongoDB Database Server
     Loaded: loaded (/lib/systemd/system/mongod.service; disabled; vendor preset: enabled)
     Active: inactive (dead)
       Docs: https://docs.mongodb.org/manual
# 显然安装好之后, mongodb并没有直接启动

# 启动mongodb
sudo systemctl start mongod

# 查看状态
sudo netstat -anp | grep mongod

# 将mongodb添加到自启动项
sudo systemctl enable mongod
# 卸载mongodb

# 停止服务
sudo service mongod stop
# 删除
sudo apt purge mongodb-org*

# 删除日志文件
sudo rm -r /var/log/mongodb
sudo rm -r /var/lib/mongodb
4.2 MySQL
-
version: 8.x
-
首先在MySQL的官网上下载一个配置文件
wget https://dev.mysql.com/get/mysql-apt-config_0.8.24-1_all.deb # 下载好之后 sudo dpkg -i mysql-apt-config_0.8.24-1_all.deb #[这里根据下载好的文件名进行修改] -
刷新一下软件仓库列表
sudo apt-get update -
安装MySQL
sudo apt-get install mysql-server过程会出现密码输入, 组件配置, 密码的安全模式(一路next, 选择推荐的配置即可)
-
安装好之后的检查
# 查看 mysql的连接情况
sudo netstat -anp | grep mysql

# 查看端口开放
netstat -ano

# 动态的状态获取
sudo service mysql status

# 停止MySQL服务
sudo service mysql stop

# 启动MySQL服务
sudo service mysql start

# 重启服务
sudo service mysql restart

# 禁止mysql自启动, 开机
sudo systemctl disable mysql

# 允许
sudo systemctl enable mysql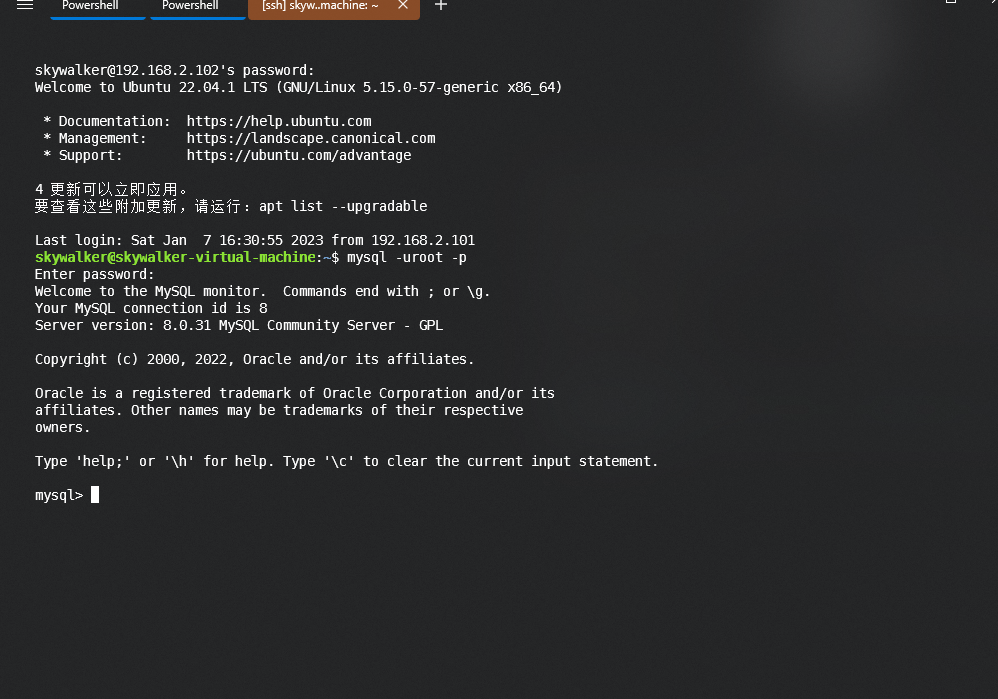
-
卸载MySQL
# remove命令依然还会残存配置等文件
sudo apt remove package1 package2

# 注意这是完全清除, 包括配置文件

sudo apt purge mysql-*

sudo rm -rf /etc/mysql/ /var/lib/mysql

# 删除所有不需要的包
sudo apt autoremove

sudo apt autoclean
五. SSH
# ubuntu terminal
sudo apt-get install openssh-server

# 确定ssh处于正常服务状态
ps -e|grep ssh
964 ?        00:00:00 sshd

# 如果未安装net-tools
sudo apt install net-tools
-- 查看ip地址
ifconfig -a
inet 192.168.2.102  netmask 255.255.255.0  broadcast 192.168.2.255
注意: 这里使用的不是mosh登录, 需要取消掉mosh
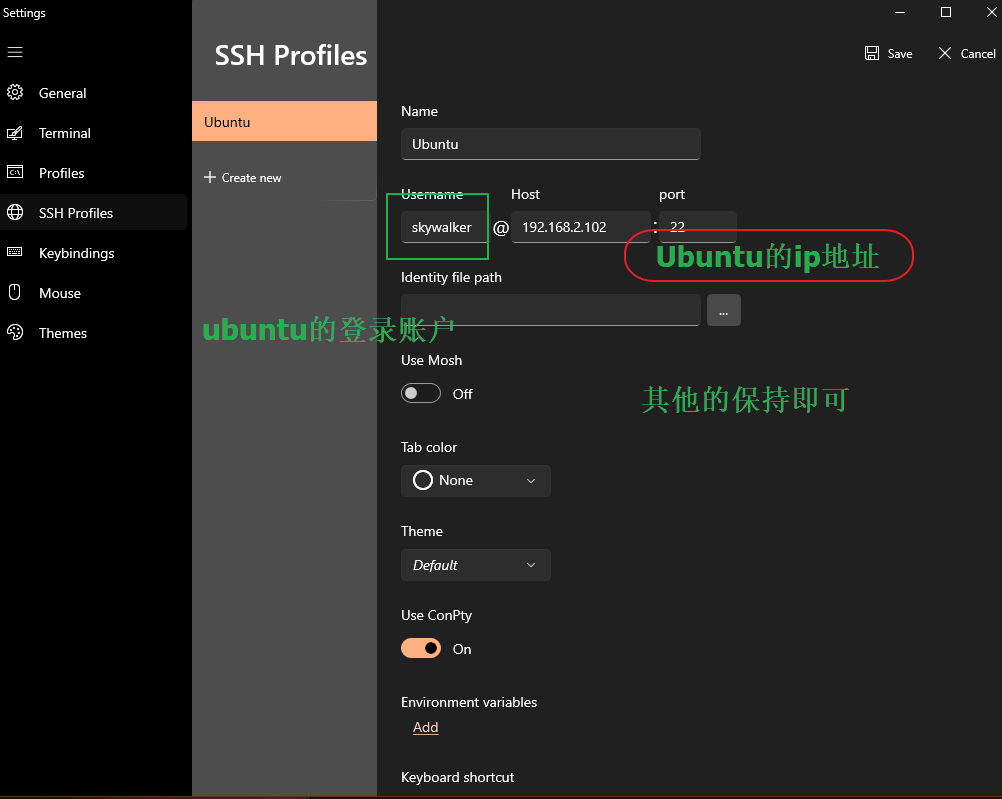
选择创建好的配置, 打开, 输入Ubuntu的对应的账号密码, 即可连接上虚拟机中的Ubuntu.


运行python, 注意默认状态下Ubuntu的python还是需要输入python3(同时也没有安装有pip包管理工具, 需要手动安装).
sudo apt install python3-pip
退出远程登录终端的方法:
| 序号 | 方法 |
|---|---|
| 方法1 | 直接关闭终端 |
| 方法2 | 输入logout |
| 方法3 | 输入exit |
| 方法4 | Ctrl + D |
六. WSL2
Windows Subsystem for Linux (WSL), 可以简单理解为Windows下的一个容器, Linux在这个容器中运行.
但是和传统的虚拟机相比, 这个容器并不是完全和主机分离, 这个容器中的Linux理论上可以获得更好的性能体验和更小的资源占用.
| 功能 | WSL 1 | WSL 2 |
|---|---|---|
| Windows 和 Linux 之间的集成 | ✅ | ✅ |
| 启动时间短 | ✅ | ✅ |
| 与传统虚拟机相比, 占用的资源量少 | ✅ | ✅ |
| 可以与当前版本的 VMware 和 VirtualBox 一起运行 | ✅ | ✅ |
| 托管 VM | ❌ | ✅ |
| 完整的 Linux 内核 | ❌ | ✅ |
| 完全的系统调用兼容性 | ❌ | ✅ |
| 跨 OS 文件系统的性能 | ✅ | ❌ |
系统的要求, 同时使用前, 需要启用CPU的虚拟化, 在主板上.
To update to WSL 2, you must be running Windows 10...
- For x64 systems: Version 1903 or later, with Build 18362 or later.
- For ARM64 systems: Version 2004 or later, with Build 19041 or later.
wsl上可以做什么:
注: 和wsl1相比, wls2是完整运行Linux内核.
- 在 Microsoft Store 中选择你偏好的 GNU/Linux 分发版.
- 运行常用的命令行软件工具( 例如
grep,sed,awk) 或其他 ELF-64 二进制文件.- 运行 Bash shell 脚本和 GNU/Linux 命令行应用程序, 包括:
- 工具: vim, emacs, tmux
- 语言: NodeJS, Javascript, Python, Ruby, C/C++, C# 与 F#, Rust, Go 等
- 服务: SSHD, MySQL, Apache, lighttpd, MongoDB, PostgreSQL.
- 使用自己的 GNU/Linux 分发包管理器安装其他软件.
- 使用类似于 Unix 的命令行 shell 调用 Windows 应用程序.
- 在 Windows 上调用 GNU/Linux 应用程序.
- 运行直接集成到 Windows 桌面的 GNU/Linux 图形应用程序
- 将 GPU 加速用于机器学习, 数据科学场景等
6.1 安装
Powershell, 管理员身份下
dism.exe /online /enable-feature /featurename:Microsoft-Windows-Subsystem-Linux /all /norestart

dism.exe /online /enable-feature /featurename:VirtualMachinePlatform /all /norestart
上述两条命令执行完成之后, 重启.
下载一个wsl update, 安装.
指定wsl的版本.
wsl --set-default-version 2
打开微软商店, 检索Linux/Ubuntu, 挑选一个版本, 下载安装, 然后运行即可.
首次运行, 需要设置账户名和密码.
6.2 使用
wsl --version
@Lian ➜ ~ ( base 3.9.12) 101ms wsl --status
Default Distribution: Ubuntu-22.04
Default Version: 2
Windows Subsystem for Linux was last updated on 1/9/2023
The Windows Subsystem for Linux kernel can be manually updated with 'wsl --update', but automatic updates cannot occur due to your system settings.
To receive automatic kernel updates, please enable the Windows Update setting: 'Receive updates for other Microsoft
products when you update Windows'.
For more information please visit https://aka.ms/wsl2kernel.
Kernel version: 5.10.16
@Lian ➜ ~ ( base 3.9.12) wslconfig /list
Windows Subsystem for Linux Distributions:
Ubuntu-22.04 (Default)
# 查看运行的linux版本
@Lian ➜ ~ ( base 3.9.12) 779ms wsl --list --verbose
NAME STATE VERSION
* Ubuntu-22.04 Running 2
# 指定默认的发行版本
wsl --set-default <Distribution Name>
# 指定运行那个版本
wsl --distribution <Distribution Name> --user <User Name>
# 更新wsl
wsl --update
# 更改默认的发行版本的账户
<DistributionName> config --default-user <Username>
# 关闭指定的发行版本
wsl --terminate <Distribution Name>
wsl --shutdown
6.3 变更镜像源
源地址的下载速度非常慢.
# 备份, 防止手抖
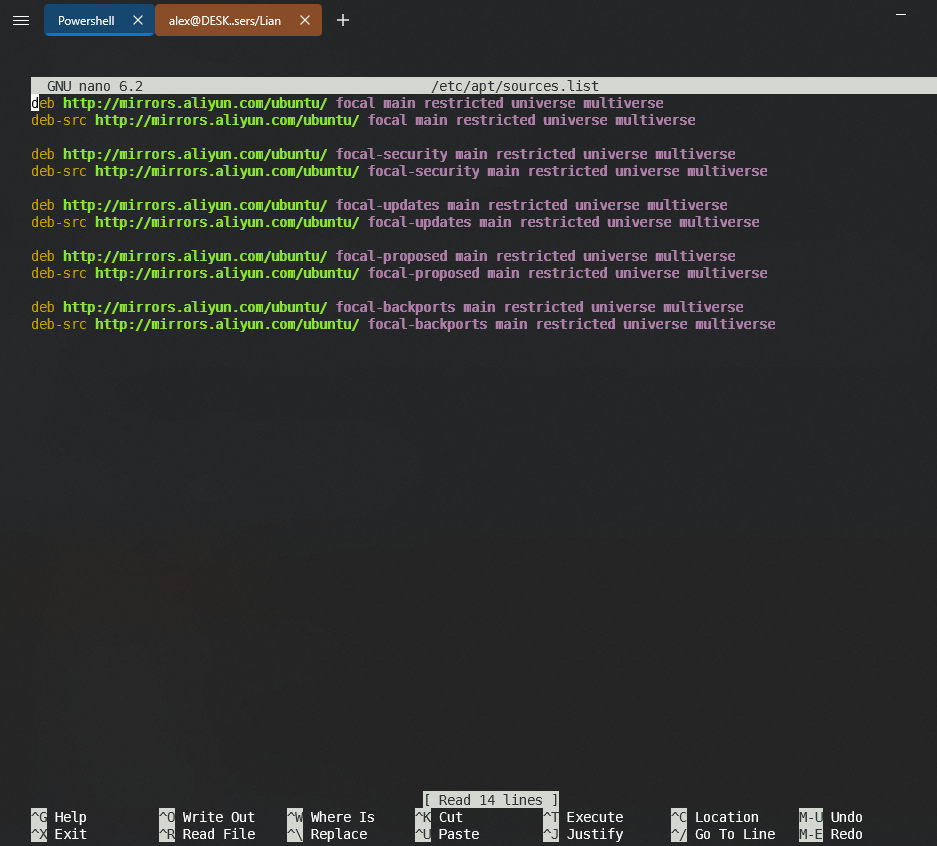
sudo cp /etc/apt/sources.list /etc/apt/sources.list.back
sudo nano /etc/apt/sources.list
Ctrl + K, 删除掉原有的文件内容
# 数据来源, 阿里云开发社区, 注意这里的url是不是可靠的.
deb http://mirrors.aliyun.com/ubuntu/ focal main restricted universe multiverse
deb-src http://mirrors.aliyun.com/ubuntu/ focal main restricted universe multiverse
deb http://mirrors.aliyun.com/ubuntu/ focal-security main restricted universe multiverse
deb-src http://mirrors.aliyun.com/ubuntu/ focal-security main restricted universe multiverse
deb http://mirrors.aliyun.com/ubuntu/ focal-updates main restricted universe multiverse
deb-src http://mirrors.aliyun.com/ubuntu/ focal-updates main restricted universe multiverse
deb http://mirrors.aliyun.com/ubuntu/ focal-proposed main restricted universe multiverse
deb-src http://mirrors.aliyun.com/ubuntu/ focal-proposed main restricted universe multiverse
deb http://mirrors.aliyun.com/ubuntu/ focal-backports main restricted universe multiverse
deb-src http://mirrors.aliyun.com/ubuntu/ focal-backports main restricted universe multiverse
复制上述内容
Ctrl + O保存 =>> enter
Ctrl + X退出
# 查看修改的内容
cat /etc/apt/sources.list
# 刷新一下
sudo apt-get update
sudo apt-get upgrade
6.4 打开
-
在
windows搜索中输入Ubuntu直接启动 -
在
Terminal中直接打开WSL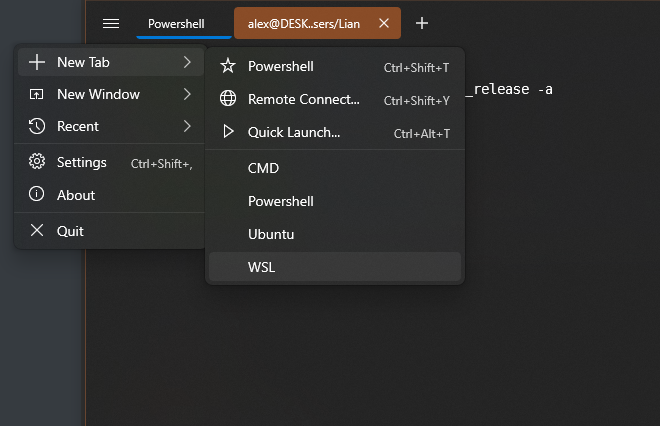
- 在
Terminal直接输入wsl
6.5 mysql
在wsl上配置MySQL远比在虚拟机上麻烦.
先按照上述在虚拟机的方式, 在wsl配置MySQL, 但是安装之后出现各种问题. 暂时转到微软提供的文档上来.
很快就遇到麻烦, 直接安装MySQL, 出现依赖问题.(Ubuntu的版本为22.04)
alex@DESKTOP-F6VO5U4:/mnt/c/Users/Lian$ sudo apt install mysql-server

[sudo] password for alex:
Reading package lists... Done
Building dependency tree... Done
Reading state information... Done
Some packages could not be installed. This may mean that you have
requested an impossible situation or if you are using the unstable
distribution that some required packages have not yet been created
or been moved out of Incoming.
The following information may help to resolve the situation:

The following packages have unmet dependencies:
 libevent-pthreads-2.1-7 : Depends: libevent-core-2.1-7 (= 2.1.11-stable-1) but 2.1.12-stable-1build3 is to be installed
E: Unable to correct problems, you have held broken packages.
由于libevent-core-2.1-7的版本(2.1.12-stable-1build3)过新, 需要降低版本.
# 安装aptitude, 可以将对应的包的版本降低
# 必须
sudo apt-get install aptitude

# 包的名称就是如此libevent-core-2.1-7, 不要去掉数字
# 必须
sudo aptitude install libevent-core-2.1-7=2.1.11-stable-1
# =2.1.11-stable-1, 不允许存在空格
# 再次安装
# 必须
sudo apt install mysql-server
安装过程和上面的APT的配置包安装的方式不一样, 整个过程是没有配置图形界面.
cat /var/log/mysql/error.log
# 查看日志

# 可以看到, root账户的创建是没有
2023-01-09T06:48:33.198137Z 6 [Warning] [MY-010453] [Server] root@localhost is created with an empty password ! Please consider switching off the --initialize-insecure option.

# 注意这个文件
alex@DESKTOP-F6VO5U4:/mnt/c/Users/Lian$ sudo cat /etc/mysql/debian.cnf

# Automatically generated for Debian scripts. DO NOT TOUCH!
[client]
host     = localhost
user     = debian-sys-maint
password = Jg0RQV8AakMJKisS
socket   = /var/run/mysqld/mysqld.sock
[mysql_upgrade]
host     = localhost
user     = debian-sys-maint
password = Jg0RQV8AakMJKisS
socket   = /var/run/mysqld/mysqld.sock

# 安装完成之后, MySQL并没有启动
sudo service mysql start/stop
# 会出现以下的警告
# su: warning: cannot change directory to /nonexistent: No such file or directory

# 关闭掉服务
sudo service mysql stop

# 关键的一步
# 必须
sudo usermod -d /var/lib/mysql/ mysql
# 这一步消除了上面的警告

sudo service mysql start

mysql -uroot -p

mysql -udebian-sys-maint -p

# 以上方式, 均无法正常登录MySQL
ERROR 2002 (HY000): Can't connect to local MySQL server through socket '/tmp/mysql.sock' (2),  /13

# 是可以正常登录进去的
sudo mysql
sudo vim /etc/mysql/mysql.conf.d/mysqld.cnf
# 必须
alex@DESKTOP-F6VO5U4:/mnt/c/Users/Lian$ sudo cat /etc/mysql/mysql.conf.d/mysqld.cnf
# 将文件的内容[mysqld] 下的 sock, pid等注释取消掉
# 端口从3306改成3307, 以作为和主机上的MySQL作为区分

[sudo] password for alex:
#
# The MySQL database server configuration file.
#
# One can use all long options that the program supports.
# Run program with --help to get a list of available options and with
# --print-defaults to see which it would actually understand and use.
#
# For explanations see
# http://dev.mysql.com/doc/mysql/en/s:erver-system-variables.html

# Here is entries for some specific programs
# The following values assume you have at least 32M ram

[mysqld]
#
# * Basic Settings
#
user            = mysql
pid-file        = /var/run/mysqld/mysqld.pid
socket  = /var/run/mysqld/mysqld.sock
port            = 3307
datadir = /var/lib/mysql

# If MySQL is running as a replication slave, this should be
# changed. Ref https://dev.mysql.com/doc/refman/8.0/en/server-system-variables.html#sysvar_tmpdir
# tmpdir                = /tmp
#
# Instead of skip-networking the default is now to listen only on
# localhost which is more compatible and is not less secure.
bind-address            = 127.0.0.1
mysqlx-bind-address     = 127.0.0.1
#
# * Fine Tuning
#
key_buffer_size         = 16M
# max_allowed_packet    = 64M
# thread_stack          = 256K

# thread_cache_size       = -1

# This replaces the startup script and checks MyISAM tables if needed
# the first time they are touched
myisam-recover-options  = BACKUP

# max_connections        = 151

# table_open_cache       = 4000

#
# * Logging and Replication
#
# Both location gets rotated by the cronjob.
#
# Log all queries
# Be aware that this log type is a performance killer.
# general_log_file        = /var/log/mysql/query.log
# general_log             = 1
#
# Error log - should be very few entries.
#
log_error = /var/log/mysql/error.log
#
# Here you can see queries with especially long duration
# slow_query_log                = 1
# slow_query_log_file   = /var/log/mysql/mysql-slow.log
# long_query_time = 2
# log-queries-not-using-indexes
#
# The following can be used as easy to replay backup logs or for replication.
# note: if you are setting up a replication slave, see README.Debian about
#       other settings you may need to change.
# server-id             = 1
# log_bin                       = /var/log/mysql/mysql-bin.log
# binlog_expire_logs_seconds    = 2592000
max_binlog_size   = 100M
# binlog_do_db          = include_database_name
# binlog_ignore_db      = include_database_name
# 必须
sudo mkdir -p /var/run/mysqld
# 必须
sudo chmod -R 755 /var/run/mysqld
# sudo chown mysql /var/run/mysqld/
sudo service mysql start

# sudo chown mysql /var/run/mysqld/mysqld.sock

# 必须
sudo mysql
# 为root账号添加密码
 ALTER USER 'root'@'localhost' IDENTIFIED WITH mysql_native_password BY '123456';
 # ALTER USER 'root'@'localhost' IDENTIFIED BY '<password>';
# 再次登录
mysql -uroot -p

# 默认状态下, MySQL并没有开机自启动

# 如果还是出现问题
# ERROR 2002 (HY000): Can't connect to local MySQL server through socket '/tmp/mysql.sock' (2)
# 备用
-----------------------
sudo service mysql stop
ln -s /var/run/mysqld/mysqld.sock
sudo service mysql start
----------------------------------

# 查看端口开放情况
show global variables like 'port';


# 安装python/connector
pip install mysql-connector-python
至此, 整个配置过程完成, 由于缺乏文档, 以及搜索得到的结果, 绝大部分都不靠谱, 花了不少时间在各种测试上.
如果将Ubuntu玩崩了, 可以在application下, 找到Ubuntu, 高级设置, 重置即可.

注意Ubuntu将被初始化, 所有的东西都将抹掉, 包括账号和密码.
6.6 nodejs
微软官方文档提供的方式, 需要文件都需要从GitHub中下载, 没有梯子, 无法下载.
# 直接安装可以运行
sudo apt-get install nodejs

# 版本已经老旧, 新版本lts, 已经更新到18
alex@DESKTOP-F6VO5U4:~$ node --version
v10.19.0
直接下载官方网站的linux_nodejs_tar, 解压后添加环境变量的方式, 并无法运行.
export PATH=/home/alex/linux_nodejs/bin:$PATH
这里改成从gitee提供的镜像地址
# clone
git clone https://gitee.com/mirrors/nvm
# 进入目录查看
cd nvm
# 查看文件
ls
# 执行脚本
bash install.sh
安装好脚本, 注意需要**重启**终端.
alx@DESKTOP-F6VO5U4:~$ nvm --version
0.39.3
这里显示nvm的版本, 即证明nvm正常的安装好了.
alx@DESKTOP-F6VO5U4:~$ nvm install --lts
Installing latest LTS version.
Downloading and installing node v18.13.0...
Downloading https://nodejs.org/dist/v18.13.0/node-v18.13.0-linux-x64.tar.xz...
################################################################################################################# 100.0%
Computing checksum with sha256sum
Checksums matched!
Now using node v18.13.0 (npm v8.19.3)
Creating default alias: default -> lts/* (-> v18.13.0)
alx@DESKTOP-F6VO5U4:~$ node --version
v18.13.0
alx@DESKTOP-F6VO5U4:~$ ls
nvm
alx@DESKTOP-F6VO5U4:~$ npm --version
8.19.3
alx@DESKTOP-F6VO5U4:~$

sudo vim /.bashrc
# 设置国内镜像
export NVM_NODEJS_ORG_MIRROR=http://npm.taobao.org/mirrors/node

echo $NVM_NODEJS_ORG_MIRROR

# node_mirror: https://npm.taobao.org/mirrors/node/
# npm_mirror: https://npm.taobao.org/mirrors/npm/

# 设置npm镜像
npm config set registry https://registry.npm.taobao.org
npm config set disturl https://npm.taobao.org/dist
npm config set electron_mirror https://npm.taobao.org/mirrors/electron/
npm config set sass_binary_site https://npm.taobao.org/mirrors/node-sass/
npm config set phantomjs_cdnurl https://npm.taobao.org/mirrors/phantomjs/

# 查看
npm get registry
6.7 备份和还原
先关闭wsl
# 删除 wsl --unregister Ubuntu-20.04
# wsl --export 发行版本号, 路径
wsl --export Ubuntu-22.04 D:\wsl2_ubuntu22\base_settings_mysql_version.tar

# 恢复
wsl --import Ubuntu-22.04 D:\wsl2_ubuntu22\base_settings_mysql_version.tar
注意: 还原后的子系统进入后, 默认成了 root 用户, 查了一下, 解决方法如下:
- 如果在商店安装过 Ubuntu 直接找到如下目录:
C:\C:\Users\用户名\AppData\Local\Microsoft\WindowsApps\ubuntu版本.exe config --default-user root执行指令修改为指定用户:
ubuntu.exe config --default-user crazyang #名称根据实际修改
- 如果电脑上之前没有安装过 WSL, 是通过还原来的, 可以下载 Windows Terminal 工具, 然后进入设置中, 指定启动的命令行 -u xxx即可, 但是这种方式如果换成其他连接 WSL 的工具还是默认 root 用户.
- 如果还是想要通过
ubuntu.exe config --default-user xxx这种方式设置默认用户, 目前最可靠的方法是下载离线的 Ubuntu WSL 安装包, 安装包中就有 ubuntu2004.exe, 然后通过这个ubuntu2004.exe 执行config --default-user xxx命令, 就可以一直默认为设置的用户了, 下载链接: https://docs.microsoft.com/en-us/windows/wsl/install-manual
6.8 Pycharm
废弃
注意: 一下破解方法已经失效, 在pycharm2022.3下.
6.9 优化占用

在使用wsl一段时间, 特别是安装大型的包之后, 内存剧烈膨胀.
sudo crontab -e -u root
# -e就是用当前登录用户的角色去执行
# sudo crontab 任务自动执行
| Element | Linux Name | Meaning |
|---|---|---|
| Daemon | ‘crond’ | Pronounced " demon" or " day-mon" . These are Linux background system processes. |
| Table | ‘crontab’ | You write rows to this table when entering a crontab command. Each ‘*’ asterisk represents a segment of time and a corresponding column in each row. |
| Job | Cron Job | The specific task to be performed described in a row, paired with its designated time id |
运行上述的crontab命令之后, 将会出现一个执行引擎的选择
选择: nano

# 在文件的底部添加下列内容
# /35表示45分钟执行一次
# 相关设置见上面的介绍
*/35 * * * * sync; echo 3 > /proc/sys/vm/drop_caches; touch /root/drop_caches_last_run
# 允许启动cron服务而无需输入root密码
sudo nano ~/.bashrc
[ -z "$(ps -ef | grep cron | grep -v grep)" ] && sudo /etc/init.d/cron start &> /dev/null
sudo visudo
# sudo: 可以让普通用户拥有root权限去执行命令, sudo的配置文件是/etc/sudoers.
# visudo: 通过visudo编辑/etc/sudoers, 可以检查语法.
# 打开文件
# 结尾添加一行
%sudo ALL=NOPASSWD: /etc/init.d/cron start
配置wsl文件, 该文件的路径为%UserProfile%, 保存文件名为.wslconfig, 限制对于硬件的使用.
[wsl2]
memory=4GB
swap=8GB
localhostForwarding=true
全部设置完成, 关闭wsl, 重新启动服务.
wsl --shutdown

# 查看自动任务运行的情况
sudo stat -c '%y' /root/drop_caches_last_run

alex@DESKTOP-F6VO5U4:/mnt/c/Users/Lian$ sudo stat -c '%y' /root/drop_caches_last_run
2023-01-10 10:15:01.486487600 +0800
经过上述的设置, 占用得到控制, 内存的波动范围在 200 - 800M波动.
6.10 问题
-
按照上述的
apt方式安装MySQLsudo service mysql status # 正常这个状态会显示出来 # 直接显示没有安装 alex@DESKTOP-F6VO5U4:~$ rpm -q mysql package mysql is not installed # 但是在dpkg -l下是可以看到MySQL已经被安装 alex@DESKTOP-F6VO5U4:~$ sudo mysql [sudo] password for alex: ERROR 2002 (HY000): Can't connect to local MySQL server through socket '/var/run/mysqld/mysqld.sock' (2) # 服务无法识别 sudo service mysql start # 和权限有关? chmod -R 770 /var/lib/mysql # 暂未测试 # mysql: unrecognized service -
MySQL添加了自启动, 但是还是开机没有自启动. -
大量的依赖包, 需要更低版本的支持, 就算是已经安装有.
-
一些服务找不到?
-
Ubuntu的Windows启动的shell界面, 会出现光标乱动的情况(特别是输出大量内容后, 光标的位置很容易出现乱跳).
6.11 C语言环境
会遇到一系列的依赖问题
alex@DESKTOP-F6VO5U4:~$ sudo apt install build-essential
Reading package lists... Done
Building dependency tree... Done
Reading state information... Done
Some packages could not be installed. This may mean that you have
requested an impossible situation or if you are using the unstable
distribution that some required packages have not yet been created
or been moved out of Incoming.
The following information may help to resolve the situation:

The following packages have unmet dependencies:
 dpkg-dev : Depends: bzip2 but it is not installable
 libc6-dev : Depends: libc6 (= 2.31-0ubuntu9.9) but 2.35-0ubuntu3.1 is to be installed
             Depends: libc-dev-bin (= 2.31-0ubuntu9.9) but it is not going to be installed
             Depends: libcrypt-dev but it is not going to be installed
E: Unable to correct problems, you have held broken packages.
alex@DESKTOP-F6VO5U4:~$ sudo apt install bzip2
Reading package lists... Done
Building dependency tree... Done
Reading state information... Done
Some packages could not be installed. This may mean that you have
requested an impossible situation or if you are using the unstable
distribution that some required packages have not yet been created
or been moved out of Incoming.
The following information may help to resolve the situation:

The following packages have unmet dependencies:
 bzip2 : Depends: libbz2-1.0 (= 1.0.8-2) but 1.0.8-5build1 is to be installed
E: Unable to correct problems, you have held broken packages.