前言
Author: HLA
GitHub: https://github.com/Kyouichirou
Version: 1.0
License: MIT
Description: Python, 进阶之道.
一. 常规
1.1 列表推导式
列表推导式支持非常复杂的操作, 但是会让代码的可阅读性降低, 过于精简的代码并不利于维护.
# 列表推导式不限于[]列表, 其他可迭代对象亦可
a = [1,2,3]

# 对a的元素进行x2
b = [e * 2 for e in a]

# 筛选内容, 大于2
c = [e for e in b if e > 2]
# [4, 6]

# 扁平化, 将内容全部转为一维元素
d = [[1,2,3], [4,5,6]]

# 展开, 从大到小 =>, 注意这里的元素长度是相同的
e = [k for e in d for k in e ]
# [1, 2, 3, 4, 5, 6]

# 集合中使用, 直接去重
print({x**2 for x in [1, 1, 2]})
# {1, 4}

# 合并字典(大小不一样的)
a = {
    "a": 1
}
b = {
    "b": 2,
    'c': 3
}
dx = {k: v for d in [a, b] for k, v in d.items()}
# {'a': 1, 'b': 2, 'c': 3}
1.2 yield
def test():
    return 1
    yield 0


print(test())
# <generator object test at 0x00000219A37C6B30>

# 相对比与(), 区别于[]
print((e * 3 for e in range(1, 3)))
# <generator object <genexpr> at 0x0000017B07216B30>
yield关键字特殊之处, 当yield存在时, 这个函数的返回值将是个generator, 而忽视return的存在, 那怕return在yield前面.
1.2.1 yield & yield from
def a():
	yield from range(5)

list(a())
# [0, 1, 2, 3, 4]
def b():
	yield range(5)

list(b())
# [range(0, 5)]
when used inside an iterable,
yield fromissues each element in another iterable, as if that item were coming from the first generator, from the point of view of the code calling the first generator.yield from => 从另一个迭代对象中获得内容, yield => 直接将内容返回
d = [11, [1, 2, 3], 7, 4, 5, [[6, 9, 10], ([21, 22], 18)]]

# 将上述不规则内容进行扁平化(一维化处理)

def flat(e):
    for _ in e:
        if isinstance(_, list) or isinstance(_, tuple):
            # 注意这里的使用的是yield from
            # yield from
            yield from flat(_)
        else:
            yield _


for o in flat(d):
    print(o)
1.2.2 yield & 协程
yield在协程操作中扮演着关键的角色.
# 对比于yield, 协程
async def test():
    print('test')


a = test()
print(a)
# 返回一个协程对象
# <coroutine object test at 0x0000023C70009740>
与yield from之相关密切的是@asyncio.coroutine(这个装饰器已经在3.8之后被废弃).
@asyncio.coroutine
def foo():
    yield from ....
import time


def task_1():
    while True:
        print("before: task1")
        time.sleep(1)
        # yield在这里起到, 交还控制权, 在不同的任务中
        x = yield
        if x:
            print(f'after: task1: some data: {x}')
        else:
            print("after: task1")
        time.sleep(1)


def task_2():
    while True:
        print("before: task_2")
        time.sleep(1)
        yield
        print("after: task_2")
        time.sleep(1)


if __name__ == "__main__":
    t1 = task_1()
    t2 = task_2()
    # 先得到两个生成器
    # 在没有执行next() 操作之前, 这两个函数并没有执行
    for i in range(2):
        # 执行任务1
        if i == 0:
            next(t1)
        else:
            # 向子任务发送消息
            t1.send('hello')
        # 主任务
        print("\n main task \n")
        # 执行任务2
        next(t2)
before: task1
main task
before: task_2
after: task1: some data: hello
before: task1main task
after: task_2
before: task_2
如此交替的执行, 就实现了对多个任务的协同执行.
def average():
    total = 0
    count = 0
    avg = None
    while True:
        num = yield avg
        total += num
        count += 1
        avg = total / count


def wrap_average(generator):
    yield from generator


def main(wrap):
    # 等价于next()
    # 第一次运行必须执行next()先
    wrap.__next__()
    print(wrap.send(10))
    print(wrap.send(20))
    print(wrap.send(30))
    print(wrap.send(40))


g = average()
main(g)
1.3 with语句
# 保证文件句柄被关闭
with open(file) as f:
    # 就算这里出现错误
    pass
# 等价于
try:
    f = open(file)
    pass
except Exception:
    f.close()
1.3.1 自定义class实现
class Test:
    def __enter__(self):
        return self

    def __exit__(self, exc_type, exc_val, exc_tb):
        # do something
        pass

with Test() as t:
    pass
1.3.2 contextlib的实现
from contextlib import contextmanager

@contextmanager
def file_open(path):
    try:
        f = open(path,"w")
        yield f
    except OSError:
        print("some errors!")
    finally:
        print("file close")
        f_obj.close()

if __name__ == "__main__":
    with file_open("test.txt") as f:
        f.write("Testing context managers")
# 进一步扩展`contextlib`的使用, 忽视在执行中的错误.
import os
from contextlib import suppress

with suppress(FileNotFoundError):
    os.remove('file')
# 相当于
try:
    os.remove('file')
except:
    pass
## 上下文管理器和yield, break之间的使用优先级

import time
import contextlib


@contextlib.contextmanager
def runtime(value):
    time.sleep(1)
    print("start: a = " + str(value))
    yield
    print("end: a = " + str(value))


a = 0
while True:
    a += 1
    with runtime(a):
        if a % 2 == 0:
            break
'''
start: a = 1
end: a = 1
start: a = 2
end: a = 2
'''
1.5 map / filter / reduce
// js中的同名函数
> [1,2,3].map(e => e > 1); // 生成列表
[ false, true, true ]
> [1,2,3].filter(e => e > 1); // 筛选内容
[ 2, 3 ]
> [1,2,3].reduce((total, e) => total + e); // 聚合
6
这几个函数的使用很大程度的一部分功能被列表推导式所取代, 相近的功能和JavaScript当中对应的同名函数.
1.5.1 map
这里的迭代, 既可以是元素也可以是函数
需要注意的时, 迭代的对象并不限于对象, 同样函数也支持.
map(function, iterable, ...)
# 迭代的是元素
a = [1, 2, 3]

b = map(lambda s: s ** 2, a)

print(list(b))
# 迭代的是函数
def a(x):
    return x * x


def b(x):
    return x + x


# 注意这个特性
funcs = [a, b]
for i in range(5):
    value = map(lambda x: x(i), funcs)
    print(tuple(value))
1.5.2 reduce
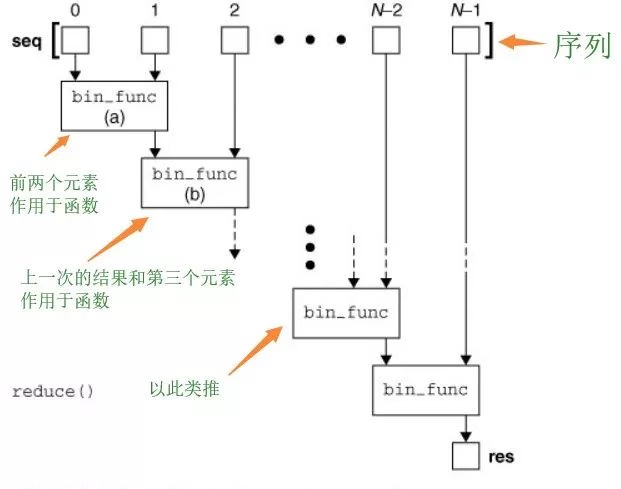
# 函数, 可迭代对象, 初始值(注意这个)
reduce(function, iterable[, initializer])
# 阶乘
from functools import reduce
# 定义函数
def f(x,y):
    return x*y
# 定义序列,含1~10的元素
items = range(1,11)
# 使用reduce方法
result = reduce(f,items)
print(result)


# 累加
from functools import reduce

a = [1, 2, 3]


def s_sum(x, y):
    return x + y


print(reduce(s_sum, a, 0))
1.5.3 filter
这个函数使用列表推导式来得更容易实现.
filter(function, iterable)
def is_odd(n):
    return n % 2 == 1

data = [1, 2, 3, 4, 5, 6, 7, 8, 9, 10]
newlist = filter(is_odd, data)
print(list(newlist))

# 列表推导式
a = [n for n in data if n % 2 == 1]
1.6 具名元组
简单理解, 具名元组可以被视作自定义的数据类型.
' 在`VBA`中的自定义数据类型.
Type People
    Name As String
    Age As Integer
End Type
from typing import NamedTuple

class Point(NamedTuple):
    x: int
    y: int = 0

p = Point(1)
print(p.x, p.y)  # 1 0
注意: 使用具名元组, 在pycharm上一直提示Unexpected argument, 使用3.7版本的写法还是继续出现这个问题.
from objprint import op


class City:
    # 由于只是需要实现数据部分的特性, 加上slots节省资源
    __slots__ = ['_name', '_country', '_population', '_coordinates']

    def __init__(self, name: str, country: str, population: str, coordinates: tuple):
        self._name = name
        self._country = country
        self._population = population
        self._coordinate = coordinates

    @property
    def name(self):
        return self._name

    @property
    def country(self):
        return self._country

    @property
    def population(self):
        return self._population

    @property
    def coordinates(self):
        return self._coordinates


tokyo = City('Tokyo', "JP", '36.93', ('35.68', '139,69'))

op(tokyo)

'''
<City 0x2c52bbb0440
  .coordinates = ('35.68', '139,69'),
  .country = 'JP',
  .name = 'Tokyo',
  .population = '36.93'
>
'''

tokyo = {
    'name': 'Tokyo',
    'country': 'JP',
    'population': '36.93',
    'coordinates': ('35.68', '139,69')
}
通过类或者字典来实现类似的功能.
from collections import namedtuple
# 生成一个City类
# 希望这个city数据
# 包含特定的信息, 如名称, 所属国家, 人口, 经纬度
# 当然不需要具名元组也可以实现
# City("Tokyo", 'JP', '36.93', ('35.68','139,69')), 直接以元组的形式进行数据传递
# 麻烦的在于取值, 如希望取出经纬度, 需要 City[3]进行取值
# 这不利于代码的阅读, 而且需要记住数据所在元组的位置(index)
City = namedtuple("City", "name country polulation coordinates")

# 3.7后的写法, City = namedtuple("City", ['name', 'country', 'polulation', 'coordinates'])
# 实例化
tokyo = City("Tokyo", 'JP', '36.93', ('35.68','139,69'))

print(tokyo)
# City(name='Tokyo', country='JP', polulation='36.93', coordinates=('35.68', '139,69'))

print(tokyo.name)
# Tokyo

# 打印字段名
print(City._fields)
('name', 'country', 'polulation', 'coordinates')

# 生成新实例
LatLong = namedtuple('LatLong', 'lat long')
Xiamen_tuple = ('Xiemen', 'China', '40,54', LatLong(24.26,118.03))
Xiamen = City._make(Xiamen_tuple)

print(Xiamen)
# City(name='Xiemen', country='China', polulation='40,54', coordinates=(24.26, 118.03))

# 将具名元组转为OrderDict
Xiamen_dict = Xiamen._asdict()
print(Xiamen_dict)
# OrderedDict([('name', 'Xiemen'), ('country', 'China'), ('polulation', '40,54'), ('coordinates', LatLong(lat=24.26, long=118.03))])
1.7 偏函数/函数柯里化
简而言之, 预先使用部分参数的函数.
def add(x):
    def add1(y, z):
        return x + y + z

    return add1


print(add(1)(2, 3))
利用 functools直接实现
from functools import partial


def test(a, b, c):
    return a + b + c


test_c = partial(test, a=1)

print(test_c(b=2, c=3))
1.7.1 偏函数和装饰器
装饰器乍看之下, 看起来很复杂, 但实际上可以拆解开来.
import time


# 一个简单的装饰器-计时器
# 需要注意的是, 这种装饰器会导致func的名称发生变化
def decorator(msg):
    def decoration(func):
        def wrapper(*args, **kwargs):
            s = time.time()
            print(msg)
            func(*args, **kwargs)
            print(time.time() - s)

        return wrapper

    return decoration


def test():
    time.sleep(0.2)

# 等价于
'''
@decorator('this is a test')
def test():
    time.sleep(0.2)

test()
'''
# 先传入部分的参数
a = decorator('this is a test')(test)
# 执行该偏函数
a()
1.8 '*'(星号)和"**"(双星号)的使用
1.8.1 常规
作为符号的使用, * 乘号, ** 次幂符号
需要注意的是 ** 次幂的求解方式
print(2 ** 3)
# 8
print( 2 ** 3.0)
# 8.0
print(pow(2, 3))
# 8
print(pow(2, 3.0))
# 8.0
import math
print(math.pow(2, 3))
# 浮点数
# 8.0
主要差异在于精度, 传入参数, 性能上, 相关详细的差异.
1.8.2 参数
>>> def a(b=[]):
...     b.append(3)
...     print(b)
...
>>>
>>> a()
[3]
>>>
>>> a() # 这里
[3, 3]
>>>
注意事项: 注意不要在函数中使用可变对象(如列表, 字典)作为默认参数, python载入函数时只加载一次, 不同的调用该函数, 使用的都是同一可变对象.(假设该默认参数没有被传入的参数所覆盖)
实现对参数的不确定的传入(不确定个数, 不确定参数名称)
# 在参数上使用符号
def test(*args, **kwargs):
    print(args)
    print(kwargs)


test(1, 2, 23, 3, a=10)
# (1, 2, 23, 3)
# {'a': 10}

def test(a, b):
    print(a + b)

# 在参数端使用符号
test(*[1,3])
# 4

def test(a, b):
    print(a + b)


test(**{'a':1, "b": 2})
# 3
1.8.3 解包
print(*'abc')
#a b c
# 快速的列表创建
a = [*'abc']

print(a)

a, b, *c = 'abcde'

print(a)
print(b)
print(c)

# 合并字典
a = {'a': 1}
b = {'b': 2}
c = {
    **a,
    **b
}
# 如果相同, 则后来的覆盖前面的
print(c)
1.9 内建-其他
1.9.1 zip
快速字典生成
a = ['a', 'b', 'c', 'd']
b = [1, 2, 3]
dic = dict(zip(a, b))
# 将按顺序合并对应键值对, 多余的部分将不会被纳入进来
print(dic)
# {'a': 1, 'b': 2, 'c': 3}
字典中的计算
dic = {'a': 1, "b": 3, "c": 2}
print(min(zip(dic.values(), dic.keys())))
# (1, 'a')
1.9.2 属性相关
hasattr, 判断是否具有属性getattr, 获取属性setattr, 设置属性,setattr(x, 'foobar', 123)等价于x.foobar = 123delattr, 删除属性
class Web:
    def login(self):
        print('welcome')

    def register(self):
        print('login')

    def save(self):
        print('storage')


## 时间类似于JavaScript的方法的执行
obj = Web()
if f := getattr(obj, 'login', None):
    f()
类似于JavaScript
{
    const funcs = {
        a() {
            console.log('a')
        },
        b(){
            console.log('b')
        }
    }

    const a = funcs['a'];
    a && a();
}
// a
1.9.3 set
注意数据的类型是可哈希对象(hashable).
a = ['a', 'b', 'c']

a_s = set(a)

b = ['a', 'd']
b_s = set(b)

## 找出在a中不包含的b元素
print(b_s.difference(a_s))
# {'d'}
# 找出交集
print(b_s.intersection(a_s))
# {'a'}

# 利用合并操作符, 可以将两个set合并在一起
c = a_s | b_s

for e in c:
    print(e)
1.10 变量
python并未提供类似JavaScript(ES6)的 const, let, var等声明变量方式, 提供全局的global, 局部(函数)nonlocal.
1.10.1 命名空间
- 内置名称空间
存放的是一些内置函数, 比如input, print, list, len等. - 全局名称空间
存放的是当前py文件中(除去函数,类内部的)变量与值的对应关系以及函数名与函数的内存地址的对应关系. - 局部(临时)名称空间
存放的是函数内部的变量与值的对应关系.
当一个函数被调用时,开辟临时名称空间, 当函数执行结束后, 临时名称空间消失.
如果一个函数被调用多次,则每调用一次, 都要重新开辟临时名称空间. - 加载顺序
内置命名空间(程序运行时开始加载...)
全局命名空间(程序运行时加载,从上到下...)
局部命名空间(程序运行中加载,调用时才加载...) - 取值顺序
遵循就近原则(**LEGB**原则), 注意这个加载的顺序, 在创建者自定义的变量时, 注意别覆盖掉内置的变量或者引用的第三方库的名称.
从局部找时,局部名称空间 => 全局名称空间 => 内置名称空间
从全局找时,全局名称空间 => 内置名称空间
1.10.2 作用域
两个作用域: 全局作用域和局部作用域
全局作用域: 全局命名空间 + 内置命名空间
局部作用域: 局部命名空间
局部作用域可以引用全局作用域的变量, 但是不能修改全局作用域的变量.
# 有别
count = 1
def func():
    count += 1
    print(count)

func()

# 报错信息:local variable 'count' referenced before assignment
# 解释:局部作用域不能改变全局作用域的变量,当Python解释器读取到局部作用域时,发现你对一个变量进行修改操作,解释器会认为你在局部已经定义过这个局部变量了,解释器就会从局部找这个局部变量,其实并没有定义,所以报错。
# 同样的原理
def test():
    a = 1
	# 这种情况同样不行
    def abc():
        a += 1
        print(a)

    abc()


test()
1.10.3 字节码
from dis import dis

a = 10


def test():
    print(a)
    # a += 1
    # print(a)


dis(test)
'''
167           0 LOAD_GLOBAL              0 (print)
              2 LOAD_GLOBAL              1 (a) , 这里可以看到a加载的来源是global Varian, 全局变量
              4 CALL_FUNCTION            1
              6 POP_TOP
              8 LOAD_CONST               0 (None)
             10 RETURN_VALUE
'''

##.................... 变换一下
from dis import dis

a = 10


def test():
    # print(a)
    a += 1
    print(a)


dis(test)
'''
168           0 LOAD_FAST                0 (a), 可以看到这里的a, 指向了局部变量, 显然局部变量的a尚未初始化(未分配变量)
              2 LOAD_CONST               1 (1)
              4 INPLACE_ADD
              6 STORE_FAST               0 (a)

169           8 LOAD_GLOBAL              0 (print)
             10 LOAD_FAST                0 (a)
             12 CALL_FUNCTION            1
             14 POP_TOP
             16 LOAD_CONST               0 (None)
             18 RETURN_VALUE
'''

## 声明全局global
## 假如再闭包函数, 则使用nonlocal
## 但是不建议使用这种大范围的变量操作的方式
from dis import dis

a = 10

'''
def a():
	i = 0
	def b():
		nonlocal i
		i += 1
'''

def test():
    # print(a)
    global a
    a += 1
    print(a)


dis(test)
'''
169           0 LOAD_GLOBAL              0 (a), 这里的a重新指向全局变量, 而全局变量的a已经声明
              2 LOAD_CONST               1 (1)
              4 INPLACE_ADD
              6 STORE_GLOBAL             0 (a)

170           8 LOAD_GLOBAL              1 (print)
             10 LOAD_GLOBAL              0 (a)
             12 CALL_FUNCTION            1
             14 POP_TOP
             16 LOAD_CONST               0 (None)
             18 RETURN_VALUE
'''
from dis import dis


def test_a():
    a = 10

    def test():
        # print(a)
        a += 1
        print(a)


dis(test_a)

# ----------------------
a = 1


def test(x=a):
    x += 1
    print(x)


dis(test)
'''
 47           0 LOAD_FAST                0 (x)
              2 LOAD_CONST               1 (1)
              4 INPLACE_ADD
              6 STORE_FAST               0 (x)

 48           8 LOAD_GLOBAL              0 (print)
             10 LOAD_FAST                0 (x)
             12 CALL_FUNCTION            1
             14 POP_TOP
             16 LOAD_CONST               0 (None)
             18 RETURN_VALUE
'''
不管是在全局变量还是在一个闭包函数, 其原理都是类似的.
需要注意匿名函数lambda
def test():
    a = [lambda x: x + n for n in range(5)]

    for f in a:
        print(f(0))
	# 4,4,4,4,4
    b = [lambda x, n=n: x + n for n in range(5)]

    for f in b:
        print(f(0))
	# 0,1,2,3,4

dis(test)
'''
45           0 LOAD_CONST               1 (<code object <listcomp> at 0x000001B24ADC72F0, file "C:\Users\Lian\AppData\Roaming\JetBrains\PyCharmCE2022.2\scratches\test_pack\w.py", line 45>)
              2 LOAD_CONST               2 ('test.<locals>.<listcomp>')
              4 MAKE_FUNCTION            0
              6 LOAD_GLOBAL              0 (range)
              8 LOAD_CONST               3 (5)
             10 CALL_FUNCTION            1
             12 GET_ITER
             14 CALL_FUNCTION            1
             16 STORE_FAST               0 (a)

 47          18 LOAD_FAST                0 (a)
             20 GET_ITER
        >>   22 FOR_ITER                16 (to 40)
             24 STORE_FAST               1 (f)

 48          26 LOAD_GLOBAL              1 (print)
             28 LOAD_FAST                1 (f)
             30 LOAD_CONST               4 (0)
             32 CALL_FUNCTION            1
             34 CALL_FUNCTION            1
             36 POP_TOP
             38 JUMP_ABSOLUTE           22

 50     >>   40 LOAD_CONST               5 (<code object <listcomp> at 0x000001B24ADC7450, file "C:\Users\Lian\AppData\Roaming\JetBrains\PyCharmCE2022.2\scratches\test_pack\w.py", line 50>)
             42 LOAD_CONST               2 ('test.<locals>.<listcomp>')
             44 MAKE_FUNCTION            0
             46 LOAD_GLOBAL              0 (range)
             48 LOAD_CONST               3 (5)
             50 CALL_FUNCTION            1
             52 GET_ITER
             54 CALL_FUNCTION            1
             56 STORE_FAST               2 (b)

 52          58 LOAD_FAST                2 (b)
             60 GET_ITER
        >>   62 FOR_ITER                16 (to 80)
             64 STORE_FAST               1 (f)

 53          66 LOAD_GLOBAL              1 (print)
             68 LOAD_FAST                1 (f)
             70 LOAD_CONST               4 (0)
             72 CALL_FUNCTION            1
             74 CALL_FUNCTION            1
             76 POP_TOP
             78 JUMP_ABSOLUTE           62
        >>   80 LOAD_CONST               0 (None)
             82 RETURN_VALUE

Disassembly of <code object <listcomp> at 0x000001B24ADC72F0, file "C:\Users\Lian\AppData\Roaming\JetBrains\PyCharmCE2022.2\scratches\test_pack\w.py", line 45>:
 45           0 BUILD_LIST               0
              2 LOAD_FAST                0 (.0)
        >>    4 FOR_ITER                16 (to 22)
              6 STORE_DEREF              0 (n)
              8 LOAD_CLOSURE             0 (n)
             10 BUILD_TUPLE              1
             12 LOAD_CONST               0 (<code object <lambda> at 0x000001B24ABE0190, file "C:\Users\Lian\AppData\Roaming\JetBrains\PyCharmCE2022.2\scratches\test_pack\w.py", line 45>)
             14 LOAD_CONST               1 ('test.<locals>.<listcomp>.<lambda>')
             16 MAKE_FUNCTION            8 (closure)
             18 LIST_APPEND              2
             20 JUMP_ABSOLUTE            4
        >>   22 RETURN_VALUE

Disassembly of <code object <lambda> at 0x000001B24ABE0190, file "C:\Users\Lian\AppData\Roaming\JetBrains\PyCharmCE2022.2\scratches\test_pack\w.py", line 45>:
 45           0 LOAD_FAST                0 (x)
              2 LOAD_DEREF               0 (n)
              4 BINARY_ADD
              6 RETURN_VALUE

Disassembly of <code object <listcomp> at 0x000001B24ADC7450, file "C:\Users\Lian\AppData\Roaming\JetBrains\PyCharmCE2022.2\scratches\test_pack\w.py", line 50>:
 50           0 BUILD_LIST               0
              2 LOAD_FAST                0 (.0)
        >>    4 FOR_ITER                16 (to 22)
              6 STORE_FAST               1 (n)
              8 LOAD_FAST                1 (n)
             10 BUILD_TUPLE              1
             12 LOAD_CONST               0 (<code object <lambda> at 0x000001B24ADC73A0, file "C:\Users\Lian\AppData\Roaming\JetBrains\PyCharmCE2022.2\scratches\test_pack\w.py", line 50>)
             14 LOAD_CONST               1 ('test.<locals>.<listcomp>.<lambda>')
             16 MAKE_FUNCTION            1 (defaults)
             18 LIST_APPEND              2
             20 JUMP_ABSOLUTE            4
        >>   22 RETURN_VALUE

Disassembly of <code object <lambda> at 0x000001B24ADC73A0, file "C:\Users\Lian\AppData\Roaming\JetBrains\PyCharmCE2022.2\scratches\test_pack\w.py", line 50>:
 50           0 LOAD_FAST                0 (x)
              2 LOAD_FAST                1 (n)
              4 BINARY_ADD
              6 RETURN_VALUE

'''
# 这里有个有趣的问题
# 和下面的JavaScript做一个对比
from dis import dis

def main():
    funs = []
    for n in range(3):
        def f():
            return f.index
        f.index = n
        funs.append(f)
	# 注意这里
    print([f() for f in funs])
	'''
	[2, 2, 2]
	'''
    # 和这里的差异
    for f in funs:
        print(f())
        '''
            0
            1
            2
        '''


if __name__ == '__main__':
    dis(main)
 4           0 BUILD_LIST               0
              2 STORE_FAST               0 (funs)

  5           4 LOAD_GLOBAL              0 (range)
              6 LOAD_CONST               1 (3)
              8 CALL_FUNCTION            1
             10 GET_ITER
        >>   12 FOR_ITER                32 (to 46)
             14 STORE_FAST               1 (n)

  6          16 LOAD_CLOSURE             0 (f)
             18 BUILD_TUPLE              1
             20 LOAD_CONST               2 (<code object f at 0x0000024A807703A0, file "d:\workspace_python\test.py", line 6>)
             22 LOAD_CONST               3 ('main.<locals>.f')
             24 MAKE_FUNCTION            8 (closure)
             26 STORE_DEREF              0 (f)

  8          28 LOAD_FAST                1 (n)
             30 LOAD_DEREF               0 (f)
             32 STORE_ATTR               1 (index)

  9          34 LOAD_FAST                0 (funs)
             36 LOAD_METHOD              2 (append)
             38 LOAD_DEREF               0 (f)
             40 CALL_METHOD              1
             42 POP_TOP
             44 JUMP_ABSOLUTE           12

 11     >>   46 LOAD_GLOBAL              3 (print)
             48 LOAD_CONST               4 (<code object <listcomp> at 0x0000024A807702F0, file "d:\workspace_python\test.py", line 11>)
             50 LOAD_CONST               5 ('main.<locals>.<listcomp>')
             52 MAKE_FUNCTION            0
             54 LOAD_FAST                0 (funs)
             56 GET_ITER
             58 CALL_FUNCTION            1
             60 CALL_FUNCTION            1
             62 POP_TOP

 13          64 LOAD_FAST                0 (funs)
             66 GET_ITER
        >>   68 FOR_ITER                14 (to 84)
             70 STORE_DEREF              0 (f)

 14          72 LOAD_GLOBAL              3 (print)
             74 LOAD_DEREF               0 (f)
             76 CALL_FUNCTION            0
             78 CALL_FUNCTION            1
             80 POP_TOP
             82 JUMP_ABSOLUTE           68
        >>   84 LOAD_CONST               0 (None)
             86 RETURN_VALUE

Disassembly of <code object f at 0x0000024A807703A0, file "d:\workspace_python\test.py", line 6>:
  7           0 LOAD_DEREF               0 (f)
              2 LOAD_ATTR                0 (index)
              4 RETURN_VALUE

Disassembly of <code object <listcomp> at 0x0000024A807702F0, file "d:\workspace_python\test.py", line 11>:
 11           0 BUILD_LIST               0
              2 LOAD_FAST                0 (.0)
        >>    4 FOR_ITER                10 (to 16)
              6 STORE_FAST               1 (f)
              8 LOAD_FAST                1 (f)
             10 CALL_FUNCTION            0
             12 LIST_APPEND              2
             14 JUMP_ABSOLUTE            4
        >>   16 RETURN_VALUE
// 构造一个类似的js
{
    const arr = [];
    for (let i = 0; i < 3; i++) {
        const f = () => f.index;
        f.index = i;
        arr.push(f)
    }

    const tmp = arr.map(f => f());

    console.log(tmp);
    //  [0, 1, 2]
    // const let 两种声明方式很好的解决了局部变量和全局变量的冲突问题
}
{
    const arr = [];
    for (var i = 0; i < 3; i++) {
        // 将这二者的let => 改成 var
        // var的声明是作用于全局的
        var f = () => f.index;
        f.index = i;
        arr.push(f)
    }

    const tmp = arr.map(f => f());

    console.log(tmp);
    // [2, 2, 2]
}
1.11 弱引用
弱引用在内存管理上发挥着不小的作用.
简而言之就是尽早让内存回收机制可以将占用大内存的对象, 不需要持续存活的对象, 用完马上回收.
A primary use for weak references is to implement caches or mappings holding large objects, where it’s desired that a large object not be kept alive solely because it appears in a cache or mapping.
弱引用的主要用途是实现保存大对象的高速缓存或映射,但又不希望大对象仅仅因为它出现在高速缓存或映射中而保持存活。
import weakref


class Test:
    def __del__(self):
        print('del...')


a = Test()
b = a
a = None
# a赋值为none, 但是b依然还是指向引用
print(b)

# <__main__.Test object at 0x000001DA8D900970>
# del...

# 两种区别
c = Test()
d = weakref.ref(c)
# c赋值为空, 该对象马上被回收销毁
c = None
print(d)

# del...
# <weakref at 0x00000277526E61D0; dead>
1.12 缓存
cache, 这是一个3.9版本引入的新特性.
需要注意的是传入的参数必须是可哈希的对象, 和下面的lru_cache相同.
返回值与
lru_cache(maxsize=None)相同,创建一个查找函数参数的字典的简单包装器。 因为它不需要移出旧值,所以比带有大小限制的lru_cache()更小更快。
from functools import cache


@cache
def factorial(n, mode=True):
    if mode:
        print(n)
    return n * factorial(n - 1, False) if n else 1


factorial(3)

factorial(4)

factorial(3)
等价于lru_cache
注意这里的可哈希, 意味着例如列表, 字典这种不可哈希的, 无法使用.
一个为函数提供缓存功能的装饰器,缓存 maxsize 组传入参数,在下次以相同参数调用时直接返回上一次的结果。用以节约高开销或I/O函数的调用时间。
由于使用了字典存储缓存,所以该函数的固定参数和关键字参数必须是可哈希的。
@lru_cache(10)
def factorial(n, test: dict, mode=True):
    if mode:
        print(n)
        print(test)
    return n * factorial(n - 1, {}, False) if n else 1


factorial(3, {})
假如传入的函数的参数包含不可哈希的对象, 将会直接报错.
TypeError: unhashable type: 'dict'
from functools import lru_cache


@lru_cache(10)
def factorial(n, mode=True):
    if mode:
        print(n)
    return n * factorial(n - 1, False) if n else 1


factorial(3)

factorial(4)

factorial(3)
需要注意的是缓存导致的对象没有引用之后, 并未被垃圾回收的问题.
import time
from functools import lru_cache
from typing import TypeVar

Number = TypeVar("Number", int, float, complex)

class TestLruCache:

    def __init__(self, delay: int = 1) -> None:
        self.delay = delay
        self.calculate = lru_cache(maxsize=128)(self._calculate)

    '''
    @lru_cache(maxsize=128)
    def calculate(self, *args: Number) -> Number:
        time.sleep(self.delay)
        return sum(args)
    '''
    # 将缓存的方式改成
    def _calculate(self, *args: Number) -> Number:
        time.sleep(self.delay)
        return sum(args)

    def __del__(self) -> None:
        print("Deleting instance ...")
1.13 切片
越界的情况
a = [1, 23, 3]

print(a[3])
# error

print(a[3:])
# []
# 返回空的[]
a = 'abcde'

b = [1, 2, 3, 4, 5]

# 参数时可以为负数的, 负数, 则意味着反转

print(a[-1])

print(a[1:-1])

print(a[0:3:2])

print(b[0: 3: 2])

print(b[::2])

print(b[:2:])

print(b[2::])
'''
e
bcd
ac
[1, 3]
[1, 3, 5]
[1, 2]
[3, 4, 5]
'''
针对序列的切片操作, 可以是列表, 也可以是字符串.
a:b:c将切片理解为一个函数的操作, 可将a, b ,c视作三个传入的可选参数.
a: start, 起始参数
b: end, 截至参数
c: step, 步进参数(即切片间隔)
相应的切片方式同样适用于numpy, pandas等的操作.
1.14 字典
需要注意字典的有序性(低版本的python).
# 构造字典
print(dict.fromkeys(['a', 'b'], [1, 2]))

# {'a': [1, 2], 'b': [1, 2]}
# 弹出元素
dic = {}

dic['a'] = 1
dic['n'] = 2

print(dic.popitem())

print(dic)
# 后进先出
'''
('n', 2)
{'a': 1}
'''
# 字典的运算
a = {
    'x': 1,
    'y': 2,
    'z': 3
}
b = {
    'w': 10,
    'x': 11,
    'y': 2
}

print(a.keys() & b.keys())

print(a.keys() - b.keys())
# 不支持values
# print(a.values() & b.values())

print(a.items() & b.items())
'''
{'y', 'x'}
{'z'}
{('y', 2)}
'''
# 合并字典
from collections import ChainMap

a = {'a': 1}
b = {'b': 2}
a.update(b)
print(a)
# {'a': 1, 'b': 2}

c = ChainMap(a, b)

print(c)
# ChainMap({'a': 1, 'b': 2}, {'b': 2})
1.15 异常
1.15.1 异常的继承树
BaseException (基类)
 ``+``-``-` `SystemExit
 ``+``-``-` `KeyboardInterrupt
 ``+``-``-` `GeneratorExit
 ``+``-``-` `Exception
   ``+``-``-` `StopIteration
   ``+``-``-` `StandardError
   ``|  ``+``-``-` `BufferError
   ``|  ``+``-``-` `ArithmeticError
   ``|  |  ``+``-``-` `FloatingPointError
   ``|  |  ``+``-``-` `OverflowError
   ``|  |  ``+``-``-` `ZeroDivisionError
   ``|  ``+``-``-` `AssertionError
   ``|  ``+``-``-` `AttributeError
   ``|  ``+``-``-` `EnvironmentError
   ``|  |  ``+``-``-` `IOError
   ``|  |  ``+``-``-` `OSError
   ``|  |     ``+``-``-` `WindowsError (Windows)
   ``|  |     ``+``-``-` `VMSError (VMS)
   ``|  ``+``-``-` `EOFError
   ``|  ``+``-``-` `ImportError
   ``|  ``+``-``-` `LookupError
   ``|  |  ``+``-``-` `IndexError
   ``|  |  ``+``-``-` `KeyError
   ``|  ``+``-``-` `MemoryError
   ``|  ``+``-``-` `NameError
   ``|  |  ``+``-``-` `UnboundLocalError
   ``|  ``+``-``-` `ReferenceError
   ``|  ``+``-``-` `RuntimeError
   ``|  |  ``+``-``-` `NotImplementedError
   ``|  ``+``-``-` `SyntaxError
   ``|  |  ``+``-``-` `IndentationError
   ``|  |     ``+``-``-` `TabError
   ``|  ``+``-``-` `SystemError
   ``|  ``+``-``-` `TypeError
   ``|  ``+``-``-` `ValueError
   ``|     ``+``-``-` `UnicodeError
   ``|       ``+``-``-` `UnicodeDecodeError
   ``|       ``+``-``-` `UnicodeEncodeError
   ``|       ``+``-``-` `UnicodeTranslateError
   ``+``-``-` `Warning
      ``+``-``-` `DeprecationWarning
      ``+``-``-` `PendingDeprecationWarning
      ``+``-``-` `RuntimeWarning
      ``+``-``-` `SyntaxWarning
      ``+``-``-` `UserWarning
      ``+``-``-` `FutureWarning
    ``+``-``-` `ImportWarning
    ``+``-``-` `UnicodeWarning
    ``+``-``-` `BytesWarning
1.15.2 自定义异常类
## 构建一个简单的自定义异常类
class CustomError(Exception):
    def __init__(self, data):
        self.__data = data

    def __str__(self):
        return f"some data have out of range: {self.__data}"


if 1 > 0:
    raise CustomError(1)
    '''
    Traceback (most recent call last):
  	File "C:\Users\Lian\AppData\Roaming\JetBrains\PyCharmCE2022.2\scratches\test_pack\w.py", line 47, in <module>
    raise CustomError(1)
	__main__.CustomError: some data have out of range: 1
    '''
1.16 杂项
容易忽略, 或者想不明白.
1.16.1 sum函数合并数组
a = [1, 2, 3]

b = ['a', 'b']

c = sum((a, b), [])

print(c)
# [1, 2, 3, 'a', 'b']

# 等价于 c = a + b
# 数组可以直接使用 + 号来合并
1.16.2 小数据池
A Python program is constructed from code blocks. A block is a piece of Python program text that is executed as a unit. The following are blocks: a module, a function body, and a class definition. Each command typed interactively is a block. A script file (a file given as standard input to the interpreter or specified as a command line argument to the interpreter) is a code block. A script command (a command specified on the interpreter command line with the ‘-c‘ option) is a code block. The string argument passed to the built-in functions eval() and exec() is a code block.
A code block is executed in an execution frame. A frame contains some administrative information (used for debugging) and determines where and how execution continues after the code block’s execution has completed.这python的块构造机制有关.
数字
The current implementation keeps an array of integer objects for all integers between -5 and 256, when you create an int in that range you actually just get back a reference to the existing object. So it should be possible to change the value of 1. I suspect the behaviour of Python in this case is undefined.字符串
Incomputer science, string interning is a method of storing only onecopy of each distinct string value, which must be immutable. Interning strings makes some stringprocessing tasks more time- or space-efficient at the cost of requiring moretime when the string is created or interned. The distinct values are stored ina string intern pool. –引自维基百科
上述内容可以理解为python为了加快运行速度, 对部分的常用的内容提供了类似于缓存的机制, 数字在-5 - 256之间的都被纳入缓存机制(减少底层的c代码的构造对象的过程).
>>> a = 1
>>> b = 1
>>> a is b
True
>>> c = -6
>>> d = -6
>>> c is d
False
>>> e = 2
>>> f = 2
>>> e is f
True
>>> g = 256
>>> h = 256
>>> g is h
True
>>> i = 257
>>> k = 257
>>> i is k
False
>>> m = 0
>>> n = 0
>>> m is n
True
>>>
from sys import intern
# 手动方式强制实现
1.16.3 finally-坑
return除了和yield一起时, 还需要注意和finally的使用场景.
def test():
    try:
        print('a')
        return 1
    finally:
        print('b')
        return 0


print(test())
# 结果是 0
# return 1并没有阻止代码继续的执行
# 字节码
111           0 SETUP_FINALLY            6 (to 8)

112           2 POP_BLOCK

114           4 LOAD_CONST               1 (0)
              6 RETURN_VALUE
        >>    8 POP_TOP
             10 POP_TOP
             12 POP_TOP
             14 POP_EXCEPT
             16 LOAD_CONST               1 (0)
             #
             18 RETURN_VALUE
             20 RERAISE
             22 LOAD_CONST               0 (None)
             #
             24 RETURN_VALUE

# 直接返回内容的字节码
111           0 LOAD_CONST               1 (1)
              2 RETURN_VALUE
## 当yield和finally同时使用时
# yield的优先级更高
def gen(text):
    try:
        for line in text:
            try:
                yield int(line)
            except:
                # Ignore blank lines - but catch too much!
                pass
    finally:
        # 这部分的代码没有被执行
        print('Doing important cleanup')


text = ['1', '', '2', '', '3']

if any(n > 1 for n in gen(text)):
    print('Found a number')

print('Oops, no cleanup.')
1.16.4 可阅读性
a = 2_012_210
# 假如数字过长

# 换行
# 换行符
a = 'this is a long string: ' \
    'A finally clause is always executed before leaving the try statement, whether an exception has occurred or not.'

# 括号
a = ('this is a long string: '
     'A finally clause is always executed before leaving the try statement, whether an exception has occurred or not.')

# 三点符
a = '''this is a long string:
     'A finally clause is always executed before leaving the try statement, whether an exception has occurred or not.'''
1.16.5 参数
# / 符号的作用
def a(c, b, /, d, e):
    return c + b
# 等价
# / 符号可以为于def func(a, b, /) 但是不能def func(a, b, *)
def f(c, b, *, d, e):
    return c + b

# / 前面的参数, 只允许通过位置(positional-only)来进行传递

# 有别于 keyword-only

print(a(c=1, b=2))
# 关键字将直接触发错误
# TypeError: a() got some positional-only arguments passed as keyword arguments: 'c, b'
二. 类
2.1 单例模式
单例模式, 顾名思义, 单一, 在程序(内存)中, 某对象只存在一个实例(地址)的存在.
使用场景:
- 数据库接口
- 日志接口
- 配置接口
# 注意很多的搜索引擎检索到的很多单例的实现, 实际上是"伪"单例, 无法通过多线程的检测
# 部分代码可能是因为执行速度过快, 内存地址才出现相同, 加一个延时(sleep)

class Test:
    _instance = None
    file = ''

    def __new__(cls, *args, **kwargs):
        if not cls._instance:
            # cls.file = 'abc'
            cls._instance = super(Test, cls).__new__(cls, *args, **kwargs)
        return cls._instance

    @classmethod
    def f(cls):
        print('test', cls.file)

    @classmethod
    def __setattr__(cls, key, value):
        # class模式下, 对cls的属性进行赋值修改
        # 直接cls.file = 'abd', 这种方式不行
        if key == 'file':
        	cls.file = value


def task(a):
    obj = Test()
    print(obj)
    # 测试, 内存地址是没有发生变化的
    # <__main__.Test object at 0x000001DBB06F3790>
    # <__main__.Test object at 0x000001DBB06F3790>
    # <__main__.Test object at 0x000001DBB06F3790>
    # <__main__.Test object at 0x000001DBB06F3790>
    # <__main__.Test object at 0x000001DBB06F3790>
    # <__main__.Test object at 0x000001DBB06F3790>
    # <__main__.Test object at 0x000001DBB06F3790>
    # <__main__.Test object at 0x000001DBB06F3790>
    # <__main__.Test object at 0x000001DBB06F3790>
    # <__main__.Test object at 0x000001DBB06F3790>
    # <__main__.Test object at 0x000001DBB06F3790>
    # <__main__.Test object at 0x000001DBB06F3790>
    # <__main__.Test object at 0x000001DBB06F3790>
    # <__main__.Test object at 0x000001DBB06F3790>
    # <__main__.Test object at 0x000001DBB06F3790>

for i in range(15):
    t = threading.Thread(target=task, args=(i,))
    t.start()
类单例模式的属性赋值
# self的属性是可以直接通过外部赋值
class Test:
    def __init__(self):
        self.key = ''

    def func(self):
        print(self.key)
	    # abc

t = Test()
t.key = 'abc'
t.func()

# --------------------------- 区别
class Test:
    _instance = None
    file = ''

    def __new__(cls, *args, **kwargs):
        if not cls._instance:
            cls._instance = super(Test, cls).__new__(cls, *args, **kwargs)
        return cls._instance

    # @classmethod
    # def __setattr__(cls, key, value):
    #     # 必须通过setattr对cls的外部属性进行赋值
    #     # 和self.key = value直接赋值的方式所差异
    #     if key == 'file':
    #         cls.file = value

    @classmethod
    def func(cls):
        print(cls.file)
        # 不加__setattr__, 打印结果为空
        # 加__setattr__, 打印结果为 'abc'


t = Test()
# 赋值必须直接以类名 + name, 假如不添加__setattr__
Test.file = 'abc'
# 这里涉及到类属性 + 和 实例之间的差异
# 假如直接以这种形式(不加 __setattr__), print(cls.file)为空
t.file = 'abc'
# 直接在t上赋值, 赋值的对象是实例化之后的对象
t.func()
2.2 继承
继承虽然有助于增强代码的复用性, 但是过多层级的继承, 在代码维护上也是个麻烦.
需要注意继承之间的属性/方法的覆盖问题.
2.2.1 单继承
class A:
    def __init__(self):
        print('a')


class B(A):
    # def __init__(self):, 没有这项, 将默认调用父类的初始化
    pass


b = B()

class A:
    def __init__(self):
        print('a init')
        self.n = 2
        print('a', id(self.n))

    def add(self, m):
        print('a-n', self.n)
        # 10
        print(f'a: add: {m}')
        self.n += m
        print(f'a: sum: {self.n}')


class B(A):
    def __init__(self):
        # 假如不调用, super().__init__(), a中的def __init__(self):将不会执行
        # super().__init__()
        self.n = 10

    def add(self, m):
        print('b-n', self.n)
        # 10
        print(f'b: add: {m}')
        # 不需要参数直接调用父类的方法
        super().add(m)
        self.n += 3
        print(f'b: sum: {self.n}')
        print('b', id(self.n))


b = B()
b.add(2)
# 假如B类的abc方法不存在, 则直接集成父类(A)中的abc方法
# 假如存在则覆盖掉父类中的abc()
print(b.n)
# 15
2.2.2 多重继承

class A:
    def __init__(self):
        self.n = 2

    def add(self, m):
        print('self is {0} @A.add'.format(self))
        self.n += m


class B(A):
    def __init__(self):
        self.n = 3

    def add(self, m):
        print('self is {0} @B.add'.format(self))
        super().add(m)
        self.n += 3


class C(A):
    def __init__(self):
        self.n = 4

    def add(self, m):
        print('self is {0} @C.add'.format(self))
        super().add(m)
        self.n += 4


class D(B, C):
    def __init__(self):
        self.n = 5

    def add(self, m):
        print('self is {0} @D.add'.format(self))
        super().add(m)
        self.n += 5


d = D()
d.add(2)
print(D.mro())
# 继承的顺序
# [<class '__main__.D'>, <class '__main__.B'>, <class '__main__.C'>, <class '__main__.A'>, <class 'object'>]
'''
self is <__main__.D object at 0x0000024A0FDE5CA0> @D.add
self is <__main__.D object at 0x0000024A0FDE5CA0> @B.add
self is <__main__.D object at 0x0000024A0FDE5CA0> @C.add
self is <__main__.D object at 0x0000024A0FDE5CA0> @A.add
a, 7, 2
c, 11, 2
b, 14, 2
d, 19, 2
19
'''
print(d.n)
# 19
# 5 + 2(a) + 4(c) + 3(b) + 5(d)
2.3 私有属性/方法
python实现私有的方式和其他的一些语言有较大的差异, 可以说python的实现方式有点不严谨.
没有针对性的private, public这种关键字用于专门处理这个问题.
class A:
    def __abc(self):
        print('abc')


A().__abc()
# AttributeError: 'A' object has no attribute '__abc'
在对应的方法或者是属性前面增加双下划线 "__".
这种方式的实现, 使用非常简单的方法依然还是可以访问到.
class A:
    def __abc(self):
        print('abc')


a = A()
## 私有方法的访问
a._A__abc()
私有的方法和属性, 在继承中可以避免一些问题的出现, 如同名覆盖.
私有的方法和属性, 在继承时时不会被子类继承的.
## 私有属性
class A:
    __abc = 1

    def say(self):
        print('a', self.__abc)


class B(A):
    __abc = 10

    def say(self):
        super(B, self).say()
        print('b', self.__abc)


B().say()
## 直接
class A:
    abc = 1

    def say(self):
        print('a', self.abc)
        # abc => 将被B的10所覆盖


class B(A):
    abc = 10

    def say(self):
        super(B, self).say()
        print('b', self.abc)


B().say()
简而言之, 虽然python的私有方式不是很严谨, 但是还是在某些方面有专门的用途, 并不单纯是为了表明私有.
2.4 关于抽象类
抽象类无法实例化, 并且需要子类来提供抽象方法的实现.
# 在 <流畅python> 一书中, 作者谨慎推荐使用相关的方法
# 作者建议: 是否需要在代码中使用相关的约束
# 就如同__slot__一样
# 保证代码的严谨性
# 抽象类, 要求类的继承上需要满足强制的要求
from abc import ABCMeta,abstractmethod

class Airer(metaclass=ABCMeta):
    @abstractmethod
    def airfly(self):
        pass
from abc import ABC, abstractmethod


class A(ABC):
    @abstractmethod
    def say(self):
        print('a')


class B(A):
    # 假如不重写这个父类的方法, 将直接报错
    # TypeError: Can't instantiate abstract class B with abstract method say
    def say(self):
        print('b')


b = B()

b.say()
简而言之, 抽象类更多是对代码的严谨性做出强制的要求, 在封装接口等上有更好的规范. 但如流畅的python的作者所言, 这将限制python的代码的灵活性, 显然是得不偿失的.
2.5 MRO
MRO(Method Resolution Order), 方法解析顺序.
from pprint import pprint


class a:
    def say_hello():
        print('a: hello')


class b:
    def say_hello():
        print('b: hello')


class c(a, b):
    pass

# 多个集成, 继承的先后顺序
pprint(c.mro())
print(c().say_hello())
# [<class '__main__.c'>,
# <class '__main__.a'>,
# <class '__main__.b'>,
# <class 'object'>]
2.6 描述符/属性魔术方法
由于二者在写法上很容易混淆, 合并在一起解析.
A key difference between getattr and getattribute is that getattr is only invoked if the attribute wasn't found the usual ways. It's good for implementing a fallback for missing attributes, and is probably the one of two you want.
getattribute is invoked before looking at the actual attributes on the object, and so can be tricky to implement correctly. You can end up in infinite recursions very easily.
New-style classes derive from object, old-style classes are those in Python 2.x with no explicit base class. But the distinction between old-style and new-style classes is not the important one when choosing between getattr and getattribute.
You almost certainly want getattr.
注意: 别混淆, 这会导致无限递归.
class A:
    def __init__(self, name):
        self.name = name

    # 这个必须存在
    def __setitem__(self, key, value):
        print(f'setitem: {value}')
        self.__dict__[key] = value
        # self[key] = value, 这回导致无限递归

    def __set__(self, instance, value):
        print(f'set : {value}')

    def __setattr__(self, key, value):
        print(f'setattr: {value}')


a = A(name='a')
# __setitem__, 否则无法对这里进行这样的操作
a['name'] = 'b'
# 但是可以这样 a.name = 'b', 这不会报错
print(a.name)

###
class Test:
    def __init__(self):
        self.abc = 1

    def __get__(self, instance, owner):
        print('get')

    def __getattribute__(self, item):
        # 假如这个项存在, __getattr__会被拦截, 不会访问__getattr__
        print('i')
        # super().__getattribute__(item)

    def __getattr__(self, item):
        # 这个项, 只有当属性不存在时触发
        print('a')


t = Test()
print(t.abc)
print(t.fuc)
-
__get__ -
__set__ -
__delete__, 注意别和__del__搞混, 后者时class中, class的销毁执行的触发 -
__getattr__ -
__getattr__, 这是读取不存在的属性时触发 -
__getattribute__
-
__setattr__
-
__delattr__
-
__setitem__
-
__delitem__
-
__getitem__
class Name:
    def __get__(self, instance, owner):
        return 'test'


class A:
    name = Name()


print(A.name)
# test
a = A()
print(a.name)
# test

### 注意和下面的区别

class Name:
    def __get__(self, instance, owner):
        return 'test'


class A:
    # 改成了内部实现
    def __init__(self):
        self.name = Name()


a = A()
print(a.name)
# <__main__.Name object at 0x0000017317F209A0>

class Name:
    def __get__(self, instance, owner):
        return 'test'


class A:
    # 改成了内部实现
    def __init__(self):
        self.name = Name()
        self.name.abc = ''


a = A()
a.name.abc = 'amd'
print(a.name.abc)
# amd

#### 注意区别
class Name:
    def __get__(self, instance, owner):
        return 'test'


class A:
    name = Name()


a = A()
a.name = 'c'
print(a.name)
# c

## 注意区别
class Name:
    def __get__(self, instance, owner):
        return 'test'


class A:
    name = Name()


a = A()
a.name = 'c'
print(a.name)
# c
print(a.__dict__)
# {"name": "c"}
Name.__set__ = lambda *args, **kwargs: None
# 在这里加入了__set__方法, 下面的结果发生了变化
# 在描述符中, 没有 __set__方法, 那么优先从__dict__中找到对应的值
# 假如存在 __set__, 则优先从__get__中找到这个值
print(a.name)
# test
print(a.__dict__)
# {"name": "c"}
class Test:
    def __init__(self):
        self.name = 'abc'

    def __get__(self, instance, owner):
        print('get')

    def __set__(self, instance, value):
        print('set')

    def __delete__(self, instance):
        print('delete')


# 由这个类产生的实例进行属性的调用/赋值/删除,并不会触发这三个方法
t = Test()
t.name = 'bcd'
print(t.name)
del t.name
注意以上的区别, 在操作上.
class Score:
    def __init__(self, subject):
        self.name = subject

    def __get__(self, instance, owner):
        return instance.__dict__[self.name]

    def __set__(self, instance, value):
        if 0 <= value <= 100:
            instance.__dict__[self.name] = value
        else:
            raise ValueError


class Student:
    math = Score("math")
    chinese = Score("chinese")
    english = Score("english")

    def __init__(self, math, chinese, english):
        self.math = math
        self.chinese = chinese
        self.english = english

    def __repr__(self):
        return "<Student math:{}, chinese:{}, english:{}>".format(self.math, self.chinese, self.english)


s = Student(10, 20, 30)
# s = Student(10, 120, 30), value_error
print(s)
对比于上下两部分的内容, 实际上__set__, __get__, __delete__提供了基础的方式实现数据的输入输出的控制.
直接使用原生的装饰器实现,更为直接和方便
class Person:
    def __init__(self):
        self._name = ''

    def f_get(self):
        print("Getting: %s" % self._name)
        return self._name

    def f_set(self, value):
        print("Setting: %s" % value)
        self._name = value.title()

    def f_del(self):
        print("Deleting: %s" % self._name)
        del self._name

    # class property(fget=None, fset=None, fdel=None, doc=None)
	# 注意这里使用property
    name = property(f_get, f_set, f_del, "I'm the property.")


p = Person()

p.name = 'alex'

print(p.name)

del p.name

## 等价
# 装饰器
class Test:
    def __init__(self):
        self._name = ''

    @property
    def name(self):
        print(f'get {self._name}')
        return self._name

    @name.setter
    def name(self, n):
        print(f'set: {n}')
        self._name = n

    @name.deleter
    def name(self):
        print(f'delete : {self._name}')


t = Test()

t.name = 'alex'

print(t.name)

del t.name

## 等价
# 描述符
class Descriptor:
    """"""

    def __init__(self):
        self._name = ''

    def __get__(self, instance, owner):
        print("__get__")
        return self._name

    def __set__(self, instance, value):
        print("__set__")
        self._name = value

    def __delete__(self, instance):
        print("__delete__")
        del self._name


class Person(object):
    name = Descriptor()


p = Person()

p.name = 'alex'

print(p.name)

del p.name
延展对比
class Test:
    def __init__(self):
        self.key = 'default'

    def func(self):
        print('func')

    def __setattr__(self, key, value):
        print(f'setattr: {key}, {value}')
        if key == 'key':
            # 陷入无限递归死循环, self.key = value
            # 正确的赋值方式
            self.__dict__[key] = value

    def __getattr__(self, item):
        print(f'getattr: {item}')

    def __getattribute__(self, item):
        print(f'getattribute: {item}')
        return super().__getattribute__(item)

    def __delattr__(self, item):
        print(f'delattr: {item}')

    def __get__(self, instance, owner):
        print('get')

    def __set__(self, instance, value):
        print('set')


t = Test()
t.key = '123'
t.func()
print(t.abc)
del t.key
print(t.key)
class Test:
    def __init__(self):
        self.age = 0
        self.name = 'abc'

    def __setattr__(self, key, value):
        print(f'setattr: {key}, {value}')
        self.__dict__[key] = value

    def __setitem__(self, key, value):
        print(f'setitem: {key}, {value}')
        self.__dict__[key] = value

    def __set__(self, instance, value):
        print('set')

    def __delitem__(self, key):
        print(f'delete: {key}')

    def __delattr__(self, item)
    	print(f'delattr: {item}')

t = Test()

t.age = 1

t['name'] = 'tom'

## 这个操作将触发两个del, 和delitem
del t['age']

# del t.age

'''
del t['age']
delete: age, __delitem__

del t.age
delattr: age, __delattr__

'''
简单来看
__xx + item__, 的操作和"[]"操作符相关联
__xx + attr__, 的操作和"."操作符相关连
__xx__, 这个无法直接在类中使用, 而是作为独立的描述符使用.
2.7 super()
# super()的初始化等价于
class A:
    def __init__(self):
        print('a')


class B(A):
    def __init__(self):
        # 直接使用类的名称
        # 而super() 就相当于实现了对类的动态的调用
        A.__init__(self)
        # 等价于
        # super().__init__()
        # super(B, self).__init__()


b = B()
class super(type, object_or_type=None)
注: super(Class, self).xxx, 这种方法常见于各种搜索引擎检索到的内容
Python 3 和 Python 2 的另一个区别是: Python 3 可以使用直接使用 super().xxx 代替 super(Class, self).xxx
In Python 2, only the
super(className,self)syntax was possible. Since It was the most used version, as ofPython 3providing no arguments will act the same.There are two typical use cases for super. In a class hierarchy with single inheritance, super can be used to refer to parent classes without naming them explicitly, thus making the code more maintainable
class A:
    def test(self):
        return 'A'


class B(A):
    def test(self):
        # 不存在参数调用父类的方法
        return 'B->' + super().test()


print(B().test())
# B -> A

class A:
    def test(self):
        return 'A'


class B(A):
    def test(self):
        # 存在参数调用
        return 'B->' + super(B, self).test()


print(B().test())
# B -> A
from objprint import op


class A:
    def __init__(self, age):
        self.age = age


class B(A):
    def __init__(self, age, name):
        super().__init__(age)
        self.name = name


class C(B):
    def __init__(self, age, name):
        # 注意这里的调用的参数
        super(C, self).__init__(age, name)
        # 可以跳过本身, 直接使用 父类的B来进行初始化
        # 因为B本身又是继承自A, A只有一个参数, 传入两个参数, 将直接报错
        # super(B, self).__init__(age, name)
        self.gender = 'male'


c = C(12, 'abc')
op(c)

# super()可以在class以外使用
d = super(C)

op(d)
Return a proxy object that delegates method calls to a parent or sibling class of type. This is useful for accessing inherited methods that have been overridden in a class
super()的返回值(proxy object), 一个代理的对象
# 继承的顺序
class A:
    def abc(self):
        print('a')


class B(A):
    def abc(self):
        super().abc()


class C(A):
    def abc(self):
        print('c')


class D(B, C):
    def abc(self):
        super(D, self).abc()

d = D()
d.abc()
# 执行的顺序 d => 调用父类B => 调用父类C => 调用c下的abc
# [<class '__main__.D'>, <class '__main__.B'>, <class '__main__.C'>, <class '__main__.A'>, <class 'object'>]
2.8 元类 - MetaClass

自定义的
Metaclass必须继承自 type.
class A:
    pass


instance = A()
print(type(instance))
print(type(A))

'''
<class '__main__.A'>
<class 'type'>
'''
# 创建一个基础图形(shape)的元类
class Shape(type):
    def __new__(mcs, *args, **kwargs):
        name, base, attrs = args
        # 假如是创建长方法
        if name == 'Rectangle':
            # 那么这个长方形的类就必须包含长和宽的属性
            if (l := attrs.get('long', None)) and (w := attrs.get('width', None)):
                print('长方形创建成功')
                print(l)
                print(w)
            else:
                return None
        # 假如是满足要求那么, 允许创建, 亦或者不满足要求就报错
        return super(Shape, mcs).__new__(mcs, *args, **kwargs)

# 长方形
class Rectangle(metaclass=Shape):
    def __init__(self, long, width):
        self._long = long
        self._width = width

    @property
    def long(self):
        return self._long

    @property
    def width(self):
        return self._width


# 三角形
class Triangle(metaclass=Shape):
    def __init__(self, a, b, c):
        self._a = a
        self._b = b
        self._c = c


r = Rectangle(10, 11)
print(r.width)
2.8.1 单例继承
元类的方式来实现单例的继承
import threading


class Shape(type):
    _instance = None

    def __new__(mcs, *args, **kwargs):
        # 必须返回对象, 只执行一次
        return super(Shape, mcs).__new__(mcs, *args, **kwargs)

    def __call__(cls, *args, **kwargs):
        # 每次子类的初始化(), 都会调用此命令
        if not cls._instance:
            cls._instance = super(Shape, cls).__call__(*args, **kwargs)
        return cls._instance


# 长方形
class Rectangle(metaclass=Shape):
    def __init__(self):
        pass

    def abc(self):
        print('abc')


def task():
    obj = Rectangle()
    print(id(obj))


for i in range(15):
    t = threading.Thread(target=task)
    t.start()
2.9 type创建类
print(type('abc'))

# <class 'str'>
type除了可以用于判断数据的类型之外, 也可以用于创建类
class type(name, bases, dict, **kwds)传入一个参数时,返回 object 的类型。 返回值是一个 type 对象,通常与
object.__class__所返回的对象相同。推荐使用
isinstance()内置函数来检测对象的类型,因为它会考虑子类的情况。传入三个参数时,返回一个新的 type 对象。 这在本质上是
class语句的一种动态形式,name 字符串即类名并会成为__name__属性;bases 元组包含基类并会成为__bases__属性;如果为空则会添加所有类的终极基类object。 dict 字典包含类主体的属性和方法定义;它在成为__dict__属性之前可能会被拷贝或包装。 下面两条语句会创建相同的type对象:>>>
>>> class X:
...     a = 1
...
>>> X = type('X', (), dict(a=1))
另请参阅 类型对象。
class Test1:
    def __init__(self):
        self.name = 'abc'
        self.age = 20


Test2 = type("Test2", (), {})


def test(self):
    print("test")
    print(self.age, self.age)


# 直接在创建时就添加属性, 方法
Test3 = type("Test3", (), {"test": test, "name": "小王", "age": 21})

test1 = Test1()
test2 = Test2()
test3 = Test3()
2.10 __slots__
槽, 用于控制class内存的消耗, 多数情况上用不到, 因为这限制了代码使用的灵活性, 因为每次修改class, 可能需要修改槽的内容.
from pympler.asizeof import asizesof

# pympler一个调试工具
# https://pypi.org/project/Pympler/
# Pympler is a development tool to measure, monitor and analyze the memory behavior of Python objects # in a running Python application.
# 支持 Python 3.6, 3.7, 3.8, 3.9, 3.10 on Linux, Windows and MacOS X

class Test:
    __slots__ = ('_a', '_b', '_c')

    def __init__(self, a, b, c):
        self._a = a
        self._b = b
        self._c = c


def test():
    t = Test(1, 1, 1)
    print(asizesof(t))


if __name__ == '__main__':
    test()
一个简单的测试, 加slots和不加, 前后的差异很大, 加88, 不加352, 相差4倍.
三. 装饰器
3.1 类装饰器
class Test:
    @staticmethod
    def abc():
        print('abc')

    @classmethod
    def c_func(cls):
        print('123')

Test.abc()

Test.c_func()
3.1.1 @classmethod
类方法, 不需要实例化即可调用
3.1.2 @staticmethod
# 可以变化未如下形式, 装饰器
class A:
    def abc():
        print('abc')
	# 等价于装饰器
    abc = staticmethod(abc)

A.abc()
静态方式, 不需要实例化即可调用
3.1.3 @property
属性设置
class Test:
    def __init__(self):
        self._abc = 0

    @property
    def result():
        return self._abc

    # 搭配属性设置使用
    # 注意顺序, .setter不能再前面, property必须再前面
    @property
    def spider_stop_flag(self) -> bool:
        return self._stop_flag

    @spider_stop_flag.setter
    def spider_stop_flag(self, flag: bool):
        # 这里可以控制输入的内容
        if isinstance(flag, bool):
            self._stop_flag = flag
            self._crawler.stop_signal = flag
        else:
            raise ValueError('valid value must be bool')
test = Test()
print(test.spider_stop_flag)
spider_stop_flag = 'abc'
3.2 装饰器
装饰器是一种灵活而强大的存在, 在对代码执行微调或者是干预.
3.2.1 无传递参数
import time

# 一个简单的装饰器-计时器
# 需要注意的是, 这种装饰器会导致func的名称发生变化
def decoration(func):
    def wrapper(*args, **kwargs):
        s = time.time()
        func(*args, **kwargs)
        print(time.time() - s)

    return wrapper


@decoration
def test(x):
    print(x)
    time.sleep(0.2)


# 实际上这部分的代码
# 可以转换为
# test = decoration(test)
# test(x)
# 这点可以参考上文的偏函数, 装饰器实际上是偏函数的一种

test()
# 这里将变成, wrapper这个装饰器的名称
print(test.__name__)
# wrapper
加入functools.wraps, 被装饰的函数依然还可以保持其真实的名称, 以及可以访问到未被装饰的原函数(但是需要注意使用多个装饰器可能存在的问题).
import time
from functools import wraps

# wraps, 装饰器, 将可以解决这个问题
def decoration(func):
    @wraps(func)
    def wrapper(*args, **kwargs):
        s = time.time()
        print(f'func_name: {func.__name__}')
        func(*args, **kwargs)
        print(time.time() - s)

    return wrapper


@decoration
def test():
    time.sleep(0.2)


test()
print(test.__name__)
# test
# 同时通过该装饰器, 可以访问到未被装饰的原函数
a = test.__wrapped__
a()
3.2.2 传递参数
import time


# 一个简单的装饰器-计时器
# 需要注意的是, 这种装饰器会导致func的名称发生变化
def decorator(msg):
    def decoration(func):
        def wrapper(*args, **kwargs):
            s = time.time()
            print(msg)
            func(*args, **kwargs)
            print(time.time() - s)

        return wrapper
    return decoration


@decorator('this is a test timer decoration')
def test():
    time.sleep(0.2)


test()
3.2.3 使用类作为装饰器
import time


class Timer:
    def __init__(self, func):
        self._func = func

    # __call__, 表示, 该cls可执行
    def __call__(self, *args, **kwargs):
        s = time.time()
        ret = self._func(*args, **kwargs)
        print(time.time() - s)
        return ret


@Timer
def add(a, b):
    time.sleep(0.35)
    return a + b

# 等价于装饰器
# add = Timer(add)

print(add(2, 3))
3.3 其他的装饰器
python函数并不支持重载
'''
首选要明白支持函数重载的目的是什么?

在静态语言中, 方法重载是希望类可以以统一的方式处理不同类型的数据提供了可能. 多个同名函数同时存在, 具有不同的参数个数/类型, 重载是一个类中多态性的一种表现.

在Java中实现函数重载:
'''
class Writer{
    public static void write(StringIO output, String content){
        output.write(content);
        return null;
    }

   public static void write(File output, String content){
        output.write(content);
        return null;
   }
}
'''
而在动态语言中, 有鸭子类型, 如果走起路来像鸭子, 叫起来也像鸭子, 那么它就是鸭子. 一个对象的特征不是由它的类型决定, 而是通过对象中的方法决定, 所以函数重载在动态语言中就显得没有意义了, 因为函数可以通过鸭子类型来处理不同类型的对象, 鸭子类型也是多态性的一种表现.

在Python中实现函数重载:
'''
clsss Writer:
    @staticmethod
    def write(output, content):
        # output对象只要实现了write方法就行
        output.write(content)

# stringIO类型
output = StringIO.StringIO()
Writer.write(output, "helloworld")

# file 类型
output = open("out.txt", "w")
Writer.write(output, "helloworld")
很多人认为只要在类方法中加上了@overload装饰器就实现了Python中的方法重载, 实际上不是的. 在官方文档中是这样介绍@overload装饰器的:
The@overloaddecorator allows describing functions and methods that support multiple different combinations of argument types. A series of@overload-decorated definitions must be followed by exactly one non-@overload-decorated definition (for the same function/method). The@overload-decorated definitions are for the benefit of the type checker only, since they will be overwritten by the non-@overload-decorated definition, while the latter is used at runtime but should be ignored by a type checker. At runtime, calling a@overload-decorated function directly will raiseNotImplementedError.
也就是说, 和typing这module里面其他东西的功能一样, @overload装饰器其实只是一种注解/提示: 该函数允许传入不同的参数类型组合. 最终, 所有加了@overload装饰器的方法都会被一个不加装饰器的方法覆盖掉. 如
from typing import overload

class Duck:

    @overload
    def quack(self) -> None: ...

    @overload
    def quack(self, mark: str) -> None: ...

    # 以上两个方法最终会被这个方法覆盖掉
    def quack(self, arg=None):
        if arg:
            print(f"GaGaGa: {arg}")
        else:
            print("GaGaGa!")

d = Duck()
d.quack()                # Output: GaGaGa!
d.quack("I am a duck~")  # Output: GaGaGa: I am a duck~
3.4 装饰器的一些使用
3.4.1 批量指定执行函数
批量执行指定的func, 由于python在批量执行某些func时, 没有类似于JavaScript可以非常灵活的执行
# 对func进行标签标注
def tag(func):
    func._add_mark = True
    return func


class Test:
    @tag
    def a(self):
        print('a')

    @tag
    def b(self):
        print('b')

    def c(self):
        print('c')

    def d(self):
        print('d')


def call_all_class_methods(c):
    # dir, 如果没有实参,则返回当前本地作用域中的名称列表。如果有实参,它会尝试返回该对象的有效属性列表。
    # getattr, 返回对象命名属性的值。name 必须是字符串。如果该字符串是对象的属性之一,则返回该属性的值。
    # 例如, getattr(x, 'foobar') 等同于 x.foobar。如果指定的属性不存在,且提供了 default 值,则返回它,否则触发 AttributeError。
    # callable, 如果参数 object 是可调用的就返回 True,否则返回 False。
    # 如果返回 True,调用仍可能失败,但如果返回 False,则调用 object 将肯定不会成功。
    # 请注意类是可调用的(调用类将返回一个新的实例);如果实例所属的类有 __call__() 则它就是可调用的。
    for name in dir(c):
        func = getattr(c, name, None)
        # 根据要求执行指定标注的func
        if func and callable(func) and getattr(func, "_add_mark", False):
            func()

# 执行所有的func
call_all_class_methods(Test())
3.4.2 忽视错误
将上面的contextlib案例进行扩展.
import os
from contextlib import ContextDecorator

# 自定义实现suppress, 可以直接使用@装饰器

class suppress(ContextDecorator):
    def __init__(self, *exceptions):
        print(0)
        self._exceptions = exceptions

    def __enter__(self):
        print(1)
        return self

    def __exit__(self, exc_type, exc_val, exc_tb):
        print(3)
        # 这里必须返回TRUE
        return exc_type is not None and issubclass(exc_type, self._exceptions)


@suppress(FileNotFoundError)
def test_exception():
    print(2)
    os.remove('test.txt')


test_exception()
3.4.3 单例继承
import weakref

# 在跨模块中测试通过, 在多线程下测试通过

def singleton(cls):
    _instances = weakref.WeakKeyDictionary()

    def _wrapper(*args, **kwargs):
        if cls not in _instances:
            _instances[cls] = cls(*args, **kwargs)

        return _instances[cls]

    return _wrapper


@singleton
class Rectangle:
    def __init__(self):
        pass

    def abc(self):
        print('abc')
四. 内置库使用
4.1 tkinker
thinker的canvas无法直接将其中的内容直接转为图片保存, 有别于JavaScript的canvas是一个图像绘制和处理的中转站, tkinker只能作为图像绘制的画布.
4.2 json
json.dumps()将对象转为字符串, 和JavaScript的JSON.stringify()有所差异
import json

json.dumps([1,2,3])
# [1, 2, 3], 数字之间是存在空格的, 注意这个细节
json.dumps([1,2,3], separators=(',', ':'))
# [1,2,3]
javascript版本
JSON.stringify([1, 2, 3]);
// [1,2,3], 不存在空格
4.3 subprocess
调用shell
import json
import subprocess
from pprint import pprint

# 调用ffmpeg转码视频文件

file = 'test.MOV'
exe = "ffprobe.exe"

cmd = f'{exe} -show_format -show_streams -of json "{file}"'
# shell=True,
p = subprocess.Popen(cmd, shell=True, stdout=subprocess.PIPE, stderr=subprocess.PIPE)
'''
class subprocess.Popen( args,
  bufsize=0,
  executable=None,
  stdin=None,
  stdout=None,
  stderr=None,
  preexec_fn=None,
  close_fds=False,
  shell=False,
  cwd=None,
  env=None,
  universal_newlines=False,
  startupinfo=None,
  creationflags=0)

'''
out, err = p.communicate()
4.4 itertools
迭代器函数
| 迭代器 | 实参 | 结果 |
|---|---|---|
product() |
p, q, ... [repeat=1] | 笛卡尔积,相当于嵌套的for循环 |
permutations() |
p[, r] | 长度r元组,所有可能的排列,无重复元素 |
combinations() |
p, r | 长度r元组,有序,无重复元素 |
combinations_with_replacement() |
p, r | 长度r元组,有序,元素可重复 |
product, 笛卡尔积
笛卡尔积, 即组合的所有组合, 常见于MySQL中并表出现的问题
from itertools import product
# 生成所有的组合adm, adn.....cdm,...cfn
for x, y, z in product(['a', 'b', 'c'], ['d', 'e', 'f'], ['m', 'n']):
    print(x, y, z)
4.5 collections
关键库, 里面的各种工具使用非常广泛
更为易用和强大的各类容器, 但是需要注意其中的部分功能在高版本的python以常规方式实现, 如有序字典(常规字典已经是有序的了)
| 支持 | 含义 |
|---|---|
namedtuple |
创建命名元组子类的工厂函数, 生成可以使用名字来访问元素内容的tuple子类 |
deque |
类似列表(list)的容器, 实现了在两端快速添加(append)和弹出(pop) |
ChainMap |
类似字典(dict)的容器类, 将多个映射集合到一个视图里面 |
Counter |
字典的子类, 提供了可哈希对象的计数功能 |
OrderedDict |
字典的子类, 保存了他们被添加的顺序, 有序字典 |
defaultdict |
字典的子类, 提供了一个工厂函数, 为字典查询提供一个默认值 |
UserDict |
封装了字典对象, 简化了字典子类化 |
UserList |
封装了列表对象, 简化了列表子类化 |
UserString |
封装了字符串对象, 简化了字符串子类化(中文版翻译有误) |
4.5.1 counter
counter除了对数据统计之外, 还可以直接运行数学运算.
from collections import Counter

# 统计各种元素出现的次数
a = [3, 8, 3, 10, 3, 3, 1, 3, 7, 6, 1, 2, 7, 0, 7, 9, 1, 5, 1, 0]

c = Counter(a)

print(c.most_common())

print(c.items())
'''
[(3, 5), (1, 4), (7, 3), (0, 2), (8, 1), (10, 1), (6, 1), (2, 1), (9, 1), (5, 1)]

dict_items([(3, 5), (8, 1), (10, 1), (1, 4), (7, 3), (6, 1), (2, 1), (0, 2), (9, 1), (5, 1)])
'''

a = Counter(['a', 'b', 'c', 'a'])

b = Counter(['a', 'b', 'c', 'b'])


print(a)

print(b)


c = a + b

print(c)
'''
Counter({'a': 2, 'b': 1, 'c': 1})
Counter({'b': 2, 'a': 1, 'c': 1})
Counter({'a': 3, 'b': 3, 'c': 2})
'''
4.5.2 deque
灵活的列表
from collections import deque

d = deque(maxlen=3)

for i in range(3):
    d.append(i)

print(d)

# 控制元素的数量, 先进先出
d.append(3)

print(d)

# 实现对不同位置的元素的弹出
print(d.popleft())

print(d.pop())

'''
deque([0, 1, 2], maxlen=3)
deque([1, 2, 3], maxlen=3)
1
3
'''
4.6 typing
注意当前的python静态的声明对于代码并无实际意义.(例如变量声明数字类型, 实际赋值可以为字符串或者其他类型的数据), 只是对于IED的检查起到帮助的作用.
# 静态类型声明
# 函数传入参数声明
# 函数内部变量声明
# 函数返回值声明
# 可变对象内部变量声明, 如列表内的元素
def abc(b: int) -> int:
    a: int = 1
    c: int = a + b
    print(c)
    return c


abc(2)
相关的功能实现已经由IDE和python直接提供.(提供更强大的静态化代码检测时python的一个重要方向, 类似于JavaScript家族中的typescript.)
// const hello = 'hello world';, javascript原生代码

const hello : string = "Hello World!"
console.log(hello)
// 注意代码并无法直接在chrome console上直接执行
类型注释相关, 用于静态检查.
让大部分的代码可以在编辑的过程就能检测到异常的存在, 而不是在进入执行环节.
from typing import NewType

UserId = NewType("UserId", int)
def get_user_name(user_id: UserId) -> str:
    pass

# 可以通过类型检查
user_a = get_user_name(UserId(42351))
# 不能够通过类型检查
user_b = get_user_name(-1)
4.6.1 TypeVar & Generic
from typing import TypeVar, Generic

# 类型变量主要是为静态类型检查器提供支持,用于泛型类型与泛型函数定义的参数

X = TypeVar('X')


# Generic: 容器中,对象的类型信息不能以泛型方式静态推断,因此,抽象基类扩展支持下标,用于表示容器元素的预期类型。
# 用于泛型类型的抽象基类

class ListInt(Generic[X]):
    def __init__(self) -> None:
        self.items: list[X] = []

    def push(self, item: X) -> None:
        self.items.append(item)

    def pop(self) -> X:
        return self.items.pop()

    def empty(self) -> bool:
        return not self.items


i_list = ListInt[int]()
i_list.push(0)
i_list.pop()

# IDE将直接提示
i_list.push('a')
TypeVar, 类型变量
用法:
T = TypeVar('T')  # Can be anything
S = TypeVar('S', bound=str)  # Can be any subtype of str
A = TypeVar('A', str, bytes)  # Must be exactly str or bytes
def test(data: list[str]) -> bool:
    pass

# python 3.9
# 将可以侦测到传入包含在容器内的数据是否满足数据的要求
test([1, 2, 3])
相关参考: 为什么 Python 的 Type Hint 没有流行起来
4.7 importlib
包的导入, 更加灵活
import random
import importlib


def is_even_number(num):
    return True if (num % 2) == 0 else False


if __name__ == "__main__":
    number = random.randint(1, 100)
    module = None
    if is_even_number(number):
        # 绝对路劲
        module = importlib.import_module('func.foo')
    else:
        # 相对路径
        module = importlib.import_module('func.bar', package="func")

    module.main()
4.8 difflib
文本的比较, 相似度等
import difflib

text1 = """Lorem ipsum dolor sit amet, consectetuer adipiscing
elit. Integer eu lacus accumsan arcu fermentum euismod. Donec
pulvinar porttitor tellus. Aliquam venenatis. Donec facilisis
pharetra tortor.  In nec mauris eget magna consequat
convalis. Nam sed sem vitae odio pellentesque interdum. Sed
consequat viverra nisl. Suspendisse arcu metus, blandit quis,
rhoncus ac, pharetra eget, velit. Mauris urna. Morbi nonummy
molestie orci. Praesent nisi elit, fringilla ac, suscipit non,
tristique vel, mauris. Curabitur vel lorem id nisl porta
adipiscing. Suspendisse eu lectus. In nunc. Duis vulputate
tristique enim. Donec quis lectus a justo imperdiet tempus."""

text1_lines = text1.splitlines()

text2 = """Lorem ipsum dolor sit amet, consectetuer adipiscing
elit. Integer eu lacus accumsan arcu fermentum euismod. Donec
pulvinar, porttitor tellus. Aliquam venenatis. Donec facilisis
pharetra tortor. In nec mauris eget magna consequat
convalis. Nam cras vitae mi vitae odio pellentesque interdum. Sed
consequat viverra nisl. Suspendisse arcu metus, blandit quis,
rhoncus ac, pharetra eget, velit. Mauris urna. Morbi nonummy
molestie orci. Praesent nisi elit, fringilla ac, suscipit non,
tristique vel, mauris. Curabitur vel lorem id nisl porta
adipiscing. Duis vulputate tristique enim. Donec quis lectus a
justo imperdiet tempus.  Suspendisse eu lectus. In nunc."""

text2_lines = text2.splitlines()

d = difflib.Differ()

diff = d.compare(text1_lines, text2_lines)

print('\n'.join(diff))

# SequenceMatcher, 用于比较两个字符串的相似度

print(difflib.SequenceMatcher(None, 'abce-125585665', 'abjcjk-158555222').quick_ratio())
print(difflib.SequenceMatcher(None, 'abce-125585665', 'abjcjk-158555222').quick_ratio())
# 0.7333333333333333
# 0.7586206896551724
4.9 types
错误处理, TracebackType
The type of traceback objects such as found in sys.exc_traceback
import types
import sys

a = b = c = None

try:
    1 / 0
except:
    a, b, c = sys.exc_info()
    print(a)
    print(b)
    print(c)

if type(c) == types.TracebackType:
    # 执行这部分
    print("c is a TracebackType")
else:
    print("c is not a TracebackType")
4.10 binascii
二进制和 ASCII 码互转, 用于在某些socket和服务器的通信.
| 函数 | 描述 |
|---|---|
a2b_uu(string) |
将以ascii编码的一行数据转化为二进制,并且返回二进制数据. |
b2a_uu(data) |
将二进制数据转化为一行以ascii编码的字符,date的最大长度为45. |
a2b_base64(string) |
将一块base64的数据转换为二进制数据,并返回该二进制数据 |
b2a_base64(string) |
与上面相反 |
a2b_qp(string[, header]) |
quoted-printable data->bin,并返回 |
b2a_qp(data[, quotetabs, istext, header]) |
与上面相反 |
a2b_hqx(string) |
binhex4格式化的ASCII数据转换为二进制,没有做RLE解压. |
b2a_hqx(data) |
与上相反 |
rledecode_hqx(data) |
按照binhex4标准,对data执行RLE解压 |
rlecode_hqx(data) |
对data执行binhex方式的压缩,并返回结果 |
crc_hqx(data, crc) |
计算data的binhex4的crc值 |
crc32(data[, crc]) |
根据crc,计算crc32(32位检验和数据,然后将结果&0xffffffff(为了在所有Python版本中生成相同的结果,具体不清楚,求指导…) |
b2a_hex(data) |
返回二进制数据的16进制的表现形式 |
a2b_hex(data) |
与上面相反, 等价(近似于 bytes.fromhex) |
hexlify(data) |
返回二进制数据的16进制的表现形式 |
unhexlify(hexstr) |
与上面相反 |
# 在aes解密的使用
def aes_decrypt(text):
    key = 'jo8j9wGw%6HbxfFn'.encode('utf-8')
    iv = '0123456789ABCDEF'.encode('utf-8')
    aes = AES.new(key=key, mode=AES.MODE_CBC, iv=iv)
    # hexstr解码
    srcs = a2b_hex(text.encode('utf-8'))
    decrypt_text = aes.decrypt(srcs).strip(''.encode()).decode()
    return decrypt_text
4.11 textwrap
文本自动换行与填充, 文本的格式化输出
import textwrap

text = "Hello  world!"

print(len(text))
# 13
print(textwrap.shorten(text, width=12))
# 压缩成12

sample_text = '''
    The textwrap module can be used to format text for output in
    situations where pretty-printing is desired.  It offers
    programmatic functionality similar to the paragraph wrapping
    or filling features found in many text editors.
    '''
print(textwrap.fill(sample_text, width=50))
'''
# 文本的长度被压缩(空格被减少一个)
Hello world!

# (文本被拉宽, 中间填充空格实现)
     The textwrap module can be used to format
text for output in     situations where pretty-
printing is desired.  It offers     programmatic
functionality similar to the paragraph wrapping
or filling features found in many text editors.
'''
4.12 fuctools
| 函数名称 | 作用 |
|---|---|
cached_property() |
类属性缓存装饰器 |
cmp_to_key() |
复杂的排序相关 |
lru_cache() |
缓存装饰器, 等价于cache() |
partial() |
偏函数 |
partialmethod() |
偏函数相关(class) |
reduce() |
累积函数 |
singledispatch() |
泛型相关 |
singledispatchmethod() |
泛型相关(class) |
total_ordering() |
|
update_wrapper() |
装饰器辅助 |
wraps() |
装饰器辅助 |
和collections库提供各种数据容器不同, functools提供的是各类工具的集合.
4.12.1 update_wrapper
functools.update_wrapper(wrapper, wrapped, assigned=WRAPPER_ASSIGNMENTS, updated=WRAPPER_UPDATES)
更新一个 wrapper 函数以使其类似于 wrapped 函数。 可选参数为指明原函数的哪些属性要直接被赋值给 wrapper 函数的匹配属性的元组,并且这些 wrapper 函数的属性将使用原函数的对应属性来更新。 这些参数的默认值是模块级常量
WRAPPER_ASSIGNMENTS(它将被赋值给 wrapper 函数的__module__,__name__,__qualname__,__annotations__和__doc__即文档字符串) 以及WRAPPER_UPDATES(它将更新 wrapper 函数的__dict__即实例字典)。为了允许出于内省和其他目的访问原始函数(例如绕过
lru_cache()之类的缓存装饰器),此函数会自动为 wrapper 添加一个指向被包装函数的__wrapped__属性。此函数的主要目的是在 decorator 函数中用来包装被装饰的函数并返回包装器。 如果包装器函数未被更新,则被返回函数的元数据将反映包装器定义而不是原始函数定义,这通常没有什么用处。
update_wrapper()可以与函数之外的可调用对象一同使用。 在 assigned 或 updated 中命名的任何属性如果不存在于被包装对象则会被忽略(即该函数将不会尝试在包装器函数上设置它们)。 如果包装器函数自身缺少在 updated 中命名的任何属性则仍将引发AttributeError。
wraps函数等价于partial(update_wrapper, wrapped=wrapped, assigned=assigned, updated=updated)
from functools import update_wrapper
def wrap(func):
	def inner(*args):
		return func(*args)
	return update_wrapper(inner, func)

@wrap
def abc():
	print('hello world')


print(abc.__name__)
4.12.2 singledispatch
将一个函数转换为 单分派 generic function。
要定义一个泛型函数,用装饰器
@singledispatch来装饰它。当使用@singledispatch定义一个函数时,请注意调度发生在第一个参数的类型上:
from functools import singledispatch


@singledispatch
def fun(arg, verbose=False):
    if verbose:
        print("Let me just say", end=" ")
    print(arg)


@fun.register(int)
def _(arg, verbose=False):
    if verbose:
        print("Strength in numbers, eh?", end=" ")
    print(arg)


@fun.register(list)
def _(arg, verbose=False):
    if verbose:
        print("Enumerate this:")
    for i, elem in enumerate(arg):
        print(i, elem)


fun("Hello world.", True)
fun(18, True)
fun(["a", "b"], True)

# 和逐个将数据进行判断, 执行有什么区别?
def abc(data):
    if isinstance(data, list):
        print('list ', ';'.join(data))
    elif isinstance(data, int):
        print('number ', data)
    elif isinstance(data, str):
        print('str ', data)


abc('hello')
abc(10)
abc(['a', 'c'])
4.12.3 cmp_to_key
a = ['abc', 'a', 'bbc']
a.sort(key=len)

print(a)

# key的方式
# 支持非常简单的操作
a.sort(key=len, reverse=True)

print(a)
这个function涉及到一个排序参数(python2.x, cmp)被删除掉的问题, 使得一些复杂的排序操作变得很麻烦.
import functools


def my_cmp(a, b):
    print("comparing ", a, " and ", b)
    if a > b:
        return 1
    elif a < b:
        return -1
    else:
        return 0

# print(sorted([1, 2, 4, 2, 3], key=my_cmp)), 将只能传入一个参数到my_camp

print(sorted([1, 2, 4, 2, 3], key=functools.cmp_to_key(my_cmp)))
from leetcode
给定一组非负整数 nums,重新排列每个数的顺序(每个数不可拆分)使之组成一个最大的整数。
注意:输出结果可能非常大,所以你需要返回一个字符串而不是整数.示例 1:
输入:nums = [10,2]
输出:“210”示例 2:
输入:nums = [3,30,34,5,9]
输出:“9534330”示例 3:
输入:nums = [1]
输出:“1”示例 4:
输入:nums = [10]
输出:“10”
即将单个的元素, 合并元素使得最后的结果最大.
from functools import cmp_to_key
from typing import List


def largest_number(nums: List[int]) -> str:
    nums.sort(
        key=cmp_to_key(lambda *args: int(''.join(str(e) for e in reversed(args))) - int(''.join(str(e) for e in args))))
    ans = ''.join([str(num) for num in nums])
    return str(int(ans))


print(largest_number([18, 7, 12, 3, 45, 109]))
# 74531812109
4.12.4 partialmethod
class functools.partialmethod(func, /, *args, **keywords)
返回一个新的
partialmethod描述器,其行为类似partial但它被设计用作方法定义而非直接用作可调用对象。func 必须是一个 descriptor 或可调用对象(同属两者的对象例如普通函数会被当作描述器来处理)。
当 func 是一个描述器(例如普通 Python 函数,
classmethod(),staticmethod(),abstractmethod()或其他partialmethod的实例)时, 对__get__的调用会被委托给底层的描述器,并会返回一个适当的 部分对象 作为结果。当 func 是一个非描述器类可调用对象时,则会动态创建一个适当的绑定方法。 当用作方法时其行为类似普通 Python 函数:将会插入 self 参数作为第一个位置参数,其位置甚至会处于提供给
partialmethod构造器的 args 和 keywords 之前。
简而言之, 这是在类当中使用的偏函数.
from functools import partialmethod


class RGB:
    def __init__(self, red, blue, green):
        self._red = red
        self._blue = blue
        self._green = green

    def _color(self, s_type):
        return getattr(self, s_type)

    red = partialmethod(_color, s_type='_red')
    blue = partialmethod(_color, s_type='_blue')
    green = partialmethod(_color, s_type='_green')


color = RGB(110, 212, 225)

print(color.green())
4.12.5 total_ordering
# 只要又1个true, 那就是True
print((10, 19) < (10, 20))
暂不清楚使用的场景
from functools import total_ordering


@total_ordering
class Person:
    def __init__(self):
        self.firstname = None
        self.lastname = None

    def __eq__(self, other):
        return ((self.lastname.lower(), self.firstname.lower()) ==
                (other.lastname.lower(), other.firstname.lower()))

    def __lt__(self, other):
        return ((self.lastname.lower(), self.firstname.lower()) <
                (other.lastname.lower(), other.firstname.lower()))


p1 = Person()
p2 = Person()

p1.lastname = "123"
p1.firstname = "000"

p2.lastname = "1231"
p2.firstname = "000"

print(p1 < p2)
print(p1 <= p2)
print(p1 == p2)
print(p1 > p2)
4.13 heapq
import heapq

nums = [1, 8, 2, 23, 7, -4, 18, 23, 42, 37, 2]
print(heapq.nlargest(3, nums))
print(heapq.nsmallest(3, nums))


## 根据条件筛选
import heapq

portfolio = [
    {'name': 'IBM', 'shares': 100, 'price': 91.1},
    {'name': 'AAPL', 'shares': 50, 'price': 543.22},
    {'name': 'FB', 'shares': 200, 'price': 21.09},
    {'name': 'HPQ', 'shares': 35, 'price': 31.75},
    {'name': 'YHOO', 'shares': 45, 'price': 16.35},
    {'name': 'ACME', 'shares': 75, 'price': 115.65}
]
cheap = heapq.nsmallest(3, portfolio, key=lambda s: s['price'])
expensive = heapq.nlargest(3, portfolio, key=lambda s: s['price'])

print(cheap)
print(expensive)
4.14 atexit(程序退出)
- 如果程序是被你没有处理过的系统信号杀死的, 那么注册的函数无法正常执行.
- 如果发生了严重的 Python 内部错误, 你注册的函数无法正常执行.
- 如果你手动调用了
os._exit(), 你注册的函数无法正常执行.
import atexit
import time


def abc(e):
    if callable(e):
        e('oh no')
    else:
        print(f'a {e}')


@atexit.register(abc, 'this is a test')
def end(e):
    print(f'i am dying {e}')


def test():
    print('wait second')
    time.sleep(1)


test()
五. 协程/多线程/多进程
关于这部分的内容, 中文网页相关的深入介绍较少, 而且由于python对这部分的内容在每个版本迭代都在进行较大幅度的改进, 相关的内容介绍很容易就已经过时, 大量内容都是错误的, 非常有误导性.
| 并发类型 | 切换机制 | CPU数量 | 适用场景 | 代表Python库 |
|---|---|---|---|---|
| 多线程(抢占式多任务处理) | 操作系统决定何时切换任务 | 1个 | I/O密集型 | _thread(已淘汰), threading, cocurrent.futures, nornir |
| 异步(协作式多任务处理) | 任务本身决定何时切换 | 1个 | I/O密集型 | asyncio, netdev, aiohttp, aioping, gevent, tornado, twisted |
| 多进程 (并行) | 所有任务同时运行 | 多个 | CPU密集型 | multiprocessing |
注: 需要注意的是涉及以下内容, python还在完善中, 各种api接口的变动较为频繁. 需要进更python不同版本的更新, 由于python的并发编程使用上依然还是很繁琐和各种的历史遗留问题, 新版本的python正在不断地让并发编程变得更简单.
更多细节的参看见URL
5.1 多线程
简而言之, 线程(Thread)是cpu调度中最小的单元.
特点是, 内存是在不同的线程之间共享(即多个线程可以同时访问同一内存, 导致数据异常的问题).
在python中,由于为了解决线程安全的问题引入GIL(global interpreter lock)导致python的多线程并不是真真意义上的多线程, 即同一时间, 多个线程并不是同时执行, 而是CPU调度不断的切换线程来执行(这就导致多线程的切换线程的额外开销, 导致多线程很多时候速度比单线程更慢).
但是线程可以执行一些相对不需要耗费cpu的简单任务时非常有帮助, 以下使用实例, 监听按键(当按下esc, q按键时退出执行), 在窗体GUI交互上, 多线程还是很重要的.
import msvcrt
import threading

# 锁是全局的
# lock = threading.Lock()
# 执行之后, 锁必须释放, 所以使用with(), 以免忘记释放锁

class Test:
    def __init__(self):
        self._exit_flag = False

    def _monitor_key_press(self):
        # 按键退出程序
        # 需要在终端(cmd/powershell)运行, 才能监听按键
        while True:
            k = ord(msvcrt.getch())
            # exit, q
            if k == 113 or k == 81:
                # 注意这里需要保证绝对的线程访问前后的问题, 需要加锁
                # with lock:
                # lock支持with()语句
                self._exit_flag = True
                break

    def _control(self):
        # 额外线程 => 控制
        th = threading.Thread(target=self._monitor_key_press)
        # 线程守护, 主进程退出,子线程退出
        th.daemon = True
        th.start()
线程锁(Lock/RLock)
Lock
最简单的锁, 需要注意的是这个锁, 不管是哪个线程设置的, 其他的线程都可以释放掉. 即A线程锁上, B线程也可以释放. 简而言之, 这是不区分线程所有权的锁.
| 方法 | 描述 |
|---|---|
threading.Lock() |
返回一个同步锁对象 |
lockObject.acquire(blocking=True, timeout=1) |
上锁,当一个线程在执行被上锁代码块时,将不允许切换到其他线程运行,默认锁失效时间为1秒 |
lockObject.release() |
解锁,当一个线程在执行未被上锁代码块时,将允许系统根据策略自行切换到其他线程中运行 |
lockObject.locaked() |
判断该锁对象是否处于上锁状态,返回一个布尔值 |
Rlock, 操作上类似的
其特性为:
- 区分所有权, 哪个线程创建的, 那么就只有这个线程可以释放
- 可以重复加锁, 即未释放, 可以继续加锁(这个应用场景是?), 但是需要注意释放.
| 方法 | 描述 |
|---|---|
threading.RLock() |
返回一个递归锁对象 |
lockObject.acquire(blocking=True, timeout=1) |
上锁,当一个线程在执行被上锁代码块时,将不允许切换到其他线程运行,默认锁失效时间为1秒 |
lockObject.release() |
解锁,当一个线程在执行未被上锁代码块时,将允许系统根据策略自行切换到其他线程中运行 |
lockObject.locaked() |
判断该锁对象是否处于上锁状态,返回一个布尔值 |
两种锁的区别
import threading

r_lock = threading.RLock()
lock = threading.Lock()


def r_fb(n):
    if n == 1:
        return 1

    with r_lock:
        # 加锁, 不释放, 可以接续加锁, 但是需要注意的是, 锁必须加多少次, 释放多少次
        # 这种情形常见于递归, 故而也成为递归锁
        out = n * r_fb(n - 1)

    return out


def fb(n):
    if n == 1:
        return 1

    with lock:
        # 锁住了, 但是因为继续执行fb
        # 暂时还没释放掉锁, 就已经进入下一循环, 下一循环继续加锁, 但是因为没有释放锁, 下一循环就需要等待当前已经加锁的释放锁, 结果线程就卡住在第一次
        # 递归循环中
        out = n * fb(n - 1)

    return out

# 正常输出内容
print(r_fb(3))

# lock将直接出现死锁的问题
print(fb(3))
事件(Event)
| 方法 | 描述 |
|---|---|
| threading.Event() | 返回一个事件锁对象 |
| lockObject.clear() | 将事件锁设为红灯状态,即所有线程暂停运行 |
| lockObject.is_set() | 用来判断当前事件锁状态,红灯为False,绿灯为True |
| lockObject.set() | 将事件锁设为绿灯状态,即所有线程恢复运行 |
| lockObject.wait(timeout=None) | 将当前线程设置为“等待”状态,只有该线程接到“绿灯通知”或者超时时间到期之后才会继续运行,在“等待”状态下的线程将允许系统根据策略自行切换到其他线程中运行 |
也可以被视作锁的一种, 支持with语句.
使用场景, 适用于需要线程之间协同.
这是线程之间通信的最简单机制之一:一个线程发出事件信号,而其他线程等待该信号.
import time
import threading


def alex():
    # 等待事件
    event.wait()
    # 收到信号, 执行
    print("alex:hello!")
    time.sleep(1)
    # 发出信号
    event.set()
    event.clear()
    event.wait()
    print("alex:me too...goodbye..")


def kitty():
    print("kitty:hi, alex.")
    # 发出信号
    event.set()
    # 清除信号
    event.clear()
    # 等待信号
    event.wait()
    time.sleep(1)
    print("kitty:alex, nice to meet you?")
    time.sleep(1)
    print("kitty:i am busy...goodbye")
    event.set()


if __name__ == '__main__':
    event = threading.Event()

    t1 = threading.Thread(target=alex)
    t2 = threading.Thread(target=kitty)
    # A线程: 设置等待 => 接受到信号 => 执行 => 发出信号 => ... B线程: 发出信号 => 设置等待 => ....
    t1.start()
    t2.start()
    t1.join()
    t2.join()
信号量(Semaphore)
| threading.Semaphore() | 返回一个信号量锁对象 |
|---|---|
| lockObject.acquire(blocking=True, timeout=1) | 上锁,当一个线程在执行被上锁代码块时,将不允许切换到其他线程运行,默认锁失效时间为1秒 |
| lockObject.release() | 解锁,当一个线程在执行未被上锁代码块时,将允许系统根据策略自行切换到其他线程中运行 |
也可以被视作锁的一种, 支持with语句.
控制线程的执行数量
import threading
import time

maxSubThreadNumber = 6


def task():
    thName = threading.currentThread().name
    semaLock.acquire()
    print("run sub thread %s" % thName)
    time.sleep(3)
    semaLock.release()


if __name__ == "__main__":
    # 每次只能放行2个
    semaLock = threading.Semaphore(2)

    for i in range(maxSubThreadNumber):
        subThreadIns = threading.Thread(target=task)
        subThreadIns.start()
条件Condition
一个条件变量对象允许一个或多个线程在被其它线程所通知之前进行等待.
| 方法 | 描述 |
|---|---|
| threading.Condition() | 返回一个条件锁对象 |
| lockObject.acquire(blocking=True, timeout=1) | 上锁,当一个线程在执行被上锁代码块时,将不允许切换到其他线程运行,默认锁失效时间为1秒 |
| lockObject.release() | 解锁,当一个线程在执行未被上锁代码块时,将允许系统根据策略自行切换到其他线程中运行 |
| lockObject.wait(timeout=None) | 将当前线程设置为“等待”状态,只有该线程接到“通知”或者超时时间到期之后才会继续运行,在“等待”状态下的线程将允许系统根据策略自行切换到其他线程中运行 |
| lockObject.wait_for(predicate, timeout=None) | 将当前线程设置为“等待”状态,只有该线程的predicate返回一个True或者超时时间到期之后才会继续运行,在“等待”状态下的线程将允许系统根据策略自行切换到其他线程中运行。注意:predicate参数应当传入一个可调用对象,且返回结果为bool类型 |
| lockObject.notify(n=1) | 通知一个当前状态为“等待”的线程继续运行,也可以通过参数n通知多个 |
| lockObject.notify_all() | 通知所有当前状态为“等待”的线程继续运行 |
import threading

currentRunThreadNumber = 0
maxSubThreadNumber = 10


def task():
    global currentRunThreadNumber
    thName = threading.currentThread().name

    condLock.acquire()
    print("start and wait run thread : %s" % thName)

    # 暂停线程运行、等待唤醒
    condLock.wait()
    currentRunThreadNumber += 1
    print("carry on run thread : %s" % thName)

    condLock.release()

if __name__ == "__main__":
    condLock = threading.Condition()

    for i in range(maxSubThreadNumber):
        subThreadIns = threading.Thread(target=task)
        subThreadIns.start()

    while currentRunThreadNumber < maxSubThreadNumber:
        notifyNumber = int(
            input("Please enter the number of threads that need to be notified to run:"))

        condLock.acquire()
        # 需要执行的线程
        condLock.notify(notifyNumber)
        condLock.release()

    print("main thread run end")
5.2 多进程
简而言之, 进程(Process)可以理解为任务执行的基础单元, 一个进程包含1个或多个线程.
为了解决GIL带来的问题, python提供了多进程的方式来实现对多核cpu的使用.
特点, 不同进程之间是相对独立的, 如: 内容原则上是不共享的, 不会出现多个进程同时访问同一内存造成如上述线程的问题.
注意需要在不同进程之间共享某些数据(亦或者称之为通信), 使用队列来实现:
队列是线程和进程安全的
from multiprocessing import Process, Queue


def f(q):
    q.put([42, None, 'hello'])


if __name__ == '__main__':
    q = Queue()
    p = Process(target=f, args=(q,))
    p.start()
    print(q.get())
    p.join()
    # prints "[42, None, 'hello']"
如上所述,在进行并发编程时,通常最好尽量避免使用共享状态。使用多个进程时尤其如此。
但是,如果你真的需要使用一些共享数据,那么
multiprocessing提供了两种方法.
注意**windows**下的多进程执行需要放置在if __name__ == '__main__'下执行.
import multiprocessing as mp
import os


def do():
    print(f'pid is : {os.getpid()}')


if __name__ == '__main__':
    print(f"parent id is : {os.getpid()}")
    p = mp.Process(target=do, args=())
    p.start()
 # 打印出主进程和子进程的id
 '''
 	parent id is : 6556
	pid is : 15080
 '''
RuntimeError:
An attempt has been made to start a new process before the
current process has finished its bootstrapping phase.This probably means that you are not using fork to start your child processes and you have forgotten to use the proper idiom in the main module: if __name__ == '__main__': freeze_support() ... The "freeze_support()" line can be omitted if the program is not going to be frozen to produce an executable.
假如没有 if __name__ == '__main__':直接运行代码, 将出现上述的问题.
5.3 协程
可以理解一种特殊的单线程的运作模式, 单一线程中可以存在多个协程.
在JavaScript中这个概念更容易理解, 由于JavaScript是单线程运行的, 为了尽可能加快页面的渲染和加载速度.

为了更好的解决JavaScript的异步回调问题(所谓的回调地狱, 即多个回调, 需要不停的写回调函数, 导致代码无比的冗长和重复), 在ES6引入的Promise.
可以简单理解, 在向服务器发出请求, 等待服务器响应, 将数据返回的这个空隙, cpu可以出现一段时间的空闲, 这段时间可以发出更多的请求, 或者是执行其他的任务, 而不是空等数据的返回.
这个过程可以理解为协同工作, 多个工作任务同时执行, 当a出现IO阻塞或者已经完成, 就切换到任务b, 如此循环往复, 而不是让cpu空置等待某个任务的完成再继续下一个任务. 这一点在JavaScript上显得尤为重要, 因为服务器数据请求消耗的时间通常而言远远超过cpu处理数据消耗的时间, 可以同时发出多个请求, 然后等待各个请求返回数据, 而不是等待请求被逐个发出.
所以协程在这种需要耗费IO的工作中, 是非常适合的, 由于其不需要切换线程(切换线程的上下文很耗费时间), 不需要在不同的进程之间通信, 不管是代码的执行效率还是代码的复杂程度, 协程都远优于多进程和多线程.
python中的协程概念:
async def main():
    await asyncio.sleep(1)
    return 'hello'


a = asyncio.run(main())

print(a)
# hello
# 可以直接返回结果
- 协程函数: 定义形式为
async def的函数. - 协程对象: 调用 协程函数 所返回的对象.
import time
import asyncio


async def a(delay, words):
    print(f"before {words}")
    await asyncio.sleep(delay)
    print(f"after {words}")


async def c():
    print(f"started: {time.strftime('%X')}")
    # 任务按顺序执行, 等待a1, 完成, 然后执行a2, 即等待的时间未 +1, + 2 = 3
    await a(1, "task 1")
    # 两个任务是分开等待的, 所以最终的完成运行的时间间隔未3秒
    await a(2, "task 2")
    print(f"finished: {time.strftime('%X')}")


async def b():
    print(f"start: {time.strftime('%X')}")
    task1 = asyncio.create_task(a(1, "task 1"))
    task2 = asyncio.create_task(a(2, "task 2"))
    # 先将这两个任务首先执行了, 然后等待(这个等待是同时发生)
    await task1
    # + 1
    await task2
    # 这里由于是同时等待, 所以已经消耗掉1s, 所以最后只需要等待1s
    # + 1
    # 最终完成运行的时间间隔的时间是2秒
    print(f"finish: {time.strftime('%X')}")

async def e():
    print(f"start: {time.strftime('%X')}")
    # 将所有的任务集中起来执行
    tasks = (asyncio.create_task(a(i, f"task {i}")) for i in range(1, 3))
    await asyncio.gather(*tasks)
    # 等价于
    # 也等价于b的执行方式
    # await asyncio.gather(a(1, "task 1"), a(2, "task 2"))
    print(f"finish: {time.strftime('%X')}")

asyncio.run(b())

# asyncio.run(c())
函数解析:
asyncio.gather: 返回的是一个可等待的对象, 可等待 对象有三种主要类型: 协程, 任务 和Future.- future:
future对象用来链接底层回调式代码和高层异步/等待式代码; 一个 Future 代表一个异步运算的最终结果, 线程不安全.(注意这个) - 任务(
task): 任务被用来“并行的”调度协程. - 协程(
coroutines):Python协程属于可等待对象, 因此可以在其他协程中被等待.
- future:
asyncio.create_task(coro, *, name=None, context=None): 将coro[协程](https://docs.python.org/zh-cn/3/library/asyncio-task.html?highlight=asyncio create_task#coroutine) 封装为一个 [Task](https://docs.python.org/zh-cn/3/library/asyncio-task.html?highlight=asyncio create_task#asyncio.Task) 并调度其执行, 返回 Task 对象.(coro可以简单理解为async装饰的函数), 该方式为3.7版本添加, 早期版本的使用asyncio.ensure_future来实现类似的功能.asyncio.run(coro*, *, debug=None): 函数用来运行最高层级的入口点 "main()" 函数(即响应的协程的代码的运行需要在这个接口上运行), 这是在3.7版本上运行协程的方式.(实际上各种差异很大的运行协程的方式, 是不同版本的python在不同阶段实现的, 总体的方向是让使用更简单)
简单理解, task是基于future的, future作为底层的基类.
Schedule the execution of a coroutine: wrap it in a future. Task is a subclass of Future.
import time
import aiohttp
import asyncio
import requests
from bs4 import BeautifulSoup as bFs


def get_dom(url):
    headers = {
        'Connection': 'keep-alive',
        'DNT': '1',
        'User-Agent': 'Mozilla/5.0 (Windows NT 10.0; Win64; x64) AppleWebKit'
                      '/537.36 (KHTML, like Gecko) Chrome/86.0.4240.198 Safari/537.36',
        'Accept': 'text/html,application/xhtml+xml,application/xml;q=0.9,image/webp,image'
                  '/apng,*/*;q=0.8,application/signed-exchange;v=b3;q=0.9',
        'Accept-Language': 'en-US,en;q=0.9',
        "Accept - Encoding": "gzip, deflate, br",
        "Referer": 'https://www.qq.com'
    }
    try:
        r = requests.get(url, headers=headers, timeout=(8, 8))
        # qq.com的页面采用的编码类型, 首页(包括其他子类的主页面) 是gbk, 其他页面现在已经采用utf-8
        return bFs(r.content.decode('gbk'), 'html.parser') if r.status_code == 200 else None
    except requests.Timeout:
        print('timeout: ', url)
        return None


def get_list():
    # 读取新闻列表
    d = get_dom('https://www.qq.com/')
    if not d:
        return None
    """
    qq.com页面采用异步加载数据, 只加载的一部分的数据, 这里只抓取这部分的数据
    """
    c = d.find('div', class_='layout qq-main cf')
    if not c:
        print('fail')
        return
    links = c.find_all('a')
    arr = []
    for a in links:
        if 'href' in a.attrs:
            href = a.attrs['href']
            if href.startswith('https://new.qq') and href.endswith('.html'):
                arr.append(href)
    return arr


async def async_download(arr, f_handle):
    # 并发的数量
    connect = aiohttp.TCPConnector(limit=10)
    # 超时控制
    timeout = aiohttp.ClientTimeout(total=63)
    headers = {
        'Connection': 'keep-alive',
        'DNT': '1',
        'User-Agent': 'Mozilla/5.0 (Windows NT 10.0; Win64; x64) AppleWebKit'
                      '/537.36 (KHTML, like Gecko) Chrome/86.0.4240.198 Safari/537.36',
        'Accept': 'text/html,application/xhtml+xml,application/xml;q=0.9,image/'
                  'webp,image/apng,*/*;q=0.8,application/signed-exchange;v=b3;q=0.9',
        'Accept-Language': 'en-US,en;q=0.9',
        "Accept - Encoding": "gzip, deflate, br",
        "Referer": 'https://www.qq.com'
    }
    async with aiohttp.ClientSession(connector=connect, timeout=timeout) as session:
        await asyncio.gather(*(asyncio.create_task(async_fetch(session, url, f_handle, headers)) for url in arr),
                             return_exceptions=True)


async def async_fetch(session, url, f_handle, headers):
    async with session.get(url, headers=headers) as r:
        try:
            if r.status == 200:
                result = await r.text(encoding='UTF-8')
                dom = bFs(result, 'lxml')
                if c := dom.find('div', class_='content-article'):
                    f_handle.writelines(
                        url + '\n' + (c.text.strip() or 'no data') + '\n-----------------------------------------')
        except Exception as error:
            print(error)


async def start_async(filename):
    arr = get_list()
    if arr:
        print(f'{len(arr)}, urls')
        with open(f'{filename}.txt', mode='w', encoding='utf-8') as f:
            print(f"start: {time.strftime('%X')}")
            await async_download(arr, f)
            print(f"finish: {time.strftime('%X')}, {filename}")
    else:
        print('no urls')


def multi(filename):
    # 子线程中调用
    loop = asyncio.new_event_loop()
    loop.run_until_complete(start_async(filename))


def single(filename):
    # 单一线程调用
    try:
        loop = asyncio.get_event_loop()
        loop.run_until_complete(start_async(filename))
        print('single ok')
    except RuntimeError:
        print('single error')


def multi_thread():
    # 在多个子线程中执行操作
    import threading
    try:
        a = threading.Thread(target=multi, args=('test_01',))
        b = threading.Thread(target=multi, args=('test_02',))
        a.start()
        b.start()
        a.join()
        b.join()
        print('multi ok')
    except RuntimeError:
        print('multi error')


if __name__ == '__main__':
    import sys

    if sys.platform == 'win32':
        asyncio.set_event_loop_policy(asyncio.WindowsSelectorEventLoopPolicy())

    single('single')
    multi_thread()
    print('all ok')
    # 在使用asyncio.run 运行时, 如果不设置事件循环类型, 必然出现错误
    asyncio.run(start_async('test_03'))
将下面提及的qq.com的爬虫完善成为一个整体, 来看看其中的细节.
爬虫的主体使用aiohttp库(不仅http, 包括文件, 数据库操作等, 均有对应的异步操作的库)
需要注意的事项:
-
get_event_loop, 只允许在当前线程运行一次(再次运行报错); 不允许在子线程中调用, 这是主线程event_loop() -
windows下务必设置事件循环, 否则很容易会出现RuntimeError: Event loop is closed错误.# 尽管在当前线程只执行一次 # loop = asyncio.get_event_loop() # loop.run_until_complete(start_async(filename)) # 并不会出现错误, 但是还是强烈建议设置 asyncio.set_event_loop_policy(asyncio.WindowsSelectorEventLoopPolicy()) # 否则错误还是潜在出现 import sys if sys.platform == 'win32': asyncio.set_event_loop_policy(asyncio.WindowsSelectorEventLoopPolicy()) -
上述的bug, 已经出现在很早时间, 但是依然还是没有被修复
参考连接
5.4 爬虫演示案例(同步/异步/多进程/多线程)
# 爬虫演示多线程, 多进程, 协程的效率

from bs4 import BeautifulSoup as bFs
import requests, time
# 进程池
from multiprocessing import Pool, cpu_count
# 异步/协程
import aiohttp, asyncio
# 多进程 进程池
from concurrent.futures import ProcessPoolExecutor as pPe
# 线程池
import concurrent.futures as cf
import random_ua
# 线程
import threading

def get_dom(url):
    headers = {
        'Connection': 'keep-alive',
        'DNT': '1',
        'User-Agent': random_ua.rdua(),
        'Accept': 'text/html,application/xhtml+xml,application/xml;q=0.9,image/webp,image/apng,*/*;q=0.8,application/signed-exchange;v=b3;q=0.9',
        'Accept-Language': 'en-US,en;q=0.9',
        "Accept - Encoding": "gzip, deflate, br",
        "Referer": 'https://www.qq.com'
    }
    try:
        r = requests.get(url, headers=headers, timeout=(8, 8))
        return bFs(r.content.decode('gbk'), 'html.parser') if r.status_code == 200 else None
    except requests.Timeout:
        print('timeout: ', url)
        return None


def get_content(url):
    d = get_dom(url)
    if not d:
        return ''
    content = d.find('div', class_='content-article')
    return content.text.strip() if content else ''


def get_list():
    # 读取新闻列表
    d = get_dom('https://www.qq.com/')
    if not d:
        return None
    """
    qq.com页面采用异步加载数据, 只加载的一部分的数据, 这里只抓取这部分的数据
    """
    c = d.find('div', class_='layout qq-main cf')
    if not c:
        print('fail')
        return
    links = c.find_all('a')
    arr = []
    for a in links:
        if 'href' in a.attrs:
            href = a.attrs['href']
            if href.startswith('https://new.qq') and href.endswith('.html'):
                arr.append(href)
    return arr


def multi_core():
    # 多进程
    arr = get_list()
    if not arr:
        print('fail')
        return
    p = Pool(cpu_count())
    mp = p.map_async(get_content, arr)
    p.close()
    p.join()
    with open(r'test_news.txt', mode='w', encoding='utf-8') as f:
        for m in mp.get():
            f.writelines(m + '\n')


def multi_core_pool():
    # 进程池的方式
    arr = get_list()
    with pPe() as pool:
        mp = pool.map(get_content, arr)
    with open(r'test_news.txt', mode='w', encoding='utf-8') as f:
        for m in mp:
            f.writelines(m + '\n')


def multi_thread_pool():
    # 线程池的方式
    arr = get_list()
    with cf.ThreadPoolExecutor(max_workers=4) as pool:
        mp = [pool.submit(get_content, url) for url in arr]
        with open(r'test_news.txt', mode='w', encoding='utf-8') as f:
            for m in cf.as_completed(mp):
                    f.writelines(m.result() + '\n')


def multi_thread():
    # 直接实现
    arr = get_list()
    mp = [threading.Thread(get_content,args=(url,)) for url in arr]
    for m in mp:
        m.start()
    for m in mp:
        m.join()

async def async_craw(url, f):
    # 异步
    timeout = aiohttp.ClientTimeout(total=8)
    async with aiohttp.ClientSession(timeout=timeout) as session:
        async with session.get(url) as resp:
            if resp.status == 200:
                result = await resp.text(encoding='gbk')
                dom = bFs(result, 'html.parser')
                c = dom.find('div', class_='content-article')
                if c:
                    f.writelines(c.text.strip() + '\n')


def start_async():
    arr = get_list()
    f = open(r'test_news.txt', mode='w', encoding='utf-8')
    loop = asyncio.get_event_loop()
    tasks = [
        loop.create_task(async_craw(url, f))
        for url in arr]
    loop.run_until_complete(asyncio.wait(tasks))
    f.close()


def normal():
    # 单线程
    arr = get_list()
    if not arr:
        print('fail')
        return
    with open(r'test_news.txt', mode='w', encoding='utf-8') as f:
        for e in arr:
            c = get_content(e)
            if c:
                f.writelines(c + '\n')


if __name__ == '__main__':
    start = time.time()
    start_async()
    print(time.time() - start)
5.5 concurrent
concurrent.futures模块提供异步执行可调用对象高层接口..异步执行可以由
ThreadPoolExecutor使用线程或由ProcessPoolExecutor使用单独的进程来实现。 两者都是实现抽像类Executor定义的接口。
简单理解这个库是对于thread和process的进一步封装.
5.5.1 Future
from concurrent.futures import Future


def callback(future):
    print(future)
    print("get the set result", future.result())
    # <Future at 0x1947ecc7520 state=finished returned str>
	# get the set result return value


def a():
    future = Future()
    future.add_done_callback(callback)
    future.set_result("return value")


a()
5.5.2 Executor
submit(fn, /, *args, **kwargs)
调度可调用对象 fn,以 fn(*args, **kwargs) 方式执行并返回一个代表该可调用对象的执行的 Future 对象。
with ThreadPoolExecutor(max_workers=1) as executor:
    future = executor.submit(pow, 323, 1235)
    print(future.result())
map(func, *iterables, timeout=None,*chunksize=1)
类似于 map(func, *iterables) 函数,除了以下两点:
iterables是立即执行而不是延迟执行的(注意这里)func是异步执行的,对func的多个调用可以并发执行
The returned iterator raises a TimeoutError if __next__() is called and the result isn't available after timeout seconds from the original call to Executor.map(). timeout can be an int or a float. If timeout is not specified or None, there is no limit to the wait time.
如果 func 调用引发一个异常,当从迭代器中取回它的值时这个异常将被引发。
使用 ProcessPoolExecutor 时,这个方法会将 iterables 分割任务块并作为独立的任务并提交到执行池中。这些块的大概数量可以由 chunksize 指定正整数设置。 对很长的迭代器来说,使用大的 chunksize 值比默认值 1 能显著地提高性能。 chunksize 对 ThreadPoolExecutor 没有效果。
import time
from concurrent.futures import ThreadPoolExecutor as Pool
from concurrent.futures import as_completed
import requests


def task(url):
    header = {
        'User-Agent': 'Mozilla/5.0 (Windows NT 10.0; Win64; x64) AppleWebKit/'
                      '537.36 (KHTML, like Gecko) Chrome/86.0.4240.198 Safari/537.36'
    }
    if 'baidu' in url:
        raise ValueError('fuck baidu')
    time.sleep(1)
    return requests.get(url, timeout=(13, 13), headers=header)


def a():
    urls = (
        'https://www.qq.com',
        'https://www.sina.com',
        'https://www.baidu.com'
    )
    # map(), 但是需要注意错误的捕捉
    with Pool(max_workers=3) as executor:
        # 执行结果是严格按顺序(即urls的顺序)返回内容的
        future_tasks = executor.map(task, urls)
        # executor.shutdown(wait=True)
        # 如果使用 with 语句,你就可以避免显式调用这个方法,
    	# 它将会停止 Executor (就好像 Executor.shutdown() 调用时 wait 设为 True 一样等待):
        for f in future_tasks:
            print(f.url, f.status_code)

    # submit()
    with Pool(max_workers=3) as executor:
        # 在这个阶段, raise ValueError('fuck baidu')并未被触发
        future_tasks = [executor.submit(task, url) for url in urls]
        for f in future_tasks:
            if f.running():
                print(f'{str(f)} is running')

        for f in as_completed(future_tasks):
            try:
                # error将在这里被捕捉到
                if f.done():
                    f_ret = f.result()
                    print(f'{f_ret.url} done, get content length: {len(f_ret.content)}')
            except Exception as e:
                f.cancel()
                print('some error', str(e))


if __name__ == '__main__':
    a()
注意多进程的ProcessPoolExecutor同样需要放置在if __name__ == '__main__'之下
# 仅用于测试, 对于IO密集型, 异步/协同的效率更高
import concurrent.futures as cf
import requests

urls = (
    'http://www.baidu.com/',
    'http://www.cnblogs.com/',
    'http://www.qq.com/'
)


def load_url(url):
    r = requests.get(url, timeout=(15, 15))
    if r.status_code == 200:
        return r.text
    return ''


with cf.ThreadPoolExecutor(max_workers=4) as executor:
    future_to_url = {executor.submit(load_url, url): url for url in urls}
    for future in cf.as_completed(future_to_url):
        url = future_to_url[future]
        try:
            data = future.result()
        except Exception as error:
            print(url, error)
        else:
            print(url, len(data))
# cpu密集型测试
# 执行持续高强度的数字计算
import time
import random
from concurrent.futures import ThreadPoolExecutor, ProcessPoolExecutor


# 穷举法的方式实现, 当然这里不是为了效率, 而是为了体现各种方式的运行效率
# 求两个大数字的最大公约数
def common_divisor(data):
    a, b = data
    low = min(a, b)
    for i in range(low, 0, -1):
        if a % i == 0 and b % i == 0:
            return i, a, b


def euclid_divisor(a, b):
    # 欧几里得辗转相除法
    while a % b:
        a, b = b, a % b
    return b


if __name__ == '__main__':
    # choice, choices
    f = lambda: random.choices(range(1_000, 1_000_000_000), k=2)
    # 随机生成20组数据, 20组的数据的计算已经相当消耗时间
    rand_nums = (f() for _ in range(20))
    start = time.time()
    # ThreadPoolExecutor, 多线程由于GIL的存在, 运行效率是非常低下的
    with ProcessPoolExecutor(max_workers=3) as executor:
        # map, 即时执行
        results = executor.map(common_divisor, rand_nums)
        for r in results:
            # 先计算出来的, 先打印
            print(r)
        end = time.time()
        print('Took %.3f seconds.' % (end - start))
六. 新版本特性
一些好用, 使用频繁的特性.
6.1 3.8
6.1.1. 海象操作符
简化了一层代码的使用, 通常在运行某个函数后得到结果, 对结果进行判断, 然后执行下一步, 同时将该结果传入到下一步的执行. 海象操作符可以一步执行即可.
a = 1 + 3
if a > 0:
    print(a)
# 等价于
if (a := 1 + 3) > 0:
    print(a)


# 分块读取大型文件
def read_file_block(file, block_size = 1024 * 8):
     with open(file, "r") as f:
        while chunk := f.read(block_size):
            yield chunk

# 大型文件的处理 - 需要平衡速度和内存之间的矛盾
# - 文件过大, 一次读取内存爆
# - 考虑内存映射(mmap), https://docs.python.org/zh-cn/3/library/mmap.html
# - 文件的读取速度过慢, 多次读取
6.2 3.9
6.2.1. 字典合并操作符
更快的字典合并操作
a = {
    "a": 1
}
b = {
    "b": 2
}

print(a | b)

## 直接更新
a = {
    "a": 1
}
b = {
    "b": 2
}
b |= a
print(b)

# 注意合并之后各个键值的变化
a = {
    "a": 1,
    "c": 2,
    'b': 3
}

b = {'a': 4, 'b': 5, "e": 6}

# a为基础, b往a合并, a没有的键, 放置到最后
print(a | b)

b |= a

# b为基础, a往b合并
print(b)
'''
{'a': 4, 'c': 2, 'b': 5, 'e': 6}

{'a': 1, 'b': 3, 'e': 6, 'c': 2}
'''
6.3 3.10
6.3.1. match语句
不少语言支持的switch语言的python版本
numbers = [1,2,3,4]
for n in numbers:
    match n:
        case 1:
            print("Number is 1")
        case 2:
            print("Number is 2")
        case 3:
            print("Number is 3")
        case _:
            print("Number is not 1,2 or 3")
6.3.2 数据类型提示
def test(a: int | float) -> int | float:
    pass
6.4 3.11
6.4.1 asyncio.TaskGroup
在协程上引入新的api, asyncio.TaskGroup
sync def main():
    async with asyncio.TaskGroup() as tg:
        task1 = tg.create_task(some_coro(...))
        task2 = tg.create_task(another_coro(...))
    print("Both tasks have completed now.")
七. 参考信息来源
重要程度, 从上到下
7.1 站点
- [
python document] - [
stackflow] - [
bilibili], 着重感谢一位UP主, 码农高天, 一系列简明扼要的讲解, 解决了我所遇到的大量悬而未决的问题. - [
csdn] - [
cnblogs] - [
jianshu] - [
zhihu]
7.2 书籍
- 流畅的python(必看)
- Python Cookbook(必看)
- Effective Python 编写高质量Python代码的59个有效方法
- python进阶
7.3 微信公众号
- Python编程时光
- Python猫